Seasoned Garlic Crab Fries with Aioli
Make easy and delicious seasoned garlic crab fries with a homemade aioli in just 30 minutes.
By Alyssa
- Prep
- 30 min
- Cook
- 30 min
- Serves
- 6
- Calories
- 304 kcal
- Protein
- 6.00 g
- Carbs
- 28.00 g
- Fat
- 19.00 g
- Sodium
- 224.00 mg
On this page25 quick jumps
TOC
25 quick jumps
Seasoned Garlic Crab Fries with Aioli
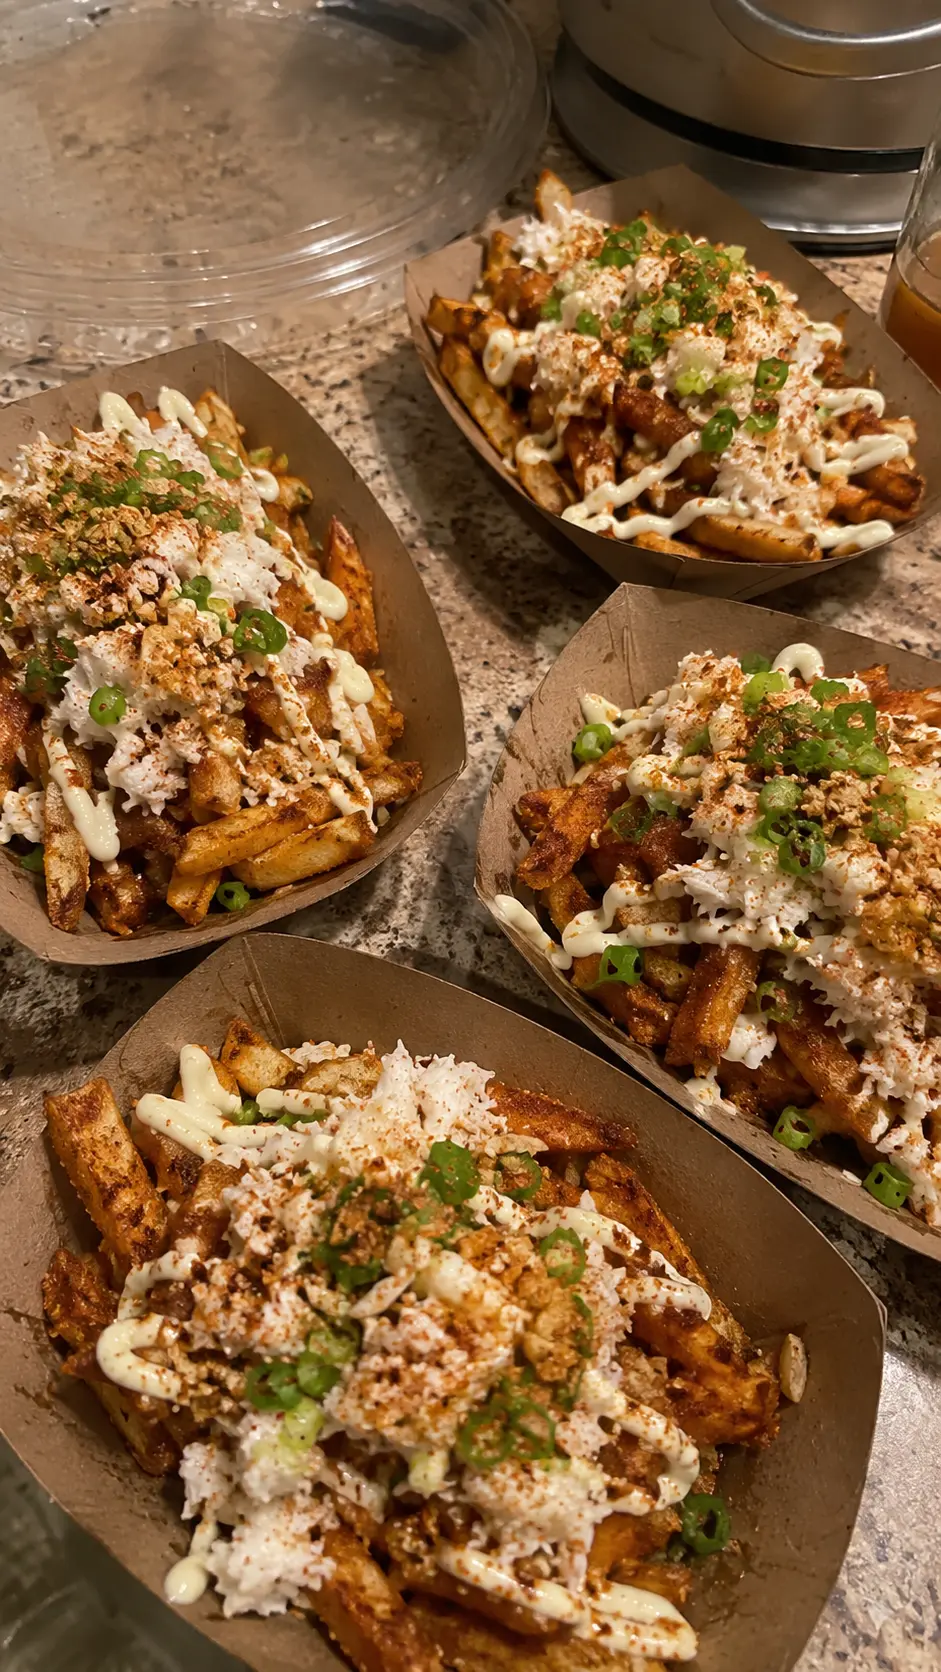
These Seasoned Garlic Crab Fries with Aioli take homemade French fries to another level with Old Bay seasoning, sweet lump crab meat, crispy garlic, fresh jalapeño, chives, and a creamy homemade garlic aioli.
The foundation is a batch of thin, double-fried Russet potatoes. They're fried once at a lower temperature to cook the centers, cooled, and then fried again at a higher temperature to create a crisp golden exterior. While they're still hot, the fries are tossed with Old Bay seasoning before being piled into serving dishes and finished with crab, aioli, jalapeño, chives, and little pieces of fried garlic.
There are plenty of loaded fry recipes, but this one works especially well because the toppings don't completely hide the potatoes. You still get crisp fries underneath, while the crab and creamy aioli make the dish feel much more special than ordinary seasoned fries.
Serve them as a shareable appetizer, game-day snack, party dish, or casual dinner when you're in the mood for something rich, crispy, savory, and just a little indulgent.
In This Guide
What Makes These Crab Fries Special
Understanding the Layers
Choosing the Best Potatoes
Why the Fries Are Cooked Twice
Preparing the Potatoes
Making Homemade Garlic Aioli
Getting Crispy Garlic Without Burning It
How to Assemble Loaded Crab Fries
Texture and Flavor Tips
Troubleshooting Common Problems
Ways to Customize Your Crab Fries
What to Serve With Them
Prep-Ahead Strategy
Storing and Reheating Leftovers
Frequently Asked Questions
Ingredients and Instructions
What Makes These Crab Fries Special
The appeal of this recipe comes from contrast.
The potatoes are hot and crispy. The crab is soft and slightly sweet. Homemade aioli is cool, rich, and garlicky. Jalapeño gives the dish freshness and mild heat, while chives add a gentle onion flavor.
Then there's the crispy garlic.
Instead of simply adding more raw or sautéed garlic, chopped garlic is quickly fried until crisp. Scattered over the finished fries, those tiny pieces add both flavor and crunch.
Old Bay ties everything together with its distinctive savory seafood-friendly seasoning.
It's a combination that feels like something you might order at a seafood restaurant, but every component can be prepared in a home kitchen.
The Five Layers of Great Garlic Crab Fries
It helps to think of this recipe as several simple components rather than one complicated dish.
1. Crispy French fries
Russet potatoes are cut into thin fries, soaked, dried, and double fried.
They need to be crisp enough to support the toppings without immediately becoming soft.
2. Old Bay seasoning
The fries are seasoned while they're still hot so the seasoning adheres to their surface.
Old Bay provides saltiness, spice, and the familiar flavor that works especially well with crab.
3. Lump crab meat
Crab is the star topping, so you don't need to bury it under a heavy sauce.
Small pieces distributed over the fries give you crab in multiple bites without overwhelming the potatoes.
4. Homemade garlic aioli
The creamy sauce provides richness and helps connect the seasoned fries with the crab.
Because the aioli is drizzled rather than poured heavily over everything, the fries can retain more of their crisp texture.
5. Fresh and crispy garnishes
Jalapeño, chives, and fried garlic prevent the dish from tasting one-dimensional.
You get something creamy, something fresh, and something crunchy in almost every bite.
Choosing the Best Potatoes for Homemade Fries
Russet potatoes are an excellent choice for these crab fries because of their relatively high starch content.
Their centers become fluffy when fried while the outside can develop a crisp shell.
Try to choose potatoes that are reasonably similar in size so your fries are easier to cut uniformly.
After peeling the potatoes, slice them into approximately ¼-inch planks and then cut those planks into ¼-inch fries.
The exact dimensions don't need to be perfect, but consistency matters.
Very thin pieces may become overly dark during the second fry while thicker pieces may remain softer.
Why Soak the Cut Potatoes?
Once cut, the fries are placed in cold water with white vinegar for about 30 minutes.
The soaking step helps remove some surface starch from the potatoes.
That excess starch can cause fries to stick together and can interfere with achieving the exterior texture you're looking for.
After soaking, drain the fries thoroughly.
Then dry them very well.
This is one of the most important details in the entire recipe.
Water and hot frying oil do not mix safely, and excess moisture also works against crispness. Spread the potatoes over clean kitchen towels or paper towels and pat them completely dry before they go anywhere near the oil.
Why These Fries Are Fried Twice
Double frying may sound like extra work, but the two frying stages serve different purposes.
The first fry cooks the potato
The first batch is cooked at approximately 250°F.
At this lower temperature, the potatoes can cook through without becoming deeply browned.
After about five minutes, remove them and allow them to cool.
At this point, the fries may look pale and not particularly exciting. That's normal.
The second fry creates the crust
Once all the fries have completed their first fry, increase the oil temperature to approximately 350°F.
The partially cooked fries go back into the hotter oil for around three minutes.
This time they become golden, crisp, and ready for seasoning.
That crisp exterior is particularly useful for loaded fries because the potatoes need enough structure to hold crab and aioli.
Don't Skip the Cooling Period
Cooling the potatoes between frying stages is part of what makes double frying effective.
After the first fry, arrange them on a paper towel-lined baking sheet and let them come toward room temperature before frying them again.
This also makes the recipe easier to manage for entertaining.
You can complete the first fry before guests arrive and perform the short second fry closer to serving time.
Season the Fries While They're Hot
As soon as each batch finishes its second fry, drain away excess oil.
Once all of the fries are cooked, transfer them to a large bowl and toss with Old Bay seasoning.
Warm fries hold seasoning much better than potatoes that have been sitting and cooling for several minutes.
Taste one before adding extra salt.
Old Bay already contains salt, and the crab and aioli contribute additional savory flavor.
How to Make Homemade Garlic Aioli
The homemade aioli might be the most impressive part of the recipe, but the technique is straightforward once you understand the goal.
Start with egg yolk, minced garlic, kosher salt, and a small amount of water.
Whisk them together in a medium bowl.
Placing the bowl on a folded kitchen towel is useful because it keeps the bowl from spinning while you're whisking.
Then begin adding grapeseed oil extremely slowly while whisking constantly.
At the beginning, patience is important.
Add roughly a teaspoon at a time until you can see that the mixture has started to thicken and emulsify.
Once the emulsion is established, you can gradually drizzle in the remaining oil, followed by the extra-virgin olive oil.
Finish with fresh lemon juice and additional salt if needed.
The result should be creamy enough to drizzle but thick enough to cling to the fries.
Because traditional homemade aioli contains raw egg yolk, use fresh properly handled eggs. Pasteurized eggs are a good option for anyone who needs to avoid raw or undercooked egg products.
Why Use Two Oils in the Aioli?
The recipe combines grapeseed oil with extra-virgin olive oil rather than using only olive oil.
Grapeseed oil has a relatively neutral flavor, which gives the emulsion body without making the sauce taste overly strong.
Olive oil is then added for richness and flavor.
Using both creates a more balanced aioli.
How to Keep Aioli From Breaking
An emulsion can separate when too much oil is introduced before the egg yolk has had enough time to incorporate it.
The most important rule is simple:
Go slowly at the beginning.
Don't pour all of the oil into the bowl at once.
Whisk constantly and add only tiny amounts until the mixture becomes noticeably thicker.
Once it has emulsified, you can add the remaining oil more steadily.
Also make sure the bowl is stable. Trying to hold a sliding bowl while whisking and pouring oil at the same time makes the process unnecessarily difficult.
Crispy Garlic: The Finishing Touch
The crispy garlic is a small component that makes a surprisingly big difference.
Finely chopped garlic is placed in a fine-mesh strainer and carefully lowered into the hot oil.
It only needs around 15 seconds.
Garlic can move from golden to burnt very quickly, so don't walk away from the pot during this step.
As soon as the pieces become crisp and lightly golden, lift the strainer out and drain the garlic on paper towels.
The garlic will continue to crisp slightly as it cools.
Working With Lump Crab Meat
The crab doesn't require much preparation.
Check through the meat for any pieces of shell, but try not to break up all of the larger chunks.
Those visible pieces make the finished fries more appealing and give the topping better texture.
The crab doesn't need to be heavily seasoned because the fries already have Old Bay and the aioli contributes garlic, lemon, and salt.
Keeping the crab relatively simple allows its naturally sweet flavor to remain noticeable.
How to Build the Perfect Plate of Crab Fries
Loaded fries are best assembled at the last moment.
Start by dividing the freshly seasoned fries among serving bowls, plates, or paper trays.
Scatter lump crab meat over the fries.
Drizzle the garlic aioli back and forth rather than completely covering the potatoes.
Then finish with diced jalapeño, chopped chives, and crispy garlic.
Serve immediately.
The longer fully assembled fries sit, the more moisture they absorb from the crab and sauce.
For a party, it's better to prepare all of the components in advance and assemble each tray shortly before it is served.
How Much Aioli Should You Add?
More sauce isn't always better.
These fries should taste like seasoned potatoes with crab and aioli—not potatoes swimming in mayonnaise.
Start with a light drizzle.
You can always serve extra aioli alongside the fries for anyone who wants more.
This approach also helps preserve the crisp texture.
Managing the Heat From Jalapeño
Removing the seeds and inner membranes from the jalapeño produces a milder result.
If you want more heat, leave some of the membrane attached or add a few very thin slices of jalapeño as garnish.
For very mild crab fries, replace the jalapeño with additional chives or finely diced green onion.
Common Problems and How to Fix Them
My fries aren't crispy
The most common causes are moisture, low oil temperature, or overcrowding.
Dry the potatoes completely after soaking.
Use a thermometer to monitor the oil instead of guessing.
Finally, cook in batches. Adding too many cold potatoes at once can cause the oil temperature to drop significantly.
The fries browned too quickly
Your oil may be too hot.
The first fry should cook the potato without creating much color. The second fry is where browning happens.
Use a reliable frying thermometer and give the oil time to return to the correct temperature between batches.
My fries are crispy but the middle is firm
The first frying stage probably wasn't long enough.
The lower-temperature fry is responsible for cooking the inside of the potato.
My aioli is runny
Continue whisking while adding the oil slowly.
If the emulsion never developed, the oil may have been added too quickly at the beginning.
My garlic tastes bitter
The garlic was likely fried too long.
Because the pieces are small, they can burn in seconds. Remove them when they're lightly golden rather than waiting for them to become dark brown.
The loaded fries became soggy
Assemble them immediately before eating.
Keep the crab, aioli, and garnishes separate until the fries are ready to serve.
Ways to Change Up the Recipe
Once you understand the basic combination, there are plenty of ways to adapt it.
For more heat, add cayenne to the Old Bay, mix hot sauce into the aioli, or use extra fresh jalapeño.
For a brighter flavor, add a little lemon zest over the finished fries.
You can also replace the crab with cooked shrimp or lobster for another seafood variation.
If you want more herbs, parsley, dill, or extra chives can be mixed into the aioli.
For an even more intense garlic flavor, add a small amount of roasted garlic to the sauce while keeping the crispy garlic topping.
Turn Them Into a Crab Fries Bar
These are particularly fun for casual gatherings because the different components can be placed out separately.
Prepare a large batch of fries and offer bowls containing crab meat, aioli, crispy garlic, jalapeño, chives, lemon wedges, hot sauce, and extra Old Bay.
Guests can build their own loaded fries.
Keeping the wet toppings separate until serving also means each portion stays crisp longer.
What to Serve With Garlic Crab Fries
Because these fries are rich, they work particularly well with something fresh or acidic on the side.
A simple green salad, cucumber salad, tomato salad, or crunchy slaw can provide contrast.
They can also be served as part of a seafood spread with grilled shrimp, crab cakes, steamed shellfish, or a light fish entrée.
For a casual meal, you don't necessarily need anything else. A generous plate of crab fries can easily become the centerpiece.
Fresh lemonade or sparkling water with citrus is especially refreshing alongside the salty, seasoned potatoes.
A Smart Prep-Ahead Plan
You don't need to do every step immediately before serving.
Earlier in the day, you can prepare the aioli and keep it refrigerated.
The potatoes can also be cut and soaked ahead of time.
For gatherings, complete the first fry before your guests arrive. Let the potatoes cool and keep them ready for the second frying stage.
Chop the chives and jalapeño and check the crab for shells.
The crispy garlic can also be prepared shortly beforehand.
Then, when you're ready to eat, all that's left is the quick second fry, seasoning, and assembly.
That approach makes the recipe feel much more manageable.
Storage and Reheating
Loaded fries are at their best immediately after they're assembled.
If you do have leftovers, store the components separately whenever possible.
Keep cooked fries in one airtight container, crab in another, and aioli refrigerated separately.
Reheating the fries
Avoid the microwave if crispness is your priority.
Spread the fries in a single layer on a baking sheet and reheat them in a hot oven until warmed through and crisp again.
An air fryer can also work well for reheating small portions.
Add the crab and fresh toppings only after the potatoes are hot.
Storing the aioli
Because the sauce contains egg yolk, keep it refrigerated in a clean covered container and use it promptly.
Don't leave homemade aioli sitting at room temperature for extended periods.
Ingredients
- 4large Russet potatoes, (peeled)
- ¼ cup white vinegar
- —Vegetable oil, (as needed, for frying)
- 3 teaspoonsOld Bay seasoning
- 4 clovesgarlic, (chopped)
- 1egg yolk
- 2 clovesgarlic (minced)
- ¼ teaspoon kosher salt, (plus additional as needed)
- ¼ cup grapeseed oil
- ¼ cup extra-virgin olive oil
- 1 teaspoonfreshly squeezed lemon juice
- ½ cup lump crab meat
- 1medium jalapeño, (seeds removed and diced)
- 1 tablespoonchopped chives
Instructions
- 1
Slice the peeled potatoes into ¼-inch thick planks and cut each plank into ¼ -inch fries. Add the cut fries to a large bowl filled with cold water and the vinegar and let sit for 30 minutes.
- 2
In a heavy-bottomed pot add enough oil to reach 2-inches up the pan. Heat the oil to 250ºF. While the oil heats, drain the fries and pat completely dry. Working in batches, add a handful of the fries to the oil and fry, stirring occasionally, until cooked through, about 5 minutes.
- 3
Use tongs to remove to a paper towel-lined baking sheet. Repeat with the remaining fries. Let all the fries cool to room temperature then increase the temperature of the oil to 350ºF (180ºC).
Taste as you go. Recipes are a guide, not a contract.
- 4
Working in batches again, add fries to the oil and fry until golden brown and crispy, about 3 minutes. Remove to a paper towel-lined baking sheet once more to drain. Add all of the fries to a large mixing bowl and toss with the Old Bay spice.
- 5
Add the garlic to a fine mesh strainer and carefully lower it into the oil until the garlic is crispy, about 15 seconds then drain on paper towels and set aside.
- 6
Place a medium-mixing bowl on a kitchen towel (this will keep it from moving). Add the egg yolk, garlic, salt and 2 teaspoons of water to the bowl, whisking to combine.
- 7
Whisking constantly, slowly drizzle the grapeseed oil into the bowl 1 teaspoon at a time, until the mixture is thick and emulsified. Continue to whisk constantly and add the olive oil, drizzling it in slowly, about a tablespoon at a time. Whisk in the lemon juice and season to taste with salt. Refrigerate until ready to use.
- 8
Divide the fries among serving bowls and top with crabmeat. Drizzle with aioli and top with jalapenos, chives and crispy garlic. Serve immediately.
FAQs
What are crab fries?
Can I use frozen French fries?
Can I make these without a deep fryer?
Can I use canned crab meat?
Can I make them without jalapeño?
Can I use mayonnaise instead of making aioli?
What other seasonings work with crab fries?
How do I keep crab fries crispy for a party?
Can I bake the fries instead?
Recipe Card
Seasoned Garlic Crab Fries with Aioli
Keep it handy for later, send it to someone cooking with you, or open the clean print view.
- Prep
- 30 min
- Serves
- 6
You might also like
The Salad My Guests Always Ask For: Strawberry Watermelon & Burrata
May 23, 2026
The Smashed Asian Cucumber Salad I Make for Hot Weeknights
May 23, 2026
The Kid-Approved Orange-Honey Fruit Snacks That Boost Immunity
May 21, 2026
How I Stash Summer in Jars: Watermelon Jelly (Quick & Easy)
May 21, 2026
Reviews
Be the first to review this.