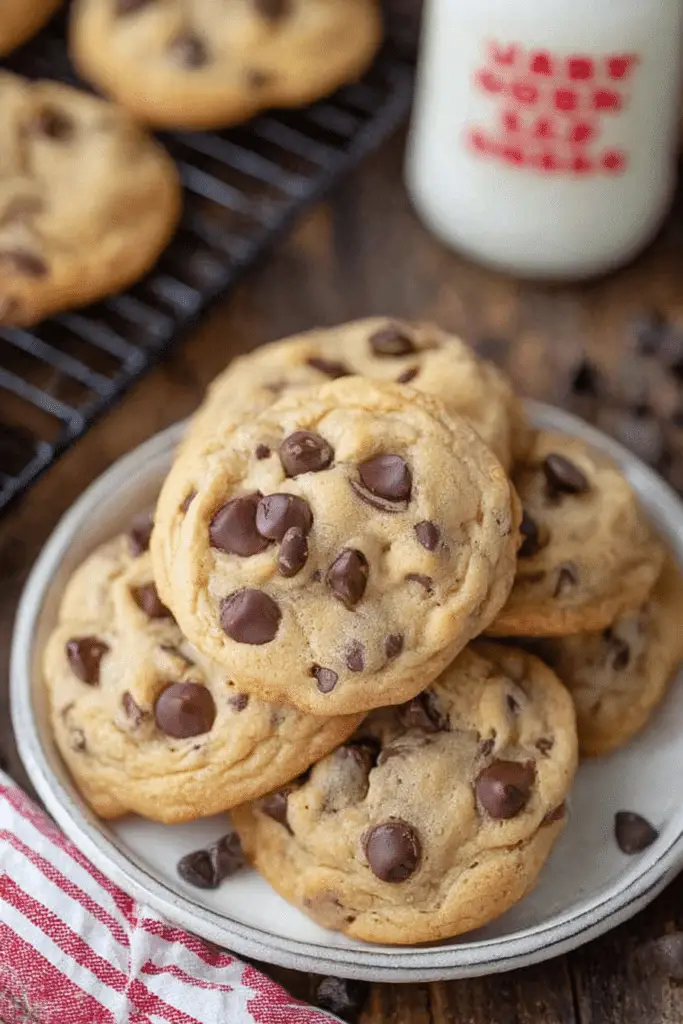
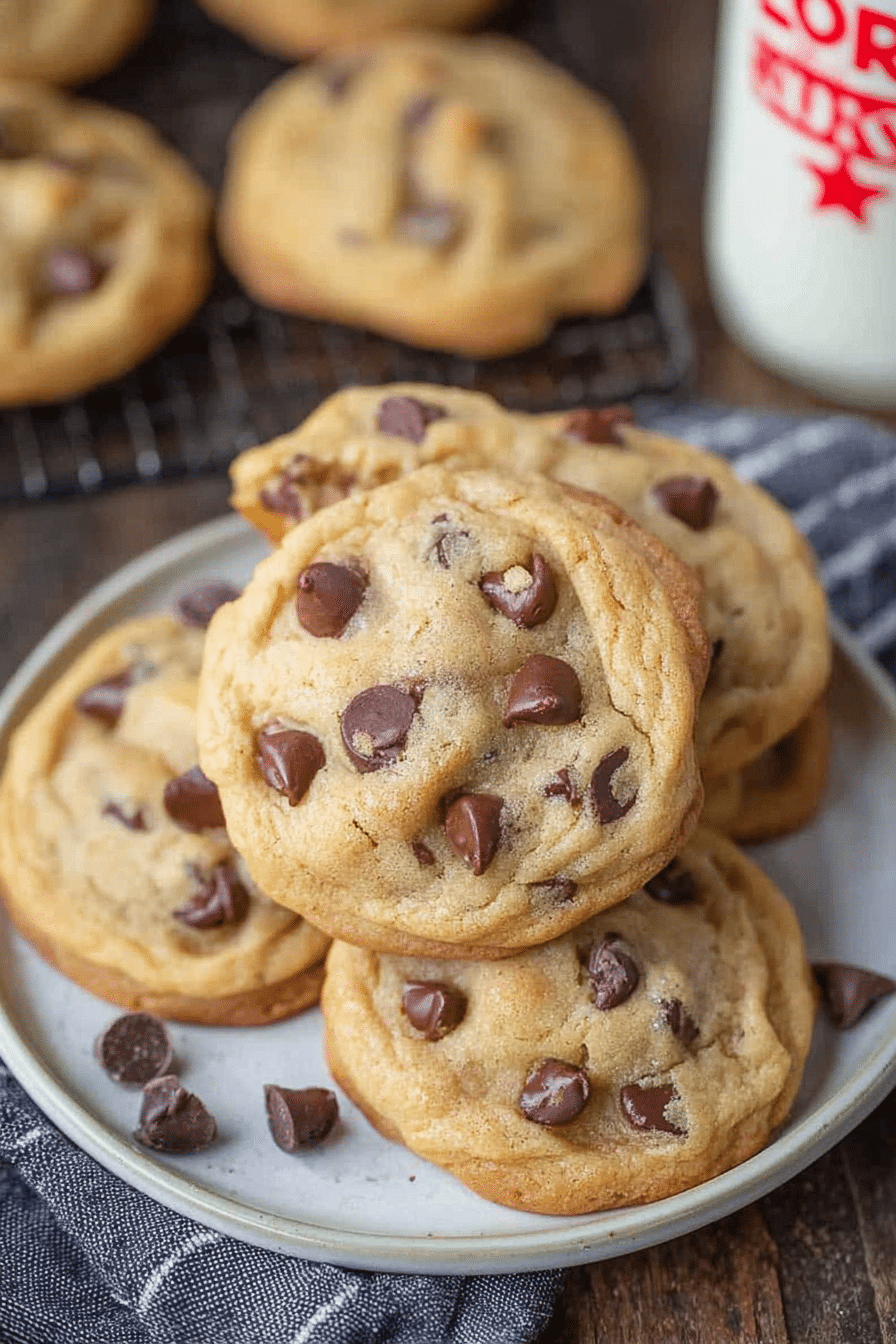
There’s something about a warm, bakery-style chocolate chip cookie that feels like a tiny, edible hug — thick, slightly crackled edges, a soft, gooey center and chocolate pockets that melt when you press them with your thumb. I’ve spent a lot of evenings in my little kitchen chasing that exact texture: not too flat, not cakey, and with enough chew to make every bite worth savoring. These are the cookies I make when I want something comforting but still a little showy — the kind you’d buy at a bakery and then try to replicate at home.
In this deep dive I’ll walk you through not only the exact recipe I use (yields, bake times and everything in between), but the why behind each step — what makes the cookie tall, how the sugars change texture, and how to rescue the dough or cookies if things go sideways. I cooked this batch on a rainy Sunday, tested temperature tweaks, and made notes about smell, look, and mouthfeel so you can reproduce bakery results in a regular home oven.
Ingredients for Perfect Cookies
Below I explain the role of each essential ingredient in plain terms. I list them conversationally (no exact measurements here) so you can understand why each one matters and what to do if you’re short on something.
- All-purpose flour – the structure-builder; the amount you use determines how thick or flat your cookie will be.
- Brown sugar – brings moisture and chewiness plus a deep caramel note thanks to the molasses.
- Granulated sugar – helps spread and crisp the edges; the balance with brown sugar controls texture.
- Butter (unsalted) – flavor and mouthfeel; softened butter creamed with sugar traps air for lift, while melted butter makes flatter cookies.
- Egg – binder and a little extra lift; room-temperature eggs incorporate better and give a tender crumb.
- Vanilla – flavor amplifier; it makes the chocolate pop without tasting like vanilla pudding.
- Baking soda & baking powder – the leavening duo: baking soda encourages spread and browning, a touch of baking powder adds height and a puffier center.
- Salt – balances sweetness and enhances overall flavor; don’t skip it even with salted butter (adjust accordingly).
- Semi-sweet chocolate chips – the pockets of chocolate; chopped chocolate can give better melt and texture, but chips are convenient for consistent results.
Step-by-Step Instructions
Here’s the tested, reliable method I follow. I include times, temperatures, and the exact ingredient amounts so you can bake with confidence. Yield: about 18 bakery-style cookies. Total time: roughly 18 minutes bake/prep (not counting chilling, if you choose to chill).
- Preheat the oven to 375°F (190°C) and line a baking sheet with parchment paper or a silicone baking mat. I find the oven racks in the middle give the most even color; my convection setting tends to brown the edges too quickly, so I stick with regular bake mode.
- In a large bowl, using a hand mixer, beat together 10 tablespoons of softened unsalted butter, 1/2 cup granulated sugar, and 3/4 cup brown sugar until creamy. You’re looking for the mixture to be smooth and slightly aerated — about 1–2 minutes on medium. The smell here changes: it goes from buttery to a warm, caramel-like aroma when the sugars are fully incorporated. Don’t over-cream or the dough will incorporate too much air and then collapse in the oven.
- Add 1 egg and 2 teaspoons vanilla and mix until just combined. Scrape the bowl once so all the butter-sugar mix is combined with the egg — pockets of unincorporated butter will cause uneven texture.
- Whisk together 2 1/8 cups all-purpose flour (scoop and level you flour for accuracy), 1 teaspoon baking soda, 1/2 teaspoon baking powder, and 1/2 teaspoon salt in a separate bowl. Add the dry ingredients to the wet and beat on low just until combined. This is where many people go wrong: overmixing develops gluten and makes the cookies dense. If you still see streaks of flour, a quick fold with a spatula finishes it without overworking.
- Fold in 1 1/2 cups semi-sweet chocolate chips with a spatula. I like to reserve a few chips to press on top of each cookie ball before baking — it gives a bakery-finish with glossy chips peeking out.
- Using a 2-tablespoon cookie scoop, place dough balls on the prepared baking sheet. Stack the scoop high for tall cookies — I literally press the scoop into the dough so the ball sits tall rather than flattened. Leave about 2 inches between cookies; they’ll spread a bit.
- Press a few extra chocolate chips on top of each dough ball if you like the look of visible chips. This is optional but it makes the cookies look irresistible and helps them stay gooey on top.
- Bake for 8–10 minutes. I pull mine at 8 minutes when they still look slightly underdone in the center — the edges will be golden and the center soft. They continue to set as they cool on the baking sheet. If you like slightly crisper centers, nudge the time closer to 10 minutes, but be careful: these cookies go from chewy to dry quickly.
- Remove from the oven and let cool on the baking sheet for 5 minutes, then transfer to a cooling rack to finish cooling. The five-minute rest is crucial: it allows the center to finish cooking gently and keeps the cookies soft instead of crumbly.
If you love experimenting with shapes and fillings, check out our chocolate chip cookie dough turnovers for inspiration on shaping and bake times.
Tips for Achieving the Best Texture
Texture is everything here: bakery-style cookies have crisp, caramelized edges and a pillowy center. Below are techniques that made the biggest difference in my tests.
- Chill the dough (if you have time) – chilling for 20–60 minutes firms the butter so the cookies spread less and stay taller. I often chill the formed dough balls for 30 minutes; they bake more evenly and have a slightly chewier interior.
- Stack your scoop – using a high-packed scoop instead of flattened dough gives you height. I literally mound the dough into the scoop so it’s tall. It looks odd at first, but it bakes into the bakery-style dome.
- Use the right sugars – brown sugar adds chew and moisture, granulated sugar encourages spreading and crisp edges. If a cookie tastes flat, try a touch more salt before grabbing for more sugar.
- Don’t overmix – once the flour goes in, mix only until combined. Overdevelopment of gluten leads to tough cookies.
- Pull early – pull at around 8 minutes when they’re still slightly underdone in the center. I always use the edge color and center jiggle as cues: golden edges and a glossy, slightly jiggly center equals success.
- Sheet rotation – if your oven has hot spots, rotate the pan halfway through baking. I learned this the hard way; my first batch in a new oven browned on one side more than the other.
Ingredient Quality: Choosing the Right Chocolate and Butter
Investing in the right chocolate and butter pays off in taste and texture. I’ve tried everything from bargain chips to single-origin bars; the differences are noticeable.
- Semi-sweet chocolate – good-quality semi-sweet chips or chopped bars melt better and taste richer. Chopped chocolate often creates larger molten pockets and a nicer texture than uniform chips, which sometimes keep their shape. If you like a deeper chocolate flavor, try dark chocolate or a mix of dark and milk.
- Butter – unsalted butter gives you control over seasoning. Fresh butter has a cleaner, fresher flavor; older butter tastes a bit flat. If you only have salted butter, reduce the added salt to balance.
To see how different chocolates and butter choices affect richness, take a look at our chocolate chip cheesecake bars, which use a deeper chocolate for an ultra-decadent bite.
Vegan and Gluten-Free Alternatives
I tested a handful of swaps when a friend asked for a vegan version. Here are the adaptations that worked best and what to expect from each.
- Egg substitute – a flax egg (1 tablespoon ground flaxseed + 3 tablespoons water, chilled 10 minutes) works well. It adds a slight grainy texture if you overuse it, so don’t add more than the recipe needs.
- Vegan butter – use a firm, block-style vegan butter rather than a spread. The stick-style behaves more like dairy butter when creamed and yields better structure.
- Dairy-free chocolate – pick a high-quality dairy-free dark chocolate. The sweetness balance may change, so taste and consider a touch more brown sugar if it feels too bitter.
- Gluten-free flour – use a trusted 1:1 gluten-free all-purpose blend with xanthan gum included. Expect a slightly different mouthfeel — a tiny bit more crumbly — but still delicious.
Notes: Vegan cookies may spread a bit differently and often need slightly longer baking time. Gluten-free doughs often require a short rest in the fridge to hydrate the flours and reduce crumbling.
Baking Method Comparisons: Oven vs. Air Fryer
I tried both methods. Here’s a straightforward comparison so you can pick the right tool for your kitchen.
- Standard oven – best for predictable, bakery-style results. The larger oven volume allows for gentle, even heat which helps the centers stay soft while edges brown. Bake at 375°F for 8–10 minutes (I pull at 8). This is my go-to for full trays.
- Air fryer – great if you only want a couple cookies fast. Use lower temperature (about 325–340°F equivalent) and watch closely: air fryers brown quickly and can crisp edges before centers set. I recommend reducing time and checking at 4–6 minutes. Only cook a couple cookies at once so air can circulate; overcrowding causes uneven cooking.
Personal note: the oven will give you the more authentic bakery look and texture. The air fryer makes quick cookies but with a slightly firmer edge and less pronounced chew in the center.
FAQs about Chocolate Chip Cookies
Below are common questions I get and the answers I rely on when troubleshooting in the kitchen.
- How do I prevent these cookies from spreading too much? Make sure your butter isn’t melted (softened is fine), measure flour by scooping and leveling, and avoid over-creaming the butter and sugars. Chilling the dough for 20–60 minutes helps, as does using a higher, stacked scoop of dough (as the recipe suggests). Bake on parchment or a silicone mat and don’t overcrowd the sheet.
- Can I make the dough ahead of time or freeze it? Yes — you can refrigerate formed dough balls for up to 72 hours for deeper flavor, or freeze them for up to 3 months. Bake chilled dough a minute or two longer; if baking from frozen, add 1–3 minutes to the bake time.
- What’s the trick to getting tall, bakery-style cookies with chewy centers? Stack the dough high in your cookie scoop, use a mix with plenty of brown sugar (for chew), and don’t overbake — pull at about 8 minutes so centers finish as they cool. Using both baking soda and a little baking powder (as in the recipe) helps achieve lift plus chew.
- Can I swap ingredients — like use salted butter, different chocolate, or make these vegan/gluten-free? Yes. If you use salted butter, reduce or omit added salt. High-quality chopped chocolate gives better flavor than low-grade chips, but chips work fine. For vegan: use a flax or chia egg substitute, vegan butter, and dairy-free chocolate (texture may change). For gluten-free: use a reliable 1:1 all-purpose GF flour blend (with xanthan gum if needed) and expect slight texture differences.
- How can I tell when the cookies are done and how should I store them? They should have golden edges but look slightly underdone in the centers when you pull them (8–10 minutes; the recipe author pulls at 8 minutes). Let them cool 5 minutes on the sheet, then transfer to a rack. Store baked cookies in an airtight container at room temperature for 3–4 days, or freeze baked cookies and dough balls for up to 2–3 months.
Conclusion and Serving Suggestions
These bakery-style chocolate chip cookies are the result of a few simple principles: the right sugar balance for chew, an extra lift from a touch of baking powder, and the technique of pulling them early so the centers finish while they cool. They’re reliable, forgiving, and hit that nostalgic spot every time I make them.
Serve them warm with a glass of cold milk, a scoop of vanilla ice cream, or alongside a strong cup of coffee for contrast. For a fun twist on bakery-style cookies, try our chocolate chip cookie dough brownie bombs—they’re perfect when you want something extra gooey.
And if you’d like to go overboard (in the best possible way), serve warm cookies with a scoop of our homemade banana ice cream — the contrast of warm cookie and cold, creamy banana is irresistible.
I’d love to hear if you try these. Tell me how they came out — did you pull them at 8 minutes or wait until 10? Did you go all-chopped chocolate or stick with chips? Baking is all about small adjustments, and I’m always tweaking based on what your oven (and taste) prefers.
Recipe (exact amounts and steps repeated for clarity):
Yield: 18 cookies
Ingredients (exact): 10 tablespoons unsalted butter, softened; 1/2 cup granulated sugar; 3/4 cup brown sugar; 1 egg; 2 teaspoons vanilla; 2 1/8 cups all-purpose flour (scoop and level); 1 teaspoon baking soda; 1/2 teaspoon baking powder; 1/2 teaspoon salt; 1 1/2 cups semi-sweet chocolate chips (plus extra for topping).
Instructions (exact): Preheat oven to 375°F and line a baking sheet. Beat butter and sugars until creamy, add egg and vanilla, then add dry ingredients and beat on low until combined. Fold in chocolate chips. Scoop dough with a 2-tablespoon scoop (stack high for thicker cookies). Place extra chips on top if desired. Bake 8–10 minutes (pull at 8 for soft centers). Cool 5 minutes on the sheet before transferring to a rack.
Happy baking — and remember: sensible measurements matter, but so does tasting along the way. The kitchen isn’t a lab; it’s a place for joy, small mistakes, and a lot of chocolate.
Bakery Style Chocolate Chip Cookies
Ingredients
Method
- Preheat oven to 375 degrees and line a baking sheet with parchment paper or a baking mat.
- In a large bowl using a hand mixer, beat together the softened butter, granulated sugar, and brown sugar until creamy. Then add in the egg and vanilla and mix.
- Add in the flour, baking soda, baking powder, and salt and beat on low just until combined.
- Fold in the chocolate chips.
- Using a 2 tablespoon cookie scoop, place dough balls (stacked high for thicker cookies) on a baking sheet lined with parchment paper or a baking mat.
- Place a few extra chocolate chips on top of each cookie ball. This is optional but makes for a very pretty cookie.
- Bake for 8-10 minutes (I pull mine at 8 minutes); they will look slightly underdone but will continue to cook as they cool a bit.
- Remove from the oven and let cool for 5 minutes, then remove to a cooling rack.