
I love a recipe that feels like a small kitchen victory: simple, forgiving, and something the whole family reaches for. These banana bars with brown butter icing have become my go-to when I need a fast dessert that still tastes homemade—sweet bananas, a tender crumb, and that warm, nutty frosting that makes everyone smile.
I test recipes in my busy kitchen and I’m honest about the mistakes I make—sometimes the butter browns a little too fast, or I don’t mash the bananas quite fine enough. Over time I learned small tweaks that keep these bars moist and consistent even when life is a bit hectic. I’ll walk you through those quick fixes and why this recipe fits neatly into a weeknight routine.
If you’re juggling school runs, after-school activities, or a last-minute dessert request, this is a reliable recipe. It uses simple pantry ingredients, makes good use of overripe fruit, and lets you get creative with swaps so everyone at the table can enjoy a square.
Why These Banana Bars with Brown Butter Icing Are Perfect for Busy Families
These bars are designed for very real kitchen life: short hands-on time, family-pleasing flavors, and flexible swaps for different dietary needs. The batter comes together quickly and bakes in under half an hour, so you can get a warm tray to the table without a long afternoon of baking.
- Ease of preparation: Minimal mixing and one pan make cleanup fast—great for weeknights or quick desserts after activities.
- Versatility: They’re an excellent way to use overripe bananas that would otherwise be tossed; you can also stir in mix-ins to change the texture or flavor.
- Family-friendly flavor profile: Kids tend to love the familiar banana sweetness while adults appreciate the toasty, nutty aroma of brown butter icing.
- Dietary swaps: For families with varied needs, you can swap dairy for plant-based options and use a gluten-free flour blend to make these accessible to more eaters.
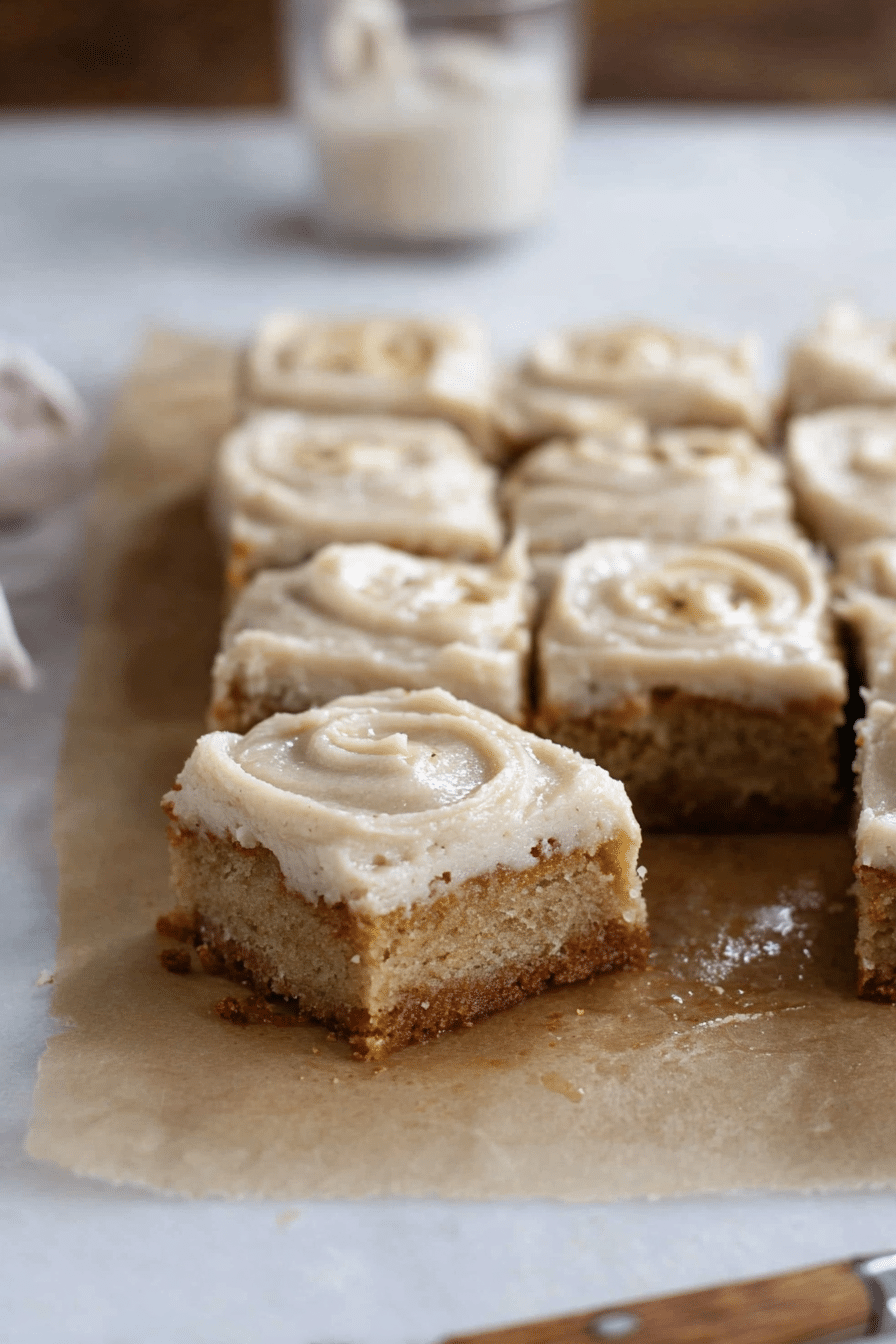
These bars visually read as comforting—golden edges, a soft center, and glossy icing—and the smell of browned butter paired with baked banana is instantly homey.
Everything You Need for Banana Bars with Brown Butter Icing
Gather simple pantry staples and a few basic tools. I also list swap ideas so you can adapt this recipe quickly for gluten-free or vegan needs. If you enjoy banana treats, you might also enjoy baking our marbled banana muffins for a tasty twist!
- * Bananas – Provide natural sweetness, moisture, and banana flavor; best when very ripe with brown spots.
- * Sour cream (or Greek yogurt) – Keeps the crumb tender and moist; Greek yogurt is a reliable substitute.
- * Butter – Adds richness to the batter; brown some of it for the icing to gain a toasty, nutty note.
- * Sugar – Sweetens and helps with browning; consider brown sugar for a deeper caramel note.
- * Flour – The structure for the bars; swap in a 1-to-1 gluten-free flour blend if needed.
- * Baking soda & salt – Leavening and flavor balance—don’t skip the salt, even if you reduce sugar.
- * Powdered sugar & vanilla – Make the brown butter icing smooth and flavorful; powdered sugar creates that soft, slightly melty finish.
- * Milk or milk alternative – Thins the icing to the right spreadable consistency; use plant milk for dairy-free icing.
- * Mix-ins (optional) – Chocolate chips, chopped nuts, or seeds for texture and extra flavor.
- * Tools – An 8×8 pan (or similarly sized pan), parchment for easy removal, mixing bowls, a whisk, and a saucepan for browning butter.
The Secret to Extra-Moist Bars (Use Overripe Bananas & Sour Cream)
Two ingredients reliably keep these bars soft: ripe bananas and sour cream. I always save bananas with lots of brown speckles for baking—those sugars concentrate as the fruit ripens and give better banana flavor and moisture.
- Overripe bananas bring natural sweetness and moisture; the higher sugar content improves both flavor and browning during baking.
- Sour cream adds a tender, slightly tangy richness that prevents the bars from drying out; plain yogurt works in a pinch.
- Balance wet-to-dry: If your bananas are small or not super ripe, add a touch more mashed banana or slightly decrease the dry ingredients to keep the texture soft.
Think about the first bite—soft, slightly dense crumb with pockets of banana sweetness. That’s what you’re aiming for.
How to Brown Butter Without Burning It
Brown butter is simple but demands attention. When I first tried this, I’d get dark, bitter bits from cooking too hot. Now I cook it gently and watch the cues closely for the best flavor.
- Use a light-colored saucepan so you can see the butter change color—this makes visual cues obvious.
- Melt butter over medium to medium-high heat, then reduce slightly; swirl the pan or stir occasionally to promote even browning.
- Watch for tiny brown flecks forming on the bottom and a nutty aroma; once you smell toasted notes and see golden-brown specks, remove immediately from heat.
- Pour the butter into a heatproof bowl to stop the cooking—carryover heat can quickly turn browned butter into burnt butter.
- Let the butter cool briefly before whisking in powdered sugar and vanilla so the icing doesn’t become too thin or melt completely.
The aroma is the best indicator: it should smell toasty and slightly sweet, not acrid. The color will be a warm amber with brown specks.
How to Make Banana Bars with Brown Butter Icing (Step-by-Step)
Follow the sequence below to get a tender crumb and a silky frosting. I guide you with practical tips so you can avoid common missteps.
- Preheat the oven and prepare your pan with parchment so the bars lift out easily after baking.
- Beat together sugar, sour cream, softened butter, and egg until creamy to ensure an even texture in the finished bars.
- Stir in mashed bananas and vanilla so the banana flavor stays distributed through the batter.
- Fold in dry ingredients—flour, baking soda, and salt—just until combined to keep the bars tender and not overworked.
- Spoon and spread the batter evenly into the prepared pan so the bars bake uniformly.
- Bake until golden brown on top and a toothpick in the center comes out with a few moist crumbs; let the pan rest briefly before lifting out the bars.
- While bars cool slightly, brown the butter following the steps above and whisk it with powdered sugar and vanilla to make the icing.
- Spread the icing on bars when they’re still a little warm—this creates that soft, slightly-melty finish I love—but not piping hot, or the icing will run off.
Timing matters: slight warmth helps the frosting set into a thin, glossy coating that sinks into the edges for a tender finish.
Pro Tip for banana bars with brown butter icing: Frost While Warm for a Soft, Slightly-Melty Finish
- Frost when the bars are warm (not hot) so the icing softens and sinks in just a bit—this keeps the surface glossy and tender.
- If you prefer a firmer icing, let the bars cool completely before spreading; chill briefly to set the frosting.
- For a shiny finish, whisk the icing until completely smooth and spread quickly before it thickens.
Easy Variations: Add Nuts, Chocolate Chips, or Try a Gluten-Free Swap
Make these bars your own with simple additions or swaps. For another delicious way to use ripe bananas, try our banana oatmeal bars, which are perfect for breakfast or a snack!
- Add chopped walnuts or pecans for crunch and a complementary toasty flavor.
- Fold in chocolate chips for pockets of melty chocolate—dark or milk both work well.
- Stir in toasted coconut or seeds for extra texture and nutty notes.
- Gluten-free swap: use a 1-to-1 gluten-free flour blend and check for added starches; the texture will be slightly different but still delicious.
- Vegan option: use plant-based butter and a yogurt alternative in place of sour cream; a flax egg can replace the egg if desired.
Troubleshooting
- If the bars are dry: I found they usually need riper bananas or a touch more sour cream; smaller or under-ripe bananas deliver less moisture.
- If the brown butter tastes bitter: I learned to stop cooking the butter at the first nutty aroma—carryover heat will continue browning if you leave it in the pan.
- If the icing is too runny: let the browned butter cool a little before whisking in powdered sugar, or add a bit more powdered sugar to thicken.
- If the center is underbaked while edges are done: try a slightly lower oven temperature and a few extra minutes to encourage even baking.
How to Store, Reheat, and Make-Ahead Banana Bars
Practical storage keeps these bars tasting fresh for days and lets you plan ahead for busy schedules.
- Room temperature: Store in an airtight container for a couple of days to keep them soft; avoid direct sunlight or heat.
- Refrigeration: Keep in an airtight container for up to a week; bring to room temperature or warm lightly before serving to soften the icing.
- Freezing: Freeze cooled, uniced bars wrapped tightly or in an airtight container for up to three months; thaw overnight in the fridge or at room temperature and add icing after thawing.
- Make-ahead: Bake and freeze uniced bars; when you’re ready to serve, warm slightly and spread fresh brown butter icing for that just-baked feel.
What to Serve with These Bars: Drink Pairings and Occasion Ideas
These bars are flexible—great for casual snacks, school lunches, or after-dinner dessert. Consider pairing them with complementary flavors and serving ideas. For a delightful chocolatey contrast, consider serving these bars with chocolate peanut butter banana cups.
- Drink pairings: Coffee (regular or iced), cold milk, a simple black tea, or a lightly spiced chai all pair nicely.
- Occasions: After-school snacks, potlucks, casual weekend brunches, or a quick dessert for weekday dinners.
- Serving idea: Cut into squares for a buffet or pack in lunchboxes as a treat-size portion.
Frequently Asked Questions
Can I use regular bananas instead of overripe bananas?
Using overripe bananas is key for moisture and flavor, but you can use regular bananas if necessary. Just ensure they’re well mashed for the best texture!
What can I substitute for sour cream?
You can use Greek yogurt or plain yogurt as a substitute for sour cream. They will help keep the bars moist!
How do I know when the banana bars are done baking?
The banana bars are done when they are golden brown on top and a toothpick inserted in the center comes out clean or with a few crumbs.
Can I freeze the banana bars?
Yes! You can freeze the banana bars after they’ve cooled completely. Wrap them tightly in plastic wrap or store them in an airtight container for up to 3 months.
What’s the best way to store leftover banana bars?
Store the leftover banana bars in an airtight container at room temperature for up to 3 days or in the refrigerator for up to a week.
Banana Bars with Brown Butter Icing
Ingredients
Method
- Heat oven to 375F. Line an 8x8 baking dish with parchment paper.
- In a large bowl, beat together sugar, sour cream, butter, and eggs until creamy. Blend in bananas and vanilla extract.
- Add flour, baking soda, salt, stir together until just combined. Spread batter evenly into pan.
- Bake 20 to 25 minutes or until golden brown. Let cool slightly and then remove from pan using the parchment to lift.
- Brown Butter in a medium saucepan, melt it over medium-high heat, letting it continue to cook until brown bits form.
- Pour the butter into a heat-proof bowl and whisk. Add in the powdered sugar and vanilla and mix until smooth.
- Spread the icing on the bars when they have cooled for about 10-15 minutes.