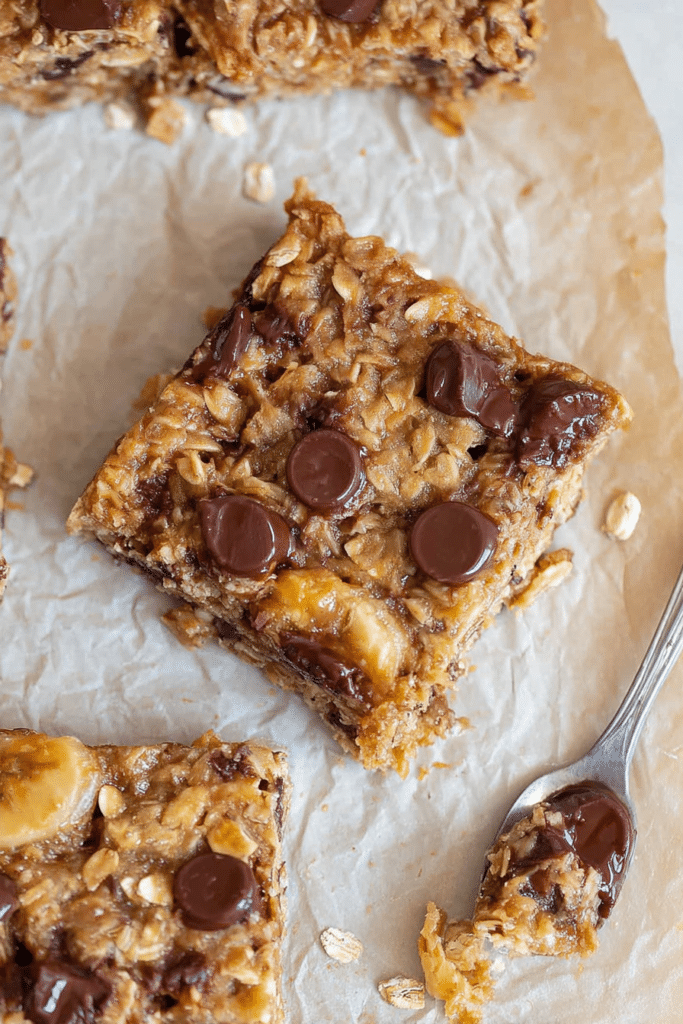
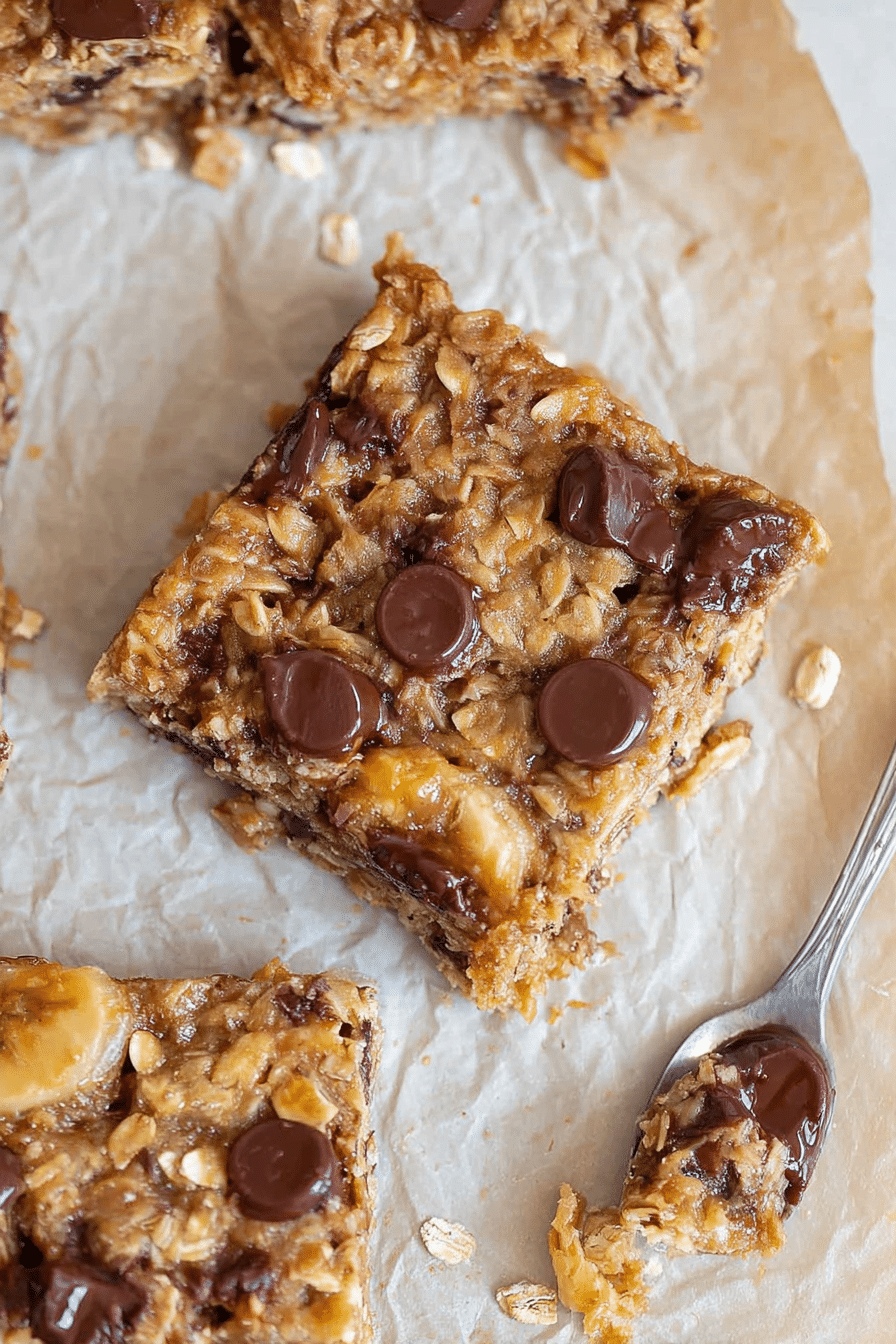
I first made these banana oatmeal bars on a Sunday afternoon when my kitchen smelled like caramelizing bananas and warm oats. I had three overly ripe bananas on the counter and a stubborn craving for something portable and honest — not a packaged granola bar but something homemade I could grab on my way out. The batter looked shaggy at first, but as I pressed it into the pan it came together into a slightly tacky, spreadable slab that promised soft, chewy bars. Fifteen minutes into baking the smell changed: the cinnamon woke up and that sweet banana note deepened, and I knew they were close. After cooling, the bars sliced cleanly, with slightly golden edges and a tender, spoonable center that wasn’t wet — just the right texture for breakfast or an afternoon pick-me-up.
Why Choose Banana Oatmeal Bars?
If you need a snack that travels, fuels workouts, or tucks into a lunchbox, banana oatmeal bars are a quiet hero. They keep you full longer than a cookie because of the fiber and healthy fats, and they don’t taste like a health stunt — they’re sweet, soft, and comforting. I reach for these on busy mornings when I want something wholesome I can eat in the car, and they’re also great after a gym session because the carbs and a little protein help recovery.
Compared with many store-bought bars, these are straightforward to make and you control the sugar, fat, and add-ins. They’re flexible — swap ingredients for allergies or preferences — and they store well, which makes batch-cooking satisfying. They’re simple enough to be part of a weekly rotation and good enough to serve to guests without apology.
For an extra twist, try our banana peanut butter oatmeal bars that combine the deliciousness of bananas and nut butter.
Simple Ingredients You Need
- Bananas – the sweet binder and main flavor note; overripe (spotted) bananas work best because they mash smoothly and taste sweeter.
- Nut butter – adds creaminess and helps bind the bars; peanut, almond, or sunflower seed butter all work for different dietary needs.
- Rolled oats – the body of the bars; they give chew and structure. Use certified gluten-free oats if you need them.
- Cinnamon – warms the flavor and complements the banana without adding sugar.
- Vanilla extract – rounds out sweetness and deepens aroma.
- Maple syrup – a mild, liquid sweetener that helps the mixture stick together and adds a little gloss.
- Chocolate chips – optional but beloved; they melt slightly into pockets of chocolate as the bars cool.
- Salt – tiny but crucial; a pinch sharpens the sweetness and balances flavors.
Step-by-Step Instructions
Below I walk you through the exact recipe I tested until I stopped tweaking it — it consistently makes 16 bars with the texture I described. If you want a quick checklist, follow the numbered steps and read the tips after each so you’ll know what to look (and smell) for.
- Preheat and prep: Heat the oven to 350°F (175°C). Line a 9×9-inch baking pan with parchment paper so you can lift the slab out easily after it cools.
- Mash the bananas: In a large bowl, mash about 1½ cups of bananas (roughly 3 medium, very ripe bananas) until mostly smooth. You want small flecks but no large lumps; those can stay if you like a more rustic texture.
- Mix the wet ingredients: Add about a half cup of nut butter, a teaspoon of vanilla extract, and three tablespoons of maple syrup to the mashed bananas. Stir until homogenous — the mixture will be glossy and slightly sticky. If your nut butter is very thick, warming it briefly helps it combine.
- Add the dry ingredients: Stir in two cups of rolled oats, a teaspoon of cinnamon, a half teaspoon of salt, and one cup of chocolate chips. The batter should hold together when pressed. If it’s too dry, add a splash more maple syrup or a teaspoon of milk; if too wet, fold in a handful more oats.
- Transfer and press: Scrape the mixture into your lined pan and press firmly into an even layer — I use the bottom of a measuring cup to pack it down for tidy edges. Sprinkle a few extra chocolate chips on top if you like the look of melted chips on the surface.
- Bake: Bake for 18 to 20 minutes, rotating the pan once if your oven runs hot. You’re aiming for edges that are lightly golden and a center that appears set — it won’t be rock hard, but it shouldn’t look runny.
- Cool fully, then slice: Let the bars cool completely in the pan on a rack before lifting out and cutting into 16 squares. Cooling is important — the bars firm up and slice cleaner once they lose heat.
Tips from my test kitchen:
- Texture cues: when you press the center after baking, it should spring back gently. If it dents deeply, it needs another minute or two.
- Aroma cues: you’ll smell the cinnamon and a deeper banana note when they’re close to done — that’s usually when I check the center.
- If the batter separates or looks oily, it usually means the nut butter was too oily or the banana mix wasn’t emulsified; stir vigorously or add a tablespoon of oats to bind.
- Overbaking makes the bars dry and crumbly; underbaking leaves them gummy. Err on the side of slightly underbaked and let cooling finish the set.
Nutritional Benefits of Banana Oatmeal Bars
These bars bring a lot to the table nutritionally without feeling like a chore to eat. Rolled oats provide soluble fiber which helps steady blood sugar and keeps you feeling full. Bananas bring potassium, vitamin B6, and natural sweetness — overripe bananas are especially high in simple sugars that are easier to digest post-workout. Nut butter contributes healthy monounsaturated fats and a little plant protein.
Per the recipe I tested, one bar is about 173 kcal, with roughly 8 g fat, 23 g carbohydrates, and 4 g protein. That balance makes them a satisfying mini-meal rather than just a sugary bite. Homemade bars also let you skip refined sugar and control portion size, which is harder to do with store-bought options.
Variations and Customizations
These bars are forgiving and built for experimentation. Below are the versions I’ve tried several times and the ones readers often ask about.
- Tropical Twist – stir in shredded coconut and swap some chocolate chips for chopped dried pineapple. Use a little lime zest for brightness.
- Nutty Delight – replace half the oats with ground almonds and use almond butter for a more pronounced nut flavor. Add chopped toasted almonds on top for crunch.
- Seed Boost – fold in a few tablespoons of chia or flaxseed for omega-3s and extra binding. You’ll notice a slightly denser crumb.
- Chocolate Lover – double the chocolate chips and sprinkle coarse sea salt on top right after baking for a bakery-style finish.
- Nut-Free – use sunflower seed butter or tahini instead of nut butter; the flavor changes slightly but the technique is the same.
- Protein-Packed – add a scoop of neutral whey or plant protein powder and 1–2 tablespoons more milk or nut butter to keep the texture balanced.
If you’re looking for another tasty option, check out our healthy blueberry oat bars for a fruity twist!
No-Bake Alternatives for Busy Days
When I don’t want to turn on the oven, I make a no-bake slab that’s just as satisfying. The trick is getting the binder right: nut butter plus a sticky sweetener or a handful of dates pureed makes everything stick.
Basic no-bake method I use: mash bananas, mix with nut butter and a little maple syrup, stir in oats and chocolate chips, press into a pan, and chill for at least an hour. If the mix seems loose, pulse everything in a food processor or add a tablespoon of melted coconut oil which firms up in the fridge.
In addition to these bars, consider making quick monster cookie protein balls for a delightful, no-bake snack option.
Storage and Freezing Tips
I keep these bars in rotation because they freeze beautifully — a batch lasts me a couple of busy weeks. Here’s how I store and thaw them to keep texture and flavor intact.
- Room temperature: These are best kept in an airtight container for up to 24 hours at room temperature. They remain soft and moist.
- Refrigerator: Stack them with parchment between layers in an airtight container for up to one week. They firm up in the fridge but become pleasantly dense and chewy.
- Freezer: Freeze individual bars on a sheet tray until solid, then transfer to a freezer bag or box. They keep well for 2–3 months. Thaw at room temperature or microwave for 10–15 seconds if you want them warm.
For a make-ahead breakfast option, try our brown sugar overnight oats that pair well with banana oatmeal bars.
Real Kitchen Troubleshooting (What I’ve Learned)
Every time I teach someone this recipe I point out the same little traps:
- Too wet batter: Often caused by very juicy bananas or extra liquid from a runny nut butter. Fix it by adding more oats a tablespoon at a time, or chill the mixture for 10 minutes before pressing and baking.
- Dry, crumbly bars: Usually from overbaking or too many oats. Brush the surface lightly with a thin smear of maple syrup or a little melted nut butter, then cover and let sit overnight — that helps rehydrate them.
- Bars won’t stick together (no-bake): Process the oats and banana together in a food processor to create a sticky base, or add a few pitted dates to the processor.
- Oven hotspots: If your bars brown unevenly, rotate the pan halfway through baking and check a minute early the next time you bake.
Conclusion: Enjoy These Healthy Treats
These banana oatmeal bars are one of my most-requested make-ahead snacks because they’re straightforward, forgiving, and genuinely tasty. They travel well, satisfy a sweet tooth without refined sugar, and adapt to whatever you have in the pantry. I make a double batch on Sundays and keep a stack in the fridge to grab all week.
Try the base recipe, then tweak — swap in seeds, try a no-bake version, or make them chocolatey. When you land on your favorite version, it becomes the kind of recipe you make without thinking. Share what you tried and how you serve them; I love hearing which variations become staples in other kitchens.
Frequently Asked Questions
Can I make these banana oatmeal bars vegan?
Yes! These banana oatmeal bars are already vegan-friendly as they use nut butter and other plant-based ingredients.
How should I store banana oatmeal bars?
Store them in an airtight container in the refrigerator for up to a week, or freeze them for longer shelf life. Just make sure to wrap them well!
What can I substitute for chocolate chips?
You can substitute chocolate chips with nuts, dried fruits, or even raisins for a different flavor. Feel free to customize it to your liking!
Can I use quick oats instead of rolled oats?
While rolled oats are recommended for texture, you can use quick oats if that’s what you have. The bars may be a bit softer, but they’ll still taste great!
How do I know when the banana oatmeal bars are done baking?
They are done when the edges turn golden and the center appears set. Allow them to cool completely before cutting for the best texture!
Banana Oatmeal Bars
Ingredients
Method
- Heat the oven to 350F and line a 9×9 baking pan with parchment paper.
- Mix together the mashed bananas, nut butter, rolled oats, cinnamon, vanilla, maple syrup, chocolate chips, and salt in a large mixing bowl.
- Transfer the mixture to the lined baking pan and flatten it into a flat, even layer. Feel free to add more chocolate chips on top!
- Bake for 18 to 20 minutes or until the edges of the bars are golden and the bars appear to be set. Allow the bars to cool completely before cutting.