
I first made deviled strawberries for a backyard summer party when I wanted something that read like dessert but behaved like finger food. I like that these are quick to assemble, don’t require baking, and dress up any dessert table without fuss. In my kitchen they’ve become my go-to when I need something pretty, portable, and easy to eat while people mingle.
I like the contrast of the ruby-red strawberries against the pale, creamy filling — it photographs beautifully and tastes like mini strawberry cheesecakes. The aroma of fresh berries with a hint of vanilla and lemon from the filling always gets comments. Over the years I’ve learned small techniques that keep these tidy and prevent watery or collapsed berries.
If you’re a host who likes simple steps and a high-impact platter, these are a winner. They pair nicely with other finger foods and are particularly handy when your guests are standing and snacking; for another crowd-pleasing option, check out our classic deviled eggs that will surely delight your guests.
Why Deviled Strawberries Are the Easiest Crowd-Pleasing Party Bite
Strawberries are already colorful, sweet, and hold up well as a handheld dessert — you don’t have to worry about slicing or plating every portion. The assembly requires just a few pantry staples and a little elbow grease. The result reads elegant on a platter and tastes familiar: cream cheese, a touch of sugar, and the bright pop of fruit.
They’re minimal fuss: no oven, no tempering, and the filling comes together in minutes. Because guests can pick them up and eat them in one or two bites, they help keep conversation flowing at parties. In my experience, bite-sized desserts like these get eaten first and keep guests moving through the buffet line.
Everything You Need for Deviled Strawberries
Below I’ll walk through the role each ingredient and tool plays so you know what to prioritize if you don’t have everything on hand.
- Cream cheese – The base of the cheesecake flavor and the source of richness; soften it so it blends silky smooth.
- Whipping cream – Lightens the filling when whipped and folded in, giving that airy, mousse-like texture.
- Sour cream – Adds tang and helps balance sweetness; can be swapped for a non-dairy alternative for dietary needs.
- Sugar – Sweetens the filling; white granulated sugar keeps texture fine, but powdered sugar will also work if you want a smoother finish.
- Vanilla extract – Anchors the flavor and makes the filling smell warm and inviting.
- Lemon juice (optional) – A small amount brightens the filling and cuts through the richness.
- Graham cracker crumbs – A finishing crunch that evokes a cheesecake crust; use gluten-free crumbs if needed.
- Strawberries – Choose firm, ripe berries that sit upright when halved; they’re the vessel and the star.
- Tools – A melon baller or small spoon for hollowing, an electric mixer for smooth cream cheese and whipped cream, and a piping bag (or zip-top bag) for neat presentation.
Enhance your dessert table with delightful strawberry shortcake kabobs that complement the flavors of deviled strawberries.
The Secret to That Cheesecake-Style Filling
The trick to a luscious, stable cheesecake-style filling is texture contrast: a dense, tangy cream cheese base folded with light whipped cream. Soften the cream cheese until it’s smooth but not warm; this avoids lumps and keeps the filling firm enough to pipe. Fold the whipped cream in gently to retain air — that’s what makes the filling feel like fluffy cheesecake mousse rather than a heavy spread.
Sensory note: when the filling is right you’ll see glossy peaks that hold shape, and the aroma will be a cozy mix of vanilla with a clean citrus lift if you added lemon. The mouthfeel should be creamy with a tiny lift from the whipped cream.
Troubleshooting
- If the filling is too stiff: I’ll soften the cream cheese a touch more or stir in a splash of cream until it spreads easily.
- If the filling is runny: I chill it briefly — 10 to 20 minutes in the fridge helps it firm up so it holds shape when piped.
- If berries get watery: I pat them dry and hollow less of the interior so they retain juice and structure.
- If whipped cream deflates: I stop whipping as soon as medium–stiff peaks form; over-whipping collapses the air and makes the filling dense.
How to Hollow Strawberries Neatly (No Waste)
- Pick firm, similar-sized strawberries so the platter looks cohesive and pieces sit level.
- Slice each berry in half lengthwise and cut a small sliver from the back of the half so it sits flat; this prevents tipping.
- Use a small melon baller or the tip of a spoon to scoop a shallow cavity — you only need an indent large enough to hold the filling, not to gut the berry.
- Save the scooped strawberry bits in a container for smoothies, syrup, or a quick compote so nothing goes to waste.
- Lightly pat each hollowed half with paper towel if they’re very juicy — this helps the filling adhere.
How to Make Deviled Strawberries (Step-by-Step)
- Beat the whipping cream until medium–stiff peaks form; be careful not to over-whip.
- In a separate bowl, beat the softened cream cheese with sour cream, sugar, vanilla, and lemon until smooth and homogenous.
- Gently fold the whipped cream into the cream cheese mixture until fully incorporated and airy.
- Transfer the filling to a piping bag fitted with a star or round tip (or use a zip-top bag with the corner snipped) and pipe into each hollowed strawberry half.
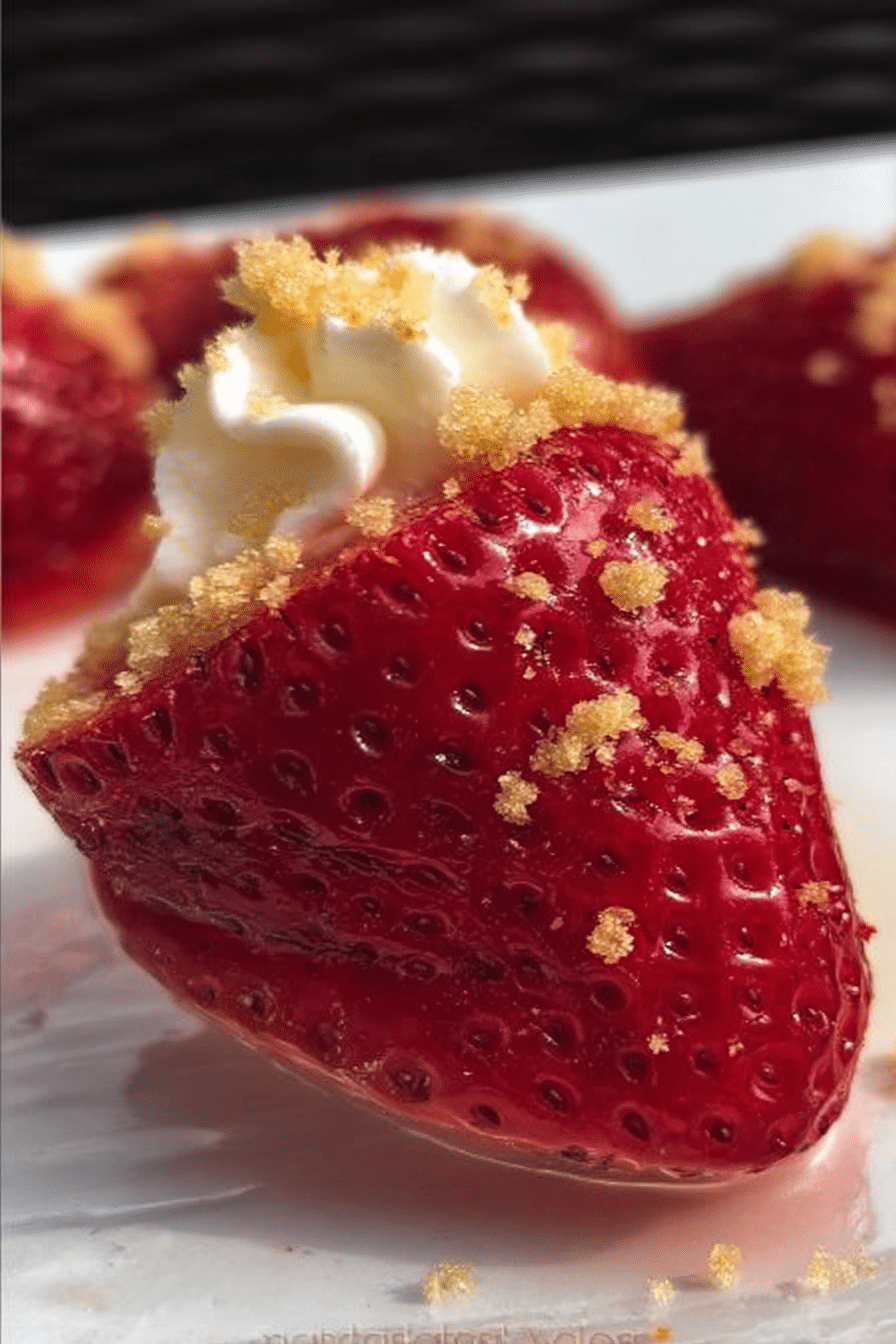
- Finish with a sprinkle of graham cracker crumbs and arrange on a platter so the color contrast shows: filling up, red rim down.
- Serve them chilled or at cool room temperature and enjoy the combination of creamy filling and fresh berry bite.
Pro Tip for Deviled Strawberries: Scale & Serve for Big Groups
- Double or triple components proportionally: keep the same ratio of cream cheese base to whipped cream so texture stays consistent.
- Prep components ahead: make the filling and store it chilled, and hollow the strawberries a few hours before — fill them within an hour of serving for best appearance.
- Use multiple platters: arrange in rows with alternating tips to create visual rhythm and make replenishing easier during the party.
- Transport tip: keep filled berries on a flat tray in the fridge and cover loosely with plastic wrap to avoid smudging the tops.
- If you need to feed a crowd quickly, pipe the filling into cups or mini phyllo shells as an alternative presentation that scales easily.
Allergy-Friendly Swaps and Flavor Variations
Here are practical swaps and easy ways to change the flavor profile without complicating prep. Try these as small experiments — I like to test one variation on a platter to see how guests react.
- Dairy-free – Use a plant-based cream cheese and a coconut or soy whipping alternative; chill well so the filling holds shape.
- Gluten-free – Substitute gluten-free graham crumbs or crushed almond cookies for the topping.
- Chocolate twist – Fold in a little melted and chilled dark chocolate or sprinkle cocoa-dusted crumbs on top.
- Nuts & nut butter – Swirl in a small amount of almond or cashew butter for a richer, nuttier filling (toast nuts for extra aroma).
- Fruit variations – Try raspberries or halved cherries as the vessel, or fold in a small spoonful of fruit puree into the filling for color and flavor.
- Extract swaps – Try almond extract in place of vanilla for a marzipan note, or orange zest instead of lemon for a citrus twist.
If you’re exploring more flavor variations, try these delectable strawberry cheesecake cupcakes for a unique twist.
How to Store, Make Ahead, and Arrange for Parties
Storage and timing are what keep these looking their best. Unfilled, hollowed strawberries can be prepped a few hours ahead and kept loosely covered in the fridge. The filling keeps well chilled for a couple of days; if you make it the day before, whisk it briefly before using to refresh the texture.
- Store filled berries in a single layer in an airtight container and eat within a day for best texture; the berries release moisture over time that softens the shell.
- Assemble just before serving when possible; if you must fill early, do it no more than a couple of hours before guests arrive and keep chilled.
- Garnish ideas: a light dusting of crushed graham crackers, a tiny mint leaf, or a few micro-slices of fresh strawberry for color contrast.
- Arrangement: place filled halves on a shallow platter with alternating rows of whole berries or other small bites so the spread looks abundant.
For additional dessert options, consider a traditional strawberry rhubarb pie to round out your gatherings.
Serving suggestion: present deviled strawberries on a chilled platter with a few extra whole strawberries and a small bowl of extra graham crumbs for guests to sprinkle if they like. I find a few simple garnishes go a long way toward a professional-looking dessert table.
Frequently Asked Questions
Can I make deviled strawberries in advance?
Yes! You can prepare the filling and hollow the strawberries a few hours before your event. Just fill the strawberries shortly before serving to keep them fresh.
What can I use instead of cream cheese?
If you want a dairy-free option, you can use a plant-based cream cheese alternative. Just ensure it’s softened for easy mixing.
How do I store leftover deviled strawberries?
Store any leftovers in an airtight container in the refrigerator. They are best eaten within a day for optimal freshness.
Can I add flavors to the cheesecake filling?
Absolutely! You can mix in different flavored extracts, such as almond or lemon, or fold in some chocolate or fruit puree for a unique twist.
Are deviled strawberries suitable for gluten-free diets?
Yes, just substitute the graham cracker crumbs with a gluten-free alternative to make it suitable for gluten-sensitive guests.
Deviled Strawberries
Ingredients
Method
- Prep the strawberries by cutting off the stems and slicing them in half. Next, cut a small sliver off of the back of each strawberry half so that they sit up straight. Use a small melon baller to carefully hollow out the middle.
- In a medium sized mixing bowl, beat the whipping cream until stiff peaks form (about 5 minutes).
- In a separate bowl, mix together the softened cream cheese, sour cream, sugar, vanilla extract, and lemon juice with an electric mixer until smooth.
- Fold the whipped cream into the cream cheese mixture until well incorporated.
- Fill a piping bag with the cream cheese mixture and pipe it onto each sliced strawberry.
- Finish with a sprinkle of graham cracker crumbs.
- Serve and enjoy!