- Prep
- 15 min
- Total
- 135 min
- Serves
- 24
- Calories
- 50 kcal
- Carbs
- 12.00 g
On this page14 quick jumps
TOC
14 quick jumps
Introduction
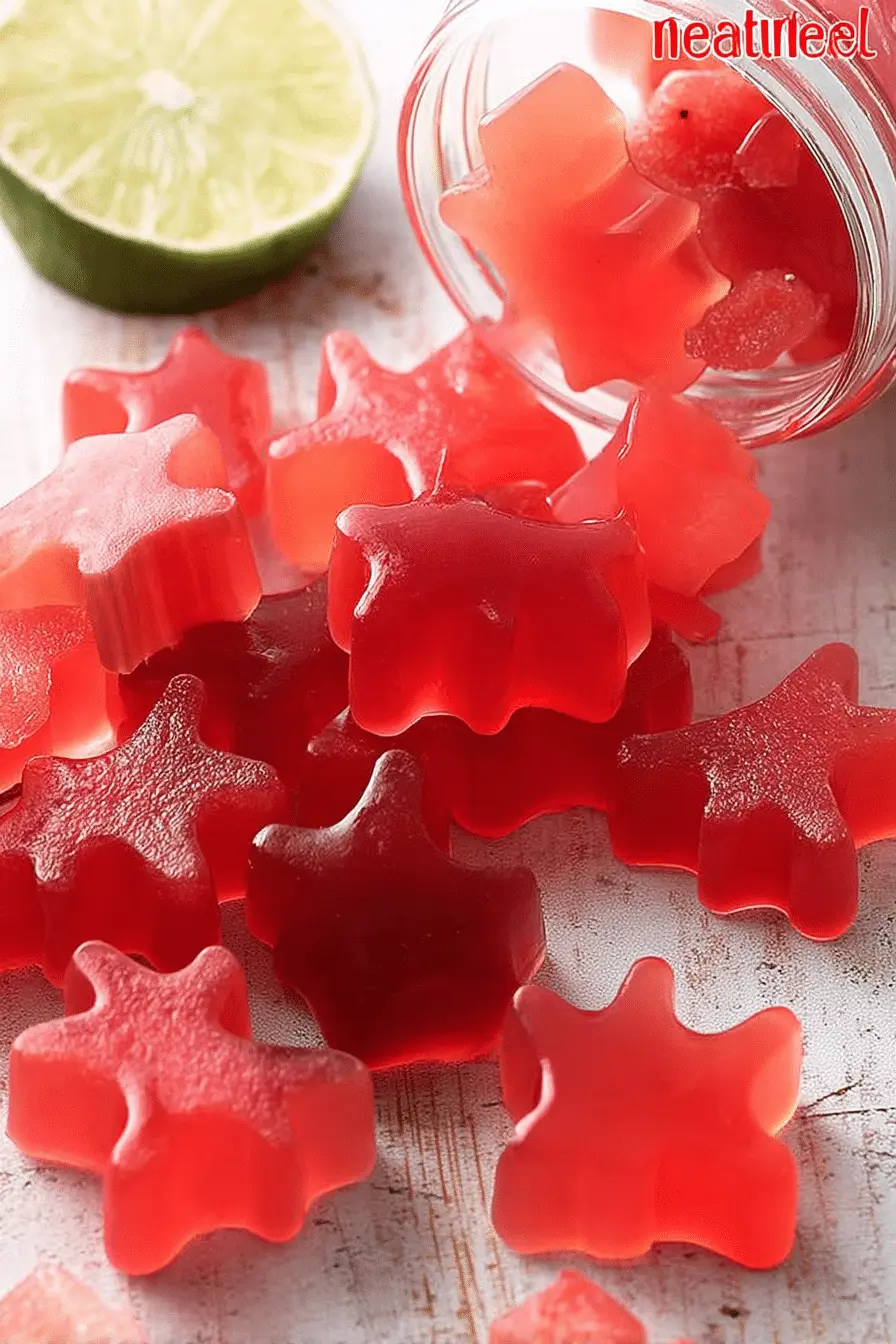
I make these homemade sour watermelon gummies every summer in my kitchen when watermelon is at its sweetest. I love how a few simple ingredients — fresh melon, a little lemon, and a clean gelling protein — turn into something that tastes like childhood gummies without the long ingredient list. I keep a small stash in the fridge for lunchboxes and for when the kids want a bright, chewy treat after the pool. From trial and error I learned that ripe fruit and proper gelatin handling make all the difference. Early batches that skipped the bloom step or were poured too hot came out either too soft or with a grainy mouthfeel. Once I adjusted temperatures and gave the gelatin time to bloom, the texture went from disappointing to reliably firm and pleasantly chewy. I like to err on the side of less added sweetener — many watermelons are so flavorful that honey is optional — and I always use fresh lemon juice for the sour kick. The result is a vibrant pink gummy with a clean citrus lift, and the grass-fed gelatin gives a little nutritional bonus in the form of protein that supports gut and joint health. Why These Homemade Sour Watermelon Gummies Are a Healthier, Nostalgic TreatWhy These Homemade Sour Watermelon Gummies Are a Healthier, Nostalgic Treat
These gummies bring back that nostalgic gummy texture and tang without the additives, artificial colors, or long lists of preservatives you often find in store-bought candies. Using fresh watermelon reduces unnecessary sugars and food dyes, while a small amount of natural sweetener (if needed) keeps the flavor balanced. The bright lemon juice adds the sour edge that makes each gummy pop.
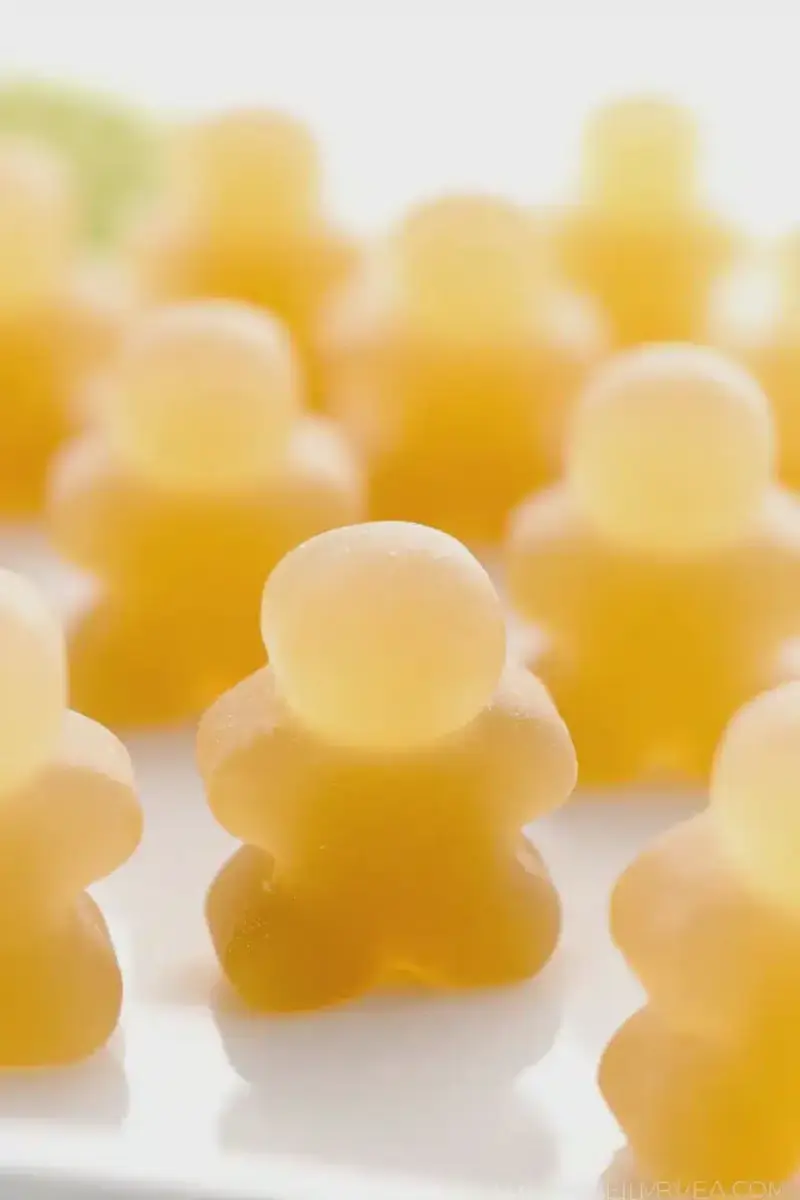
Visually they’re appealing: a translucent, jewel-like pink that smells faintly of ripe melon and bright lemon. Texturally they’re firm but springy — the kind of chew you remember from childhood, just cleaner.
Nutrition at a glance: when made with minimal or no added sweetener, these gummies are low in calories per piece and provide a small amount of protein from gelatin. Expect roughly a light-calorie snack per gummy with about one to two grams of protein (exact values depend on serving size and added sweetener). If you’re watching sugar, skip the honey and rely on ripe watermelon for natural sweetness.
Everything You Need for Homemade Sour Watermelon Gummies
Choosing ripe watermelon and the right tools matters more than having a long ingredient list. Pick fruit that smells faintly sweet and yields easily when pressed — that aroma translates into sweeter gummies so you may not need extra sweetener. A good silicone mold makes unmolding painless, but a shallow fridge-safe dish works if you prefer cutting squares.
Essential tools and ideas:
- Blender or food processor – to turn watermelon into a smooth juice.
- Fine mesh strainer – to remove pulp and foam for a clear, pretty gummy.
- Saucepan and whisk – gentle heat and steady whisking melt the gelatin smoothly.
- Silicone molds or fridge-safe dish – silicone is easiest for popping shapes out; a baking dish lets you cut bars.
Quick note on nutrition: if you want exact numbers for meal planning, I recommend calculating values based on the amount of watermelon and any sweetener you add — the basic recipe is naturally low-calorie and provides a touch of protein from grass-fed gelatin.
The Secret to the Perfect Texture: Getting Gummies That Hold Their Shape
The texture is all about technique. Blooming gelatin properly and avoiding overheating are the two biggest factors that determine whether gummies set firm and clear rather than soft or grainy. When gelatin is sprinkled on cold liquid it hydrates and swells; adding it to warm (not boiling) juice melts the granules into a smooth gel that will hold its shape when chilled.
To get glossy, bubble-free gummies, skim foam from strained juice before warming, use gentle heat, and pour carefully into molds. A cool, steady chill lets the structure set evenly — rushing this step can cause a gummy that’s too soft in the center.
Why Fresh Citrus Matters for That Clean, Sour Kick
Fresh lemon juice brightens the watermelon and adds the acidic lift that makes the gummies taste tangy rather than flat. The lemon’s aroma and acidity cut through sweetness and highlight the melon’s freshness. If you use bottled lemon juice, the flavor can be muted; fresh juice has a lively, fragrant lift and adds vitamin C.
If you want to vary the sourness or flavor, try other citrus fruits for different nuances: lime for a sharper, more tropical edge, or a touch of orange for a sweeter, floral pop. Remember: citrus also affects set slightly, so keep amounts moderate to preserve the texture.
Gelatin vs. Vegan Alternatives: What to Use and When
Gelatin gives that classic gummy chew and contributes small amounts of protein — I use grass-fed gelatin for a cleaner ingredient profile. If you prefer a plant-based route, agar-agar and pectin are the most common alternatives, but they behave differently.
- Gelatin – provides the chew and springy texture most people expect from gummies; melts at mouth temperature and yields a smooth finish.
- Agar-agar – derived from seaweed, sets firmer and more brittle than gelatin; requires boiling and different ratios, and the texture will be less chewy and more jelly-like.
- Pectin – fruit-based gelling agent that pairs well with high-acid or high-sugar recipes; can create a softer, more jam-like set unless adjusted carefully.
If you go vegan, expect to experiment with quantities and techniques to approach the chewiness of gelatin-based gummies. I encourage you to try small test batches so you can tweak texture and flavor without wasting a lot of fruit.
How to Make Homemade Sour Watermelon Gummies (Step-by-Step)
- Blend fresh watermelon until completely smooth.
- Strain the puree through a fine mesh to collect clear juice; skim and discard any surface foam for a shiny finish.
- Reserve half of the juice in a separate container and sprinkle the gelatin over the reserved portion; let the gelatin sit so it blooms and absorbs the liquid.
- Gently warm the remaining juice in a saucepan over low-medium heat — do not boil — to bring it to a warm temperature.
- Add the bloomed gelatin to the warm juice and whisk until completely dissolved and silky.
- Stir in fresh lemon juice and a touch of honey if you want extra sweetness; taste and adjust before pouring.
- Pour the mixture into silicone molds or a fridge-safe dish, taking care to minimize bubbles as you fill.
- Chill until fully set, then unmold or slice and store in the refrigerator.
Pro Tip for homemade sour watermelon gummies: Control Sourness & Bloom Gelatin Properly
- I always taste the watermelon first to decide whether I need added sweetener; ripe melon often needs none.
- Bloom gelatin by sprinkling it over cold juice and letting it sit undisturbed — this step prevents grainy texture.
- Warm the juice gently and keep it below a simmer when melting gelatin; heat that’s too high can degrade gelling power.
- For a cleaner-looking gummy, remove foam from strained juice before heating and pour slowly into molds to avoid trapped air.
- Adjust sourness by adding lemon a little at a time — you want a bright lift, not a puckering bite.
Troubleshooting
- If your gummies are too soft, I recommend checking that the gelatin was fully bloomed and that the warm juice reached a high enough temperature to dissolve it.
- If they’re rubbery or too firm, try slightly reducing the amount of gelatin next time or using a little more juice to soften the set.
- If you notice cloudy or foamy gummies, skim foam before heating and pour more slowly; using a trimmed spoon to stir gently can reduce bubbles.
- If flavors taste muted after setting, increase the fresh lemon slightly or add a touch more concentrated fruit puree before cooling.
Variations
- Swap watermelon for strawberries or mangoes for a different fruit profile — adjust sweet and acid balance to taste.
- Make a sugar-free version by omitting honey and using naturally sweet, ripe fruit.
- Try a layered gummy by pouring a thin first set, chilling until tacky, then adding a second color or flavor.
- For a fun finish, toss chilled gummies in a light mix of citric acid and fine sugar for a sour coating.
How to Store, Make-Ahead, and Serve Homemade Sour Watermelon Gummies
Store gummies in an airtight container in the refrigerator; they keep best chilled and will remain chewy for up to about a week. If you need to make them ahead, I recommend preparing them no more than a day or two in advance to preserve the fresh watermelon flavor.
When serving, let molds sit a minute at room temperature for easier unmolding. Serve straight from the fridge as a snack, pack a few in lunchboxes, or use them as a colorful topping for chilled desserts. Silicone molds work best for gummies as they make it easy to pop the gummies out. You can also use a baking dish and cut them into pieces after they set.
Frequently Asked Questions
Can I use a different type of fruit instead of watermelon?
Absolutely! You can experiment with other fruits like strawberries or mangoes. Just keep in mind that you may need to adjust the sweetness and acidity accordingly.
How should I store the homemade sour watermelon gummies?
Store your gummies in an airtight container in the refrigerator. They can last for up to a week!
Is there a vegan alternative to gelatin I can use?
Yes! You can use agar-agar or pectin as a plant-based alternative. Just follow the package instructions for the correct ratio.
Can I skip the honey if my watermelon is sweet enough?
Of course! If you find your watermelon is sweet enough, feel free to omit the honey.
What kind of molds should I use for making gummies?
Silicone molds work best for gummies as they make it easy to pop the gummies out. You can also use a baking dish and cut them into pieces after they set.
Ingredients
- 4 cupsfresh watermelon, cut into chunks
- 5 tablespoonsunflavored gelatin powder
- 1/2 cupfreshly squeezed lemon juice (or preservative free bottled lemon juice)
- 1/4 cuphoney (optional, depending on the sweetness of the watermelon)
Instructions
- 1
Add the fresh watermelon to a blender and process until smooth.
- 2
Pour the blended watermelon through a fine mesh strainer into a Pyrex measuring cup or similar. You should have about 2 cups / 480 milliliters of juice. Skim any white foam from the top of the juice and discard.
A well-seasoned pan is worth more than a drawer of gadgets.
- 3
Pour half of the watermelon juice into a saucepan, leaving the other half behind in the measuring cup. Sprinkle the unflavored gelatin powder over the reserved juice. Let it sit for a few minutes until it is absorbed by the liquid.
- 4
While the gelatin is blooming, warm the watermelon juice in the saucepan over a low medium heat. You do not want or need to bring it to a boil. Add the bloomed gelatin to the warm watermelon juice, whisking until it melts and combines into a smooth liquid. Stir in the lemon juice and, if using, the honey, to taste.
- 5
Pour the gelatin mixture into molds or a refrigerator & knife friendly baking dish. Let chill for at least 2 hours before removing from the molds or slicing into pieces.
Recipe Card
The Homemade Sour Watermelon Gummies My Family Asks For
Keep it handy for later, send it to someone cooking with you, or open the clean print view.
- Prep
- 15 min
- Total
- 135 min
- Serves
- 24
You might also like
How I Make Quick Blueberry Lemon Jam — Canning in 1 Hour
May 21, 2026
The 5-Ingredient Japanese Jelly Dessert I Make All Summer
May 21, 2026
The Homemade Peachy Gummies My Kids Love — Fun, Simple Treat
May 21, 2026
How I Make Green Tea Lemon Ginger Gummies for Daily Immune Support
May 21, 2026
Reviews
Be the first to review this.