
My first memory of turtle candy is a paper plate at a church bake sale — glossy chocolate domes, each crowned with a clustered pecan, smelling like warm sugar and holidays. Years later I made them myself in a cramped apartment kitchen with a tiny microwave and a stubborn jar of caramel topping. The very first batch was uneven: some candies were stodgy and flat, others had caramel that refused to set properly. After a few tests and a couple of late-night snack trials, I landed on the version I make now — reliably glossy chocolate, a soft-but-stable caramel center, and pecans that crackle when you bite in.
I like homemade turtles because they’re forgiving and personal — you control the salt, the chocolate, the type of nut. They don’t need tempering or complicated tools, but they do reward a little attention. The combination of warm, sticky caramel, cooling chocolate, and toasted nuts is comfort food in bite-sized form: the caramel pulls softly, the chocolate snaps if you chill them properly, and the nuts add that toasty, buttery note that keeps you reaching for one more.
Ingredients You’ll Need
- Pecans – the traditional nut for turtles; toasting brings out their toasted, buttery flavor and adds crunch. Cashews or almonds work if you prefer.
- Caramel topping – a thick caramel ice cream topping gives you that soft, spoonable caramel without making candy on the stovetop. It’s the glue for the cluster.
- Milk chocolate chips – melt for a smooth, sweet coating. Use dark chocolate for a less sweet, more sophisticated bite.
- Shortening (optional) – a small splash helps melted chocolate smooth out and sets shinier; coconut oil is a swap for flavor if you like.
- Optional salt or sea salt flakes – a tiny sprinkle on top contrasts the sweetness and highlights flavors.
Step-by-Step Instructions
I include a straightforward recipe card near the end of this post with exact measurements, but here I’ll walk you through each step with the little observations that matter in a real kitchen.
- Toast the nuts (if needed). Spread pecan halves in a single layer on a baking sheet and roast in a preheated 350°F oven for 7–10 minutes, stirring once. Watch them — they go from warm-smelling to burning quickly. You want a deep toasted aroma and slightly darker edges, but not char. Let them cool completely; warm nuts will melt the caramel prematurely and make clusters slumpy.
- Chop if desired. I sometimes roughly chop toasted pecans — it makes smaller, more uniform clusters. But whole halves give the classic turtle look. If you chop, keep some whole pieces for visual interest.
- Coat the nuts with caramel. In a bowl, stir the cooled pecans with the thicker caramel ice cream topping until each nut is lightly coated. It looks weird at first — shiny and almost sloppy — but when you scoop it, the caramel will hold the cluster together. If the caramel seems too runny, chill for 10–15 minutes; if it’s too thick to stir, let it warm slightly at room temperature.
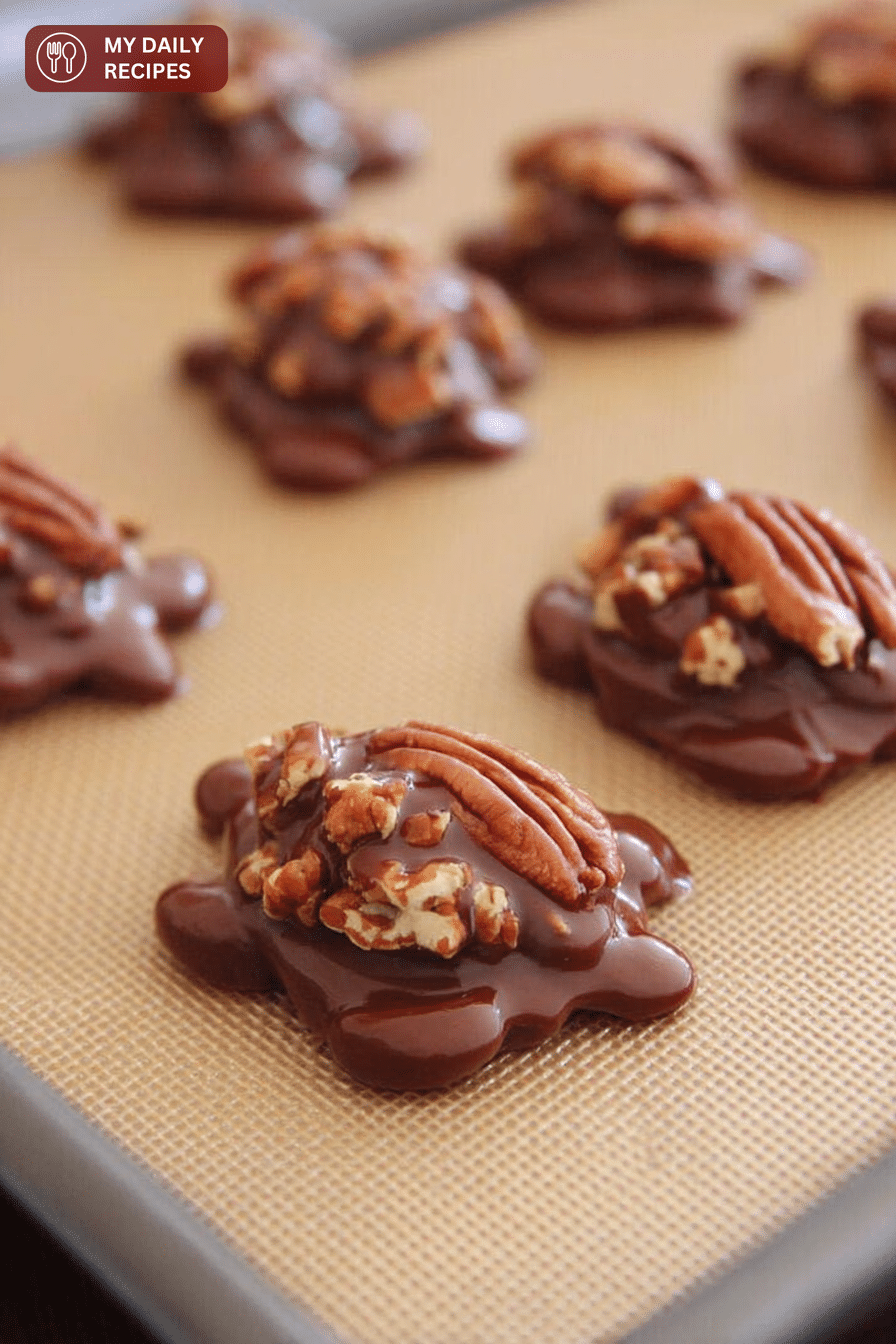
- Form clusters. Drop heaping tablespoons of the caramel-coated pecans onto a parchment-lined baking sheet, spacing them so the chocolate won’t glue them together later. Press slightly so they’re stable. I usually get about 24 medium clusters. Pop the tray into the refrigerator for 1–2 hours until the caramel is firm — this is crucial for a neat chocolate coating later.
- Melt the chocolate. Place chocolate chips and an optional teaspoon of shortening in a heatproof bowl. Microwave in 15–20 second bursts, stirring between each burst, until fully melted and glossy. Alternatively, use a double boiler: a bowl over gently simmering water. Stir constantly and remove from heat as soon as it’s smooth. If your chocolate becomes grainy, a teaspoon of neutral oil or shortening usually brings it back.
- Coat the clusters with chocolate. Using a spoon, drizzle or pour melted chocolate over each chilled cluster, covering the top and sealing the caramel inside. You can fully enrobe them or create the classic turtle-look (a chocolate button with nutty bumps). If you plan to add sea salt, sprinkle it on while the chocolate is still wet.
- Let them set. Leave the candies at room temperature for a glossy finish, or refrigerate for a faster, slightly firmer set. Chocolate will develop a bloom if exposed to temperature swings, so once set, store them in a cool place or the fridge depending on your climate.
- Serve and enjoy. Once the chocolate is completely set, the turtles are ready. They hold well in an airtight container in the refrigerator for up to a week — or freeze individually on a tray for longer storage.
Tips for Making Perfect Turtle Candy
I’ve made dozens of batches and these are the lessons that saved me most often.
- Toast the nuts: Don’t skip it. Toasting removes the raw edge and releases oils that taste buttery and deep. It also helps the pecans stay crisp under caramel.
- Cool the nuts: Hot nuts melt caramel prematurely. Let them cool completely before mixing.
- Chill the clusters before chocolate: If the caramel isn’t firm, the melted chocolate will sink in and the turtles will spread. A 1–2 hour chill makes a big difference.
- Microwave in short bursts: Chocolate goes from glossy to seized in seconds. Stir frequently and stop heating when small chunks remain — the residual heat will finish melting them.
- Add a little fat for shine: A teaspoon of shortening or coconut oil smooths and shines melted chocolate, but use sparingly — too much makes the chocolate soft at room temperature.
- Watch caramel consistency: If your caramel topping is thin, chill it slightly to thicken. If it’s too thick to stir, let it come up to room temp briefly. You want a ribbon-coating consistency that holds clusters together.
- Avoid moisture: Water is chocolate’s enemy. Make sure bowls and utensils are dry. Even a drop can seize melted chocolate.
- Fix seized chocolate: Stir in a little neutral oil or a teaspoon of shortening to smooth it out. If it’s granular because of overheating, quickly transfer to a double boiler and whisk until smooth.
Healthy Alternatives for Turtle Candy
If you’re aiming for a lighter or lower-sugar version, these swaps worked in my kitchen after a few trials — results vary, so test small batches first.
- Dark chocolate: Use 70% or higher for less sugar and more complex cocoa notes. It’s firmer and pairs beautifully with salty nuts.
- Sugar-free caramel: There are sugar-free caramel sauces meant for ice cream; these can work but may be thinner. Chill before forming clusters or combine with a touch of nut butter to thicken.
- Date paste or blended Medjool dates: For a whole-food sweetener, blend pitted dates with a splash of warm water to form a sticky paste. It won’t taste exactly like caramel but gives chew and sweetness.
- Nut-free option: Roasted sunflower seeds, pepitas, or small pretzel clusters make a nut-free crunch that’s still satisfying. Keep in mind flavor will shift from buttery to toasty-or-salty.
- Smaller portions: Make mini turtles with a teaspoon of mixture to cut calories while keeping enjoyment.
Creative Variations of Turtle Candy
Once you have the basic technique down, it’s fun to riff. Here are tried ideas and ones I’ve tested or swapped in my own kitchen.
- Different nuts: Hazelnuts add a praline-like note; walnuts are earthier; almonds add a crisp bite. Mix nuts for texture variety.
- Flavored chocolate: White chocolate with a hint of peppermint extract makes a festive version. Be careful: white chocolate needs even gentler heating.
- Sea salt and caramel drizzle: A tiny pinch of flaky sea salt on top enhances flavors. A second drizzle of warm caramel before serving adds drama.
- Spiced turtles: Stir a pinch of cinnamon or smoked paprika into the caramel for warmth or a savory kiss.
- Layered look: Make a chocolate button base, chill slightly, add a caramel-nut mound, then top with more chocolate for a neat layered appearance.
- Decorations: A few chopped pecans, cocoa nibs, or a dusting of freeze-dried raspberries can make them party-ready.
How to Store and Gift Turtle Candy
Storage is where homemade turtles either shine or get ruined. These candies are best kept cool and dry.
- Short term: Store in an airtight container in the refrigerator for up to one week. Layer parchment between layers to prevent sticking.
- Long term: Freeze on a single layer on a tray until solid, then transfer to a freezer-safe container for up to three months. Thaw in the refrigerator to avoid condensation on the chocolate.
- Avoid temperature swings: Moving between hot and cold causes chocolate bloom (white streaks). If you’re gifting, keep them chilled until just before handing off.
- Packaging ideas for gifts: Tins lined with parchment are classic. Glass jars look beautiful with a handwritten label. For small batches, decorative boxes or cellophane bags tied with twine are charming. Add a small card listing nuts and allergens — helpful and thoughtful.
- Make-ahead tips: Assemble and chill the turtles 2–3 days ahead for parties. Keep refrigerated and present on a chilled platter to avoid melting.
FAQ
How do I melt the chocolate without burning or seizing it?
Melt chocolate in short bursts in the microwave (15–20 seconds), stirring between each burst until smooth. Alternatively, use a double boiler over gently simmering water. Stir constantly and add a teaspoon of shortening or coconut oil if you want a glossier, smoother finish.
Can I substitute the pecans or make these nut-free?
Yes — swap pecans for cashews, almonds, or hazelnuts. For nut-free versions try roasted sunflower seeds or small pretzel clusters for crunch. Keep in mind flavor and texture will change slightly.
How should I store homemade turtle candies and how long will they keep?
Store in an airtight container in the refrigerator for up to one week. For longer storage, freeze them in a single layer on a tray, then transfer to a freezer-safe container for up to 3 months. Thaw in the fridge or at room temperature before serving.
Can I make these ahead for gifts and how should I package them?
Yes — make them a few days in advance and keep chilled until packaging. Layer candies between sheets of parchment in tins, jars, or decorative boxes. Keep packages cool and include an ingredient note if gifting to someone with allergies.
Are there healthier or lower-sugar variations of turtle candy?
Try using 70% (or higher) dark chocolate, a reduced amount of caramel, or a sugar-free caramel alternative. You can also use date paste or a small amount of natural sweetener, but texture and set may vary, so test a small batch first.
Conclusion and Serving Suggestions
Homemade turtles candy is one of those projects that feels fancy but is utterly doable in a small kitchen. You’ll get glossy chocolate, soft caramel, and toasted nut crunch in each bite. Expect a little hands-on time for toasting, chilling, and drizzling — but not complicated technique. I usually make these around holidays and package them in small jars to hand out to neighbors. They’re also a lovely finish to a dinner party: arrange a few on a small plate with expresso or black tea and watch guests’ faces light up.
If you try this recipe, start with the basic version first and then experiment: swap nuts, try darker chocolate, or add a pinch of sea salt. Share what worked and what you tweaked — I’d love to hear about your kitchen discoveries. These turtles have saved many a last-minute gift and elevated a simple coffee break into a tiny celebration.
Homemade Turtles Candy
Ingredients
Method
- If your pecans aren’t toasted, spread them on a baking sheet and bake in a preheated 350°F oven for 7-10 minutes, stirring halfway through. This enhances their flavor. Let them cool completely before using.
- Optional: Roughly chop the toasted pecans into smaller pieces for more manageable clusters.
- In a mixing bowl, stir the toasted, cooled pecans with the caramel topping until the nuts are evenly coated.
- Drop heaping tablespoons of the caramel-coated pecans onto a parchment-lined baking sheet, spacing them out to avoid sticking. Place in the refrigerator to chill for 1-2 hours, or until solid.
- In a heatproof or glass bowl, combine the chocolate chips and optional shortening. Microwave in 15-20 second intervals, stirring between each, until the chocolate is fully melted and smooth. Be careful not to overheat.
- Using a spoon, drizzle or pour the melted chocolate over each pecan cluster, ensuring they are well-covered. Allow the chocolate to set at room temperature or refrigerate for quicker results.
- Once the chocolate is set, your Turtle Candies are ready to serve. Store any leftovers in an airtight container in the refrigerator for up to a week.