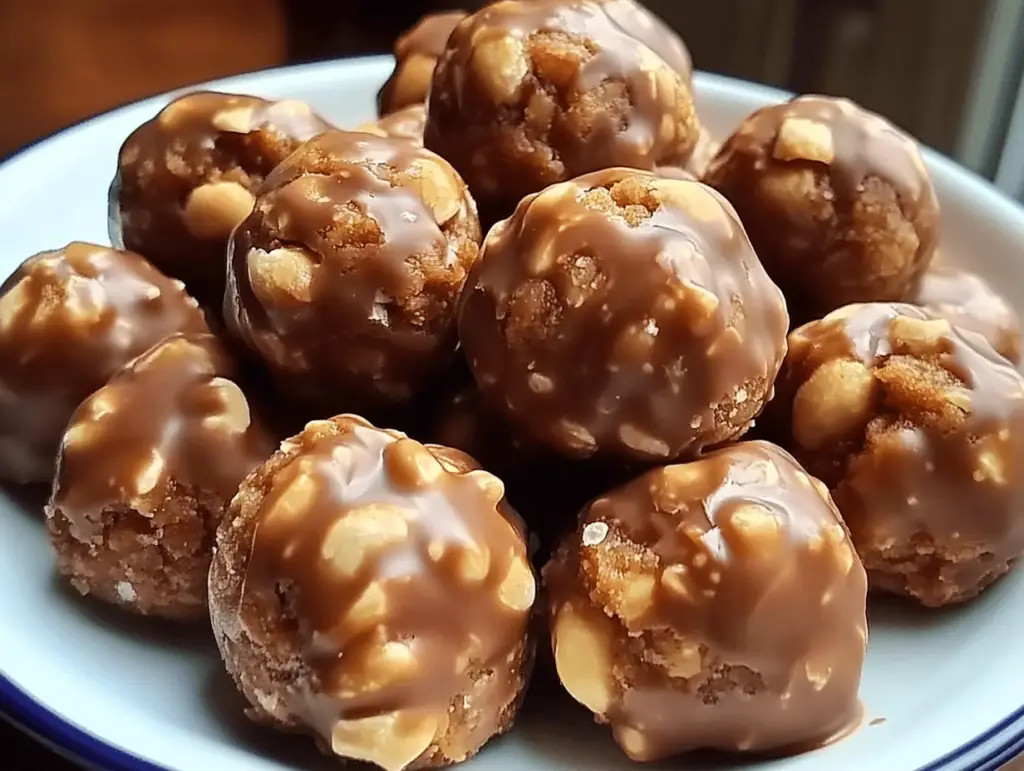
If you’re looking for an indulgent dessert that combines creamy flavors with a satisfying crunch, look no further than Butterfinger Bliss Balls. These delightful bites bring together the rich taste of peanut butter, the sweetness of Butterfinger candy bars, and the irresistible allure of chocolate—all in one delicious ball! Perfect for parties, gatherings, or simply as a treat for yourself, these bliss balls are quick to prepare and sure to please anyone with a sweet tooth. In this article, we’ll delve into the origins of this delightful recipe, walk you through each ingredient, provide step-by-step instructions, and offer creative variations to make these treats your own. By the end, you’ll be fully equipped to whip up these delicious Butterfinger Bliss Balls in your kitchen!
Understanding the Recipe
Butterfinger Bliss Balls not only provide an explosion of flavor but also carry a certain nostalgia thanks to their ingredients. The creamy peanut butter and crunchy graham crackers evoke childhood memories for many, while the addition of Butterfinger candy bars adds a fun twist that elevates these treats to another level. Peanut butter desserts have a long-standing popularity in American culture, and when paired with the crispy texture of Butterfinger bars, they create a perfect harmony of flavors and textures. These bliss balls are also incredibly comforting—allowing you to reminisce about time spent with family and friends, making them ideal for gatherings, celebrations, or simply a cozy night in. In this article, you’ll not only learn how to make these delicious treats, but also discover their background and personal touches you can add to them!
Ingredient Breakdown
Let’s dive into the key ingredients that make up the Butterfinger Bliss Balls:
- 4 tablespoons softened butter: This ingredient helps to bind the mixture together while adding a creamy texture.
- 1 teaspoon vanilla extract: Provides a warm, sweet aroma that enhances the overall flavor of the dish.
- 8 ounces chocolate bark or chips: This chocolate coating gives the bliss balls that delightful outer layer and adds richness to each bite.
- ½ cup crushed Butterfinger bars: These bars contribute a uniquely crunchy texture and a sweet, caramel-like flavor, making them the star of the dish.
- 1 cup powdered sugar: Acts as a sweetener, balancing out the flavors while adding a smooth consistency.
- 1 cup peanut butter: The creamy base of our bliss ball, providing both flavor and richness; avoid all-natural varieties as they can affect the texture.
- ¾ cup graham cracker crumbs: Adds both flavor and a bit of crunch, reminiscent of a classic s’mores dessert.
- Optional garnishes: Additional crushed Butterfinger, festive sprinkles, or coarse sea salt can enhance presentation and flavor.
Choosing high-quality ingredients is essential in this recipe. For instance, using premium chocolate can elevate the taste of your bliss balls significantly. If you have dietary restrictions, consider substituting the peanut butter with almond butter or sunflower seed butter for a nut-free option. Moreover, for those who prefer to keep things gluten-free, look for gluten-free graham crackers. The versatility of these ingredients allows you to personalize the bliss balls while still adhering to your dietary preferences.
Step-by-Step Instructions
Ready to make these mouthwatering Butterfinger Bliss Balls? Follow these detailed steps for optimal success:
- Prepare the Dough: In a mixing bowl, combine 1 cup of peanut butter and 4 tablespoons of softened butter. Use an electric mixer or a wooden spoon to mix until creamy and well-blended.
- Add Vanilla: Include 1 teaspoon of vanilla extract to the peanut butter mixture, blending thoroughly to ensure even distribution of flavor.
- Sweeten Up: Gradually incorporate 1 cup of powdered sugar into the peanut butter mixture at low speed. Scrape the sides of the bowl to mix evenly until fully incorporated.
- Add Crunch: Gently fold in ¾ cup of graham cracker crumbs and ½ cup of crushed Butterfinger bars. Stir until the mixture is consistency is thick and lumps of candy bar are evenly visible.
- Shape Your Balls: Using a cookie scoop or your hands, take about 1 to 1½ tablespoons of the dough and roll it into balls. Place each ball on a parchment-lined cookie sheet for easy cleanup.
- Chill Time: Freeze the cookie sheet with the butterfinger balls for about 30 minutes, or until they are firm to the touch.
- Melt the Chocolate: In a microwave-safe bowl, melt 8 ounces of chocolate bark or chips in 30-second intervals at 50% power, stirring gently after each interval until smooth.
- Coat and Decorate: Dip each chilled bliss ball into the melted chocolate, allowing excess chocolate to drip off before placing it back on the parchment. You may leave some peanut butter visible if desired.
- Finishing Touches: While the chocolate is still wet, sprinkle with additional crushed Butterfinger, festive sprinkles, or coarse sea salt for that extra flair.
- Enjoy: Let the chocolate set for 10-15 minutes before serving. These delicious balls are ready to be enjoyed by all!
Variations and Customizations
One of the best aspects of Butterfinger Bliss Balls is their flexibility in variations. If you’re feeling adventurous, consider trying these customizations:
- Nut-Free Version: Replace peanut butter with sunflower seed butter to accommodate nut allergies while still retaining a creamy consistency.
- Vegan Option: Use dairy-free chocolate chips and switch out the butter for a plant-based alternative to achieve a vegan-friendly version.
- Enhanced Nutrition: Incorporate flaxseeds or chia seeds into the mixture for added nutritional benefits without sacrificing the dessert’s integrity.
- Flavor Twists: Experiment with different flavored extracts, such as almond or coconut, for a fun twist on the classic flavor.
Feel free to mix and match these ideas to create your perfect Butterfinger Bliss Balls. The freedom to modify the recipe means you can cater to any diet or preference, making these treats enjoyable for everyone.
Serving Suggestions
Butterfinger Bliss Balls are not just delicious; they also look incredibly inviting! Presented on a decorative platter or individual mini cupcake liners, these sweet bites will catch the eye of any guest. Here are some perfect ways to enjoy and serve them:
- Accompaniments: Pair these bliss balls with a glass of cold milk or a creamy vanilla ice cream for an indulgent dessert combo.
- Garnishes: Use fresh herbs like mint to add a splash of color or serve with an array of colorful sprinkles to make them festive.
- Occasions: Perfect for birthday parties, holiday celebrations, potlucks, or casual get-togethers where you want something sweet and fun.
Every occasion can be a little sweeter with these delightful treats!
Tips for Success
To ensure your Butterfinger Bliss Balls turn out perfectly, keep these tips in mind:
- Stir Carefully: When folding in the graham cracker crumbs and crushed Butterfinger, be gentle to maintain the airy texture of the dough.
- Chill Thoroughly: Don’t skip the chilling process; it’s vital for the balls to hold their shape when dipping them in chocolate.
- Storage: Leftover bliss balls can be stored in an airtight container in the refrigerator for up to a week or frozen for up to three months. To enjoy frozen bliss balls, simply allow them to come to room temperature before consuming.
FAQs
Can I use a different type of nut butter?
Yes! You can certainly substitute peanut butter with almond butter, cashew butter, or sunflower seed butter, depending on your taste preference and dietary restrictions.
Can I use fresh Butterfinger bars instead of crushed ones?
Absolutely! Just chop the Butterfinger bars into small pieces instead of crushing them. They’ll add a delightful crunch and chocolatey bursts in every bite!
How should I store the Butterfinger Bliss Balls?
Store them in an airtight container in the refrigerator for up to a week. They can also be frozen for up to three months. Just remember to thaw them in the refrigerator before serving.
Can I make these in advance?
Yes, you can prepare the dough a day ahead and chill it. Just roll into balls and coat them in chocolate on the day of serving for the best results.
Conclusion
Butterfinger Bliss Balls are an irresistible treat that combines rich flavors, delightful textures, and easy preparation. With their nostalgic connections and the ability to customize them for various dietary needs, these bliss balls are perfect for any gathering or just as a special snack. We hope you feel inspired to try making these scrumptious bites for your next event or a cozy night at home. Don’t forget to share your experience and any creative variations you might come up with; we’d love to hear how they turned out! Happy cooking!
Irresistible Butterfinger Bliss Balls
Ingredients
Method
- Prepare the Dough: In a mixing bowl, combine 1 cup of peanut butter and 4 tablespoons of softened butter. Use an electric mixer or a wooden spoon to mix until creamy and well-blended.
- Add Vanilla: Include 1 teaspoon of vanilla extract to the peanut butter mixture, blending thoroughly to ensure even distribution of flavor.
- Sweeten Up: Gradually incorporate 1 cup of powdered sugar into the peanut butter mixture at low speed. Scrape the sides of the bowl to mix evenly until fully incorporated.
- Add Crunch: Gently fold in ¾ cup of graham cracker crumbs and ½ cup of crushed Butterfinger bars. Stir until the mixture is consistency is thick and lumps of candy bar are evenly visible.
- Shape Your Balls: Using a cookie scoop or your hands, take about 1 to 1½ tablespoons of the dough and roll it into balls. Place each ball on a parchment-lined cookie sheet for easy cleanup.
- Chill Time: Freeze the cookie sheet with the butterfinger balls for about 30 minutes, or until they are firm to the touch.
- Melt the Chocolate: In a microwave-safe bowl, melt 8 ounces of chocolate bark or chips in 30-second intervals at 50% power, stirring gently after each interval until smooth.
- Coat and Decorate: Dip each chilled bliss ball into the melted chocolate, allowing excess chocolate to drip off before placing it back on the parchment. You may leave some peanut butter visible if desired.
- Finishing Touches: While the chocolate is still wet, sprinkle with additional crushed Butterfinger, festive sprinkles, or coarse sea salt for that extra flair.
- Enjoy: Let the chocolate set for 10-15 minutes before serving. These delicious balls are ready to be enjoyed by all!