
I’ve been making this picnic cake in my kitchen for years because it solves a particular problem: you want something home-baked that travels well, doesn’t need frosting, and still feels special. I usually pull it together when plans shift at the last minute — a quick simmer of dates, a simple batter, and a scatter of brown sugar and chocolate on top. The result is a rustic, golden-brown slab cake that holds up to a picnic blanket and a breeze.
What I love about this cake is the balance of textures. The interior stays moist from the dates and eggs, while the top crisps into a caramelized crust. No frosting means no sticky fingers, and that makes it perfectly portable — I can slice it into squares and stash it in a container without worrying about squashed icing or melting decorations.
In my kitchen I learned a few small tricks that keep the cake reliably tender: cool the hot date liquid before it meets the eggs, don’t overmix once you add the flour, and watch the top in the last five minutes so the brown sugar caramelizes without burning. Read on for everything you need, exactly how I make it, and quick swaps to suit dietary needs or flavor preferences.
Pro-Tips, Troubleshooting, and Variations are presented as bulleted lists below for fast scanning — they are intentionally concise so you can get this cake on the table (or in the picnic basket) quickly.
Everything You Need for Picnic Cake
This cake is forgiving and needs very little equipment — perfect when you want to keep things simple. I prefer a rectangular sheet-style pan because it gives the cake the right surface area for that caramelized top and a tender, even bake.
- Dates – Provide natural sweetness and moisture; fresh (soft) dates will incorporate more smoothly, while drier dates can be rehydrated in hot liquid.
- Boiling water – Softens the dates so they blend into the batter and contribute to a tender crumb.
- Baking soda – Reacts with the hot date liquid to help lift the cake and neutralize acidity.
- Shortening – Keeps the crumb tender and helps the cake stay moist at room temperature; you can swap with butter for flavor or a plant-based shortening for vegan needs.
- Sugar (granulated and brown) – Granulated sugar for structure and lift; brown sugar sprinkled on top for a crunchy, caramelized crust.
- Vanilla and cinnamon – Warm spice and aroma that pair beautifully with dates.
- Eggs – Provide structure and richness; they help the cake hold together when sliced into portable squares.
- All-purpose flour – The backbone of the cake; for gluten-free options use a reliable gluten-free blend formulated to replace all-purpose flour.
- Chocolate chips – Add pockets of gooey richness on top; milk, dark, or dairy-free chips all work.
- Equipment – A mixing bowl, a spoon or mixer for creaming, and a greased sheet-style baking pan (a common 9×13-style pan is ideal for texture and baking time).
The Secret to a Moist Date Cake Without Frosting
The cake’s moisture comes from a few reliable sources and one technique I swear by. First, the hot water softens the dates so they release sugars and body into the batter. Second, the combination of eggs and shortening creates a tender, stable crumb that keeps the cake soft at room temperature. Finally, patience: let the date mixture cool before adding it to the eggs and creamed fat so the eggs don’t curdle and you don’t lose structure.
Think warm, aromatic steam of cinnamon and vanilla when you stir the batter — that’s the signal the cake will smell irresistible at the picnic blanket. If you want alternate flavor directions, try swapping cinnamon for cardamom for a floral note, or add a splash of orange zest for brightness.
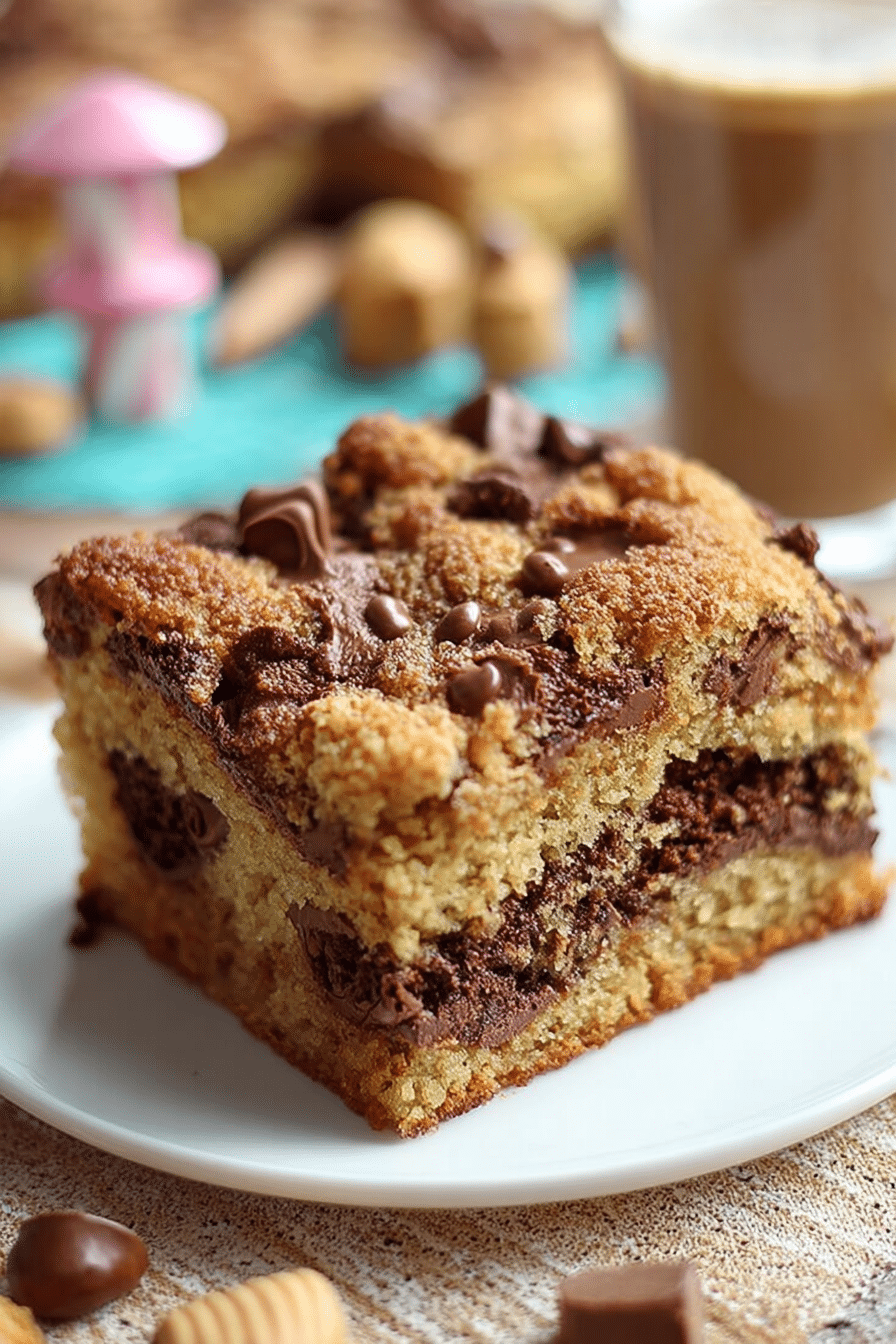
How the Brown-Sugar Topping Creates a Crispy, Portable Crust
The brown-sugar topping is the reason this cake feels special without frosting. During baking the brown sugar on top melts and caramelizes, creating a thin, crisp crust that contrasts with the moist cake beneath. Sprinkle chocolate chips just before baking — they soften into pockets of goo but won’t weigh the topping down.
The texture is specific: a golden, slightly crackly top that gives way to soft, date-sweet cake beneath. If you want more texture, scatter chopped toasted nuts over the brown sugar so each bite has crisp, nutty notes.
How to Make Picnic Cake (Step-by-Step)
- Combine the chopped dates with boiling water and baking soda; stir and set aside to cool so the dates soften and the mixture mellows.
- Cream the shortening and granulated sugar until light; add eggs and vanilla, mixing until combined.
- Fold the cooled date mixture into the creamed mixture, then add cinnamon, flour, and salt. Mix gently until just combined — avoid overmixing to keep the cake tender.
- Pour the batter into a greased rectangular baking pan (a 9×13-style pan gives the right thickness). Smooth the top evenly.
- Sprinkle brown sugar evenly over the batter, then scatter chocolate chips (and optional nuts) across the top.
- Bake until the top is golden and a toothpick in the center comes out clean or with a few moist crumbs; watch the last 5 minutes so the brown sugar caramelizes without burning.
- Cool in the pan for a short while, then transfer to a rack to finish cooling before slicing into squares for transport.
Troubleshooting (scannable bullets):
- If the cake sinks in the center, I check whether the date mixture was still hot when added — always let it cool to avoid deflating the batter.
- If the top browns too quickly, tent with foil for the final minutes and test doneness with a toothpick.
- If it feels dry, consider switching to a higher-fat shortening or using a portion of butter; also avoid overbaking by checking a few minutes before the recipe’s upper time limit.
Pro Tip for picnic cake: Best Mix-Ins and Quick Swaps
These are written as a bulleted list for quick reference — I use these swaps in my kitchen regularly.
- Chopped nuts (walnuts or pecans) — Add crunch and a complementary flavor to the date-sweet interior.
- Dried fruit (raisins or chopped dried apricots) — Mix into the batter for extra chew and sweetness.
- Butter instead of shortening — Use for richer flavor; keep in mind butter can make the cake a bit denser.
- Vegan swap — Use plant-based shortening and an egg replacer; ensure the chocolate chips are dairy-free.
- Gluten-free option — Use a one-to-one gluten-free flour blend and add a bit of xanthan gum if your blend doesn’t include it for structure.
I find that small changes make a big difference — swapping one element at a time helps you understand how each ingredient affects texture and flavor.
Easy Variations: Nuts, Dried Fruit, and Gluten-Free Options
Here are simple variation ideas to suit different tastes and diets, presented as a bulleted list for scannability.
- Nut-forward: Fold toasted walnuts into the batter and sprinkle chopped pecans on top for a nutty crust.
- Fruit-forward: Add chopped dried apricots and a hint of orange zest to brighten the profile.
- Chocolate-forward: Use dark chocolate chips and a pinch of espresso powder in the batter to deepen the chocolate flavor.
- Gluten-free: Replace all-purpose flour with a tested gluten-free blend and add a small binder if needed; bake times are similar but check for doneness a few minutes earlier.
How to Store, Slice, and Transport Picnic Cake
To keep the cake fresh and transportable, cool it fully before covering so condensation doesn’t make the crust soggy. I slice mine into uniform squares so they stack neatly in a container and are easy for guests to grab without utensils.
- Storage: Keep at room temperature in an airtight container for a couple of days, or refrigerate for longer storage.
- Slicing: Use a sharp knife and wipe it clean between cuts to get tidy squares that won’t crumble.
- Transport: Use a flat, lidded container and line it with parchment; place a sheet of parchment between layers if stacking to protect the caramelized top.
Serving Ideas and Simple Presentation for Outdoor Gatherings
Presentation should be effortless but attractive: arrange squares on a wooden board or a simple platter, and add fresh fruit or a sprig of mint for color. For a casual picnic, wrap individual squares in parchment or place them in cupcake liners for easy serving.
- Garnish with fresh berries or orange slices to add brightness and a pop of color.
- Serve alongside whipped cream or a scoop of ice cream if you have a cooler — otherwise the cake is delightful on its own.
- Offer small plates and napkins and consider a basket or wooden board for a rustic, picnic-friendly display.
The History and Significance of Picnic Cakes
Picnic cakes historically filled a practical niche: they were simple, travel-friendly desserts that could be baked in pans, sliced, and shared easily at community gatherings. Over time they evolved with regional ingredients — dried fruits, nuts, and local spices — but the core idea stayed the same: a cake that keeps well and feeds a crowd. For many families these cakes carry a sense of nostalgia, a reminder of potlucks and outdoor celebrations where the dessert was meant to be shared without fuss.
Frequently Asked Questions
What is a picnic cake? A picnic cake is a delicious, lightly spiced cake made with ingredients like dates, cinnamon, and chocolate chips, topped with brown sugar for a delightful crust. It’s perfect for outdoor gatherings!
Can I use different types of nuts in this recipe? Absolutely! You can experiment with a variety of nuts like walnuts or pecans to personalize your picnic cake to your taste.
How do I store leftover picnic cake? To keep your picnic cake fresh, store it in an airtight container at room temperature for up to 3 days, or refrigerate it for longer freshness.
Is it possible to make this recipe gluten-free? Yes! You can substitute the all-purpose flour with a gluten-free flour blend to make a gluten-free version of the picnic cake.
What are some serving ideas for picnic cake? For a fun outdoor experience, serve your picnic cake with fresh fruit, whipped cream, or ice cream. You can also slice it into portable squares for easy sharing!
Picnic Cake
Ingredients
Method
- Combine dates, boiling water and baking soda. Stir well and set aside to cool.
- In a mixing bowl, cream shortening and sugar. Add eggs and vanilla. Mix well. Stir in cooled date mixture. Add cinnamon, flour and salt and mix until well combined.
- Pour into a greased 9x13 pan.
- Sprinkle brown sugar and chocolate chips evenly over top. Bake at 350 degrees for 35-40 minutes.