Protein balls are the kind of snack I reach for when I need something that tastes like a treat but actually supports my day — morning coffee runs, a late-afternoon slump, or a quick bite after a workout. These no-bake protein balls are the version I return to again and again: simple, forgiving, and endlessly tweakable. They’ve become a pantry staple in my house because they’re portable, don’t require an oven, and you can pull a batch together in about ten minutes.
I first made these on a weekday morning when the kids wanted something to pack with their lunches and I didn’t want to waste time. The countertop smelled like warm oats and peanut butter within minutes, and the texture came together into a slightly sticky, almost cookie-dough-like ball that held up in the fridge. If you’ve never made protein balls before, expect a hands-on, tactile little kitchen moment — pressing, rolling, and tasting as you go. They’re forgiving: small mistakes are easy to fix and the results are always snackable.
Ingredients You’ll Need
- Quick-cook oats – give the mixture body and a tender chew; use certified gluten-free if you need to avoid gluten.
- Protein powder – the base for protein boost; vanilla works beautifully for a sweet, balanced flavor.
- Nut butter – peanut or almond butter adds richness, healthy fats, and helps bind the mixture.
- Liquid sweetener – maple syrup or honey for stickiness and to round out the flavor.
- Chia seeds – tiny texture-booster that adds fiber and helps hold things together.
- Cinnamon – warms the flavor profile and pairs wonderfully with vanilla and nut butter.
- Pinch of salt – essential to brighten flavors; a little goes a long way.
- Mini chocolate chips – optional but highly recommended for chocolatey pops in every bite.
- Water – used sparingly to adjust the dough if it’s too dry; add a teaspoon at a time.
Step-by-Step Instructions
- Line a large baking pan with parchment paper. This is one of those small prep steps that saves you from sticky cleanup later — trust me, you don’t want to be scraping dough off a tray at the end.
- In a large bowl combine the oats, protein powder, peanut butter, maple syrup, chia seeds, vanilla extract, cinnamon, and a pinch of salt and mix well. I usually spoon everything into the bowl and then press the nut butter into the mix with the back of the spoon before stirring. That helps distribute it without overworking your arms.
- Add 1 tablespoon at a time of water until the consistency is like a dough and all the oats are coated. The dough should be tacky but not soupy — if it’s too wet, add a little more oats; if it’s too dry and crumbly, add a touch more nut butter or another teaspoon of water. I often find I need the full tablespoon, sometimes a touch more depending on the protein powder brand.
- Mix in the chocolate chips. I prefer adding the chips last so they stay whole and give you those occasional little chocolate bursts. If your kitchen is warm and the chocolate gets soft, pop the bowl in the fridge for 10 minutes before rolling.
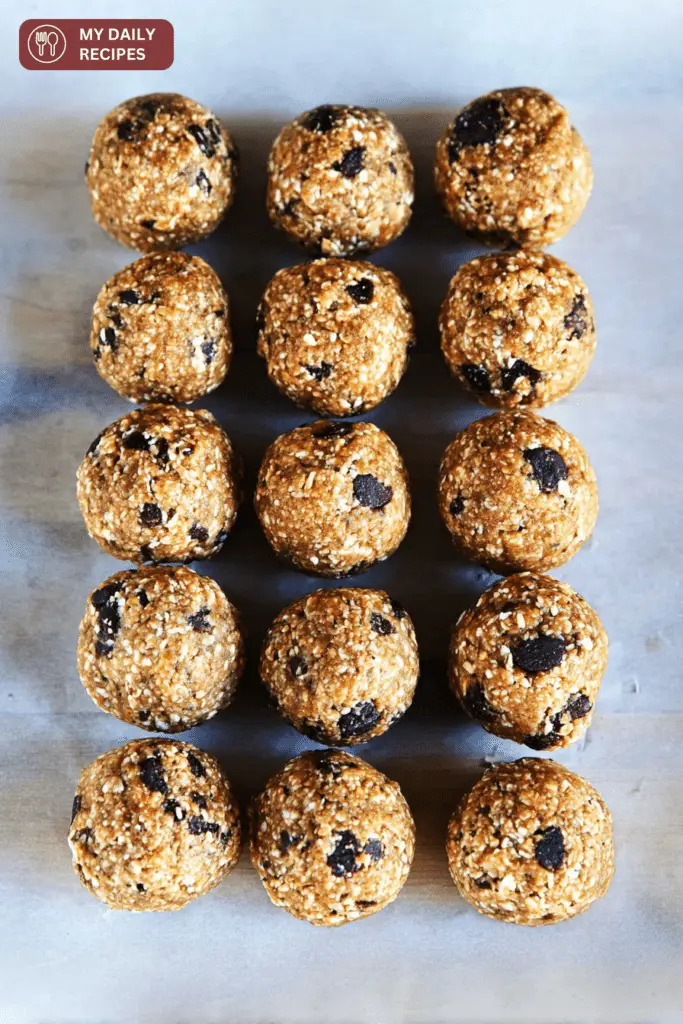
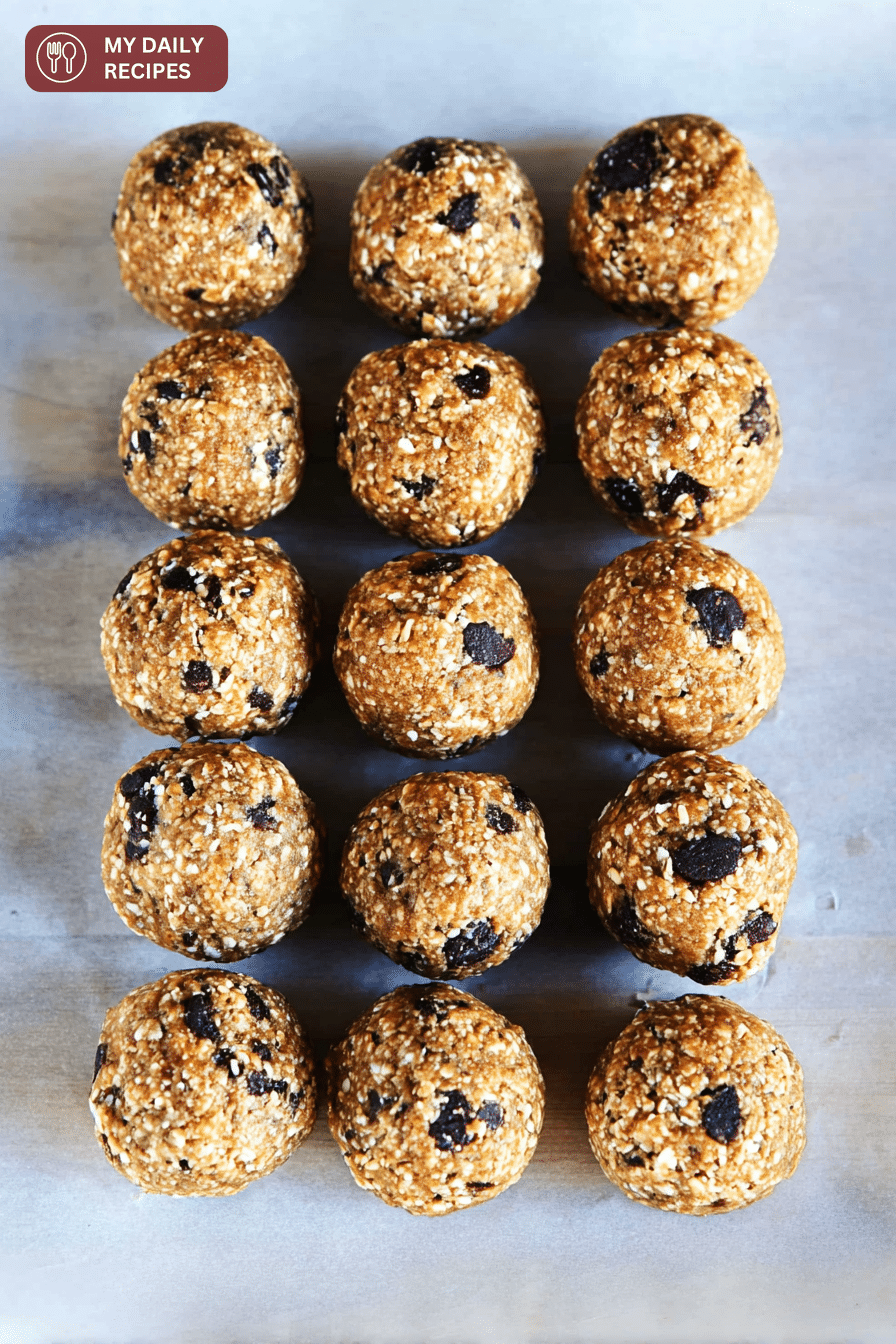
- Using a tablespoon cookie scoop, scoop out the dough onto the cookie sheet. A scoop keeps the balls uniform — I use a small cookie scoop and then roll between my palms.
- Using your hands, roll each ball of the dough into smooth balls and set each back on the parchment paper. If the mixture sticks to your hands, dampen them slightly or rub a tiny amount of oil on your palms. The balls should be lightly sticky but hold their shape.
- Store in the refrigerator in an airtight container for up to 1 week. If you want to eat them sooner, 10–20 minutes in the fridge firms them up nicely and makes them less sticky to handle.
Efficiency tip: I like to line two cookie sheets at once and use one scoop for the dough and one spoon to push the dough into the scoop. It saves a few trips to the bowl and gets the kids involved — rolling is a great job for little helpers.
Nutritional Benefits
These protein balls are compact nutrition: protein from the powder and nut butter, healthy fats from the nut butter, fiber from the oats and chia, and a little natural sugar from the maple syrup. A single ball clocks in at about 104 kcal with roughly 5 g of protein, 5 g fat, and 11 g carbohydrates depending on the exact brands you use.
Here’s what each main ingredient contributes:
- Oats – complex carbs and fiber for steady energy and gut-friendly beta-glucan.
- Protein powder – concentrated protein for muscle repair and satiety; choosing a higher-quality powder often means less sugar and more usable protein per serving.
- Nut butter – monounsaturated fats that help you feel full and provide a creamy mouthfeel.
- Chia seeds – add omega-3s, fiber, and a little gel-like binding power after hydration.
Compared to a typical granola bar or sweet pastry, these protein balls provide a better balance of protein and fiber with less added processed sugar. They’re ideal as a post-workout bite (pair one or two with a banana) or as a mid-morning snack when you need sustained fuel. If you’re relying on them as part of a recovery routine, aim for 2–3 balls alongside a hydrating beverage for better glycogen replenishment and muscle repair.
Storage Tips and Shelf Life
I always keep a jar of these in the fridge and a batch frozen for busy weeks. Here’s what to expect and how I store them so they stay fresh:
- Refrigerator: Store in an airtight container for up to 1 week. They firm up and are easy to grab on the go.
- Freezer: Freeze for up to 3 months. Layer parchment between rows so they don’t stick together and thaw in the fridge or at room temperature for 20–30 minutes when ready to eat.
- Preventing sticking: Dust balls with a bit of extra oats or cocoa powder, or keep them separated with parchment squares.
- Travel tips: If you’re packing them for a lunchbox, include an ice pack for longer days to keep chocolate from softening and the texture refreshed.
One realistic note: they will firm up in the fridge and soften a little at room temperature. That’s normal — texture is meant to be soft and spoonable, not crunchy.
Customization Options for Flavors
One of the reasons I love these is how easy they are to change. You can take the base and riff on it depending on the season, what’s in the pantry, or what you’re pairing them with.
- Chocolate peanut butter: Add 1–2 tablespoons unsweetened cocoa powder to the dry mix for a richer chocolate flavor. Increase maple syrup slightly if it tastes dry.
- Lemon poppy seed: Swap vanilla protein for unflavored or a neutral protein, add a teaspoon of lemon zest and a tablespoon of poppy seeds — bright and refreshing.
- Pumpkin spice: Stir in a couple of tablespoons of pumpkin puree, increase oats a touch to balance moisture, and add pumpkin pie spice.
- Tropical: Fold in small bits of dried mango or pineapple and swap chocolate chips for shredded coconut or white chocolate chips.
- Superfood boost: Add a teaspoon of maca powder, a tablespoon of hemp hearts, or a teaspoon of matcha for subtle added nutrients and flavor complexity.
When you add wet ingredients like pumpkin puree, reduce the water or maple syrup slightly and increase the oats or protein powder as needed to maintain that dough-like consistency. I learned this the hard way after my third attempt when a particularly generous scoop of pumpkin turned the dough into more of a sticky paste — a quick stir in more oats fixed it.
Common Dietary Adaptations
I make these with friends who have different dietary needs all the time, so here are my tested swaps and notes on how they affect texture and flavor:
- Vegan: Use maple syrup instead of honey, a plant-based protein powder, and dairy-free chocolate chips. The texture is the same if your nut butter is creamy — thicker seed butters can change the mouthfeel slightly.
- Gluten-free: Use certified gluten-free quick-cook oats. Standard oats are often fine for most people but certified gluten-free avoids cross-contamination concerns.
- Nut-free: Swap peanut butter for sunflower seed butter or tahini. Because seed butters can be oilier, you might need an extra tablespoon of oats or a teaspoon less liquid sweetener to get the right dough hold.
- Lower sugar: Reduce the maple syrup slightly and add a splash more nut butter to maintain binding; you’ll sacrifice some sweetness but keep the structure.
- Higher protein: Add more protein powder to the dry mix — if the dough gets dry, counter with a little more nut butter or a teaspoon of water at a time.
Always taste a tiny pinch of the dough (most of these ingredients are safe to taste raw) so you can adjust sweetness and salt. If you reduce sweetener dramatically, salt becomes more important to lift the flavors.
Frequently Asked Questions
- Can I make these protein balls vegan?
Yes — use maple syrup (instead of honey), a plant-based protein powder, dairy-free chocolate chips, and a nut or seed butter (like almond or sunflower) to keep them vegan. - How long do the protein balls last and can I freeze them?
Store in an airtight container in the refrigerator for up to 1 week. You can freeze them for up to 3 months; thaw in the fridge or at room temperature before eating. Layer with parchment to stop them sticking together. - What can I use instead of peanut butter (nut-free options)?
Swap peanut butter for almond or cashew butter. For nut-free, use sunflower seed butter or tahini. You may need to adjust texture with an extra tablespoon of oats or a splash of water if the mixture is too wet or dry. - How can I increase the protein or adjust the sweetness?
To boost protein, add a little more protein powder or use a higher-protein powder; if the mix gets dry, add a bit more nut butter or 1 tablespoon of water at a time. To change sweetness, simply reduce or increase the maple syrup (or honey) to taste. - Are these suitable as a post-workout snack or a meal replacement?
They’re an excellent post-workout snack — each ball is about 104 kcal and ~5 g protein. For a full meal replacement, eat multiple balls and pair with fruit or yogurt for added calories, fiber, and nutrients.
Conclusion and Serving Suggestions
If you love recipes that are quick to make, forgiving to tweak, and reliably satisfying, these protein balls will be a new favorite. I bring them to swim practice, toss a few into a salad lunchbox for a snack, or keep them in my gym bag in a little container with an ice pack. They feel homemade, they store well, and they behave — meaning you don’t have to babysit them in the oven.
Serving ideas I use all the time:
- Two balls plus a banana and a small yogurt for a solid post-workout snack.
- Sliced over a bowl of yogurt with fresh berries and a drizzle of honey for breakfast parfait vibes.
- A single ball with a cup of coffee for a mid-morning boost that keeps late-morning cravings at bay.
- Tucked into kids’ lunchboxes alongside carrot sticks and cheese cubes for a balanced treat.
Now it’s your turn: try the base recipe, then make one small change — swap the chocolate chips for dried cranberries, or add a zest of lemon — and see how quickly you fall into your own favorite variation. If a batch turns out too sticky or too dry, remember the easy fixes: more oats to firm up, more nut butter or a few drops of water to soften. Real cooking is trial and taste, and these protein balls are one of those recipes that reward a little tinkering.
Happy rolling. When you try a variation that surprises you, I’d love to hear what worked — it’s how I build new favorites in my kitchen.
Protein Balls Recipe
Ingredients
Method
- Line a large baking pan with parchment paper.
- In a large bowl combine the oats, protein powder, peanut butter, maple syrup, chia seeds, cinnamon, and a pinch of salt and mix well. Add 1 tablespoon at a time of water until the consistency is like a dough and all the oats are coated. Mix in the chocolate chips.
- Using a tablespoon cookie scoop, scoop out the dough onto the cookie sheet. Using your hands, roll each ball of the dough into smooth balls and set each back on the parchment paper. Store in the refrigerator in an airtight container for up to 1 week.