There are few treats that hit the nostalgia button the way a s’more does — that warm, toasty marshmallow sandwiched with melting chocolate between two graham crackers. S’mores bars take all that nostalgia and simplify it: no campfire required, fewer crumbs to chase around, and you get perfect squares you can hand out at a potluck. I’ve been making a version of these for years and, after testing a handful of tweaks, this is the version I reach for when I want everything s’more-related but easier to serve.
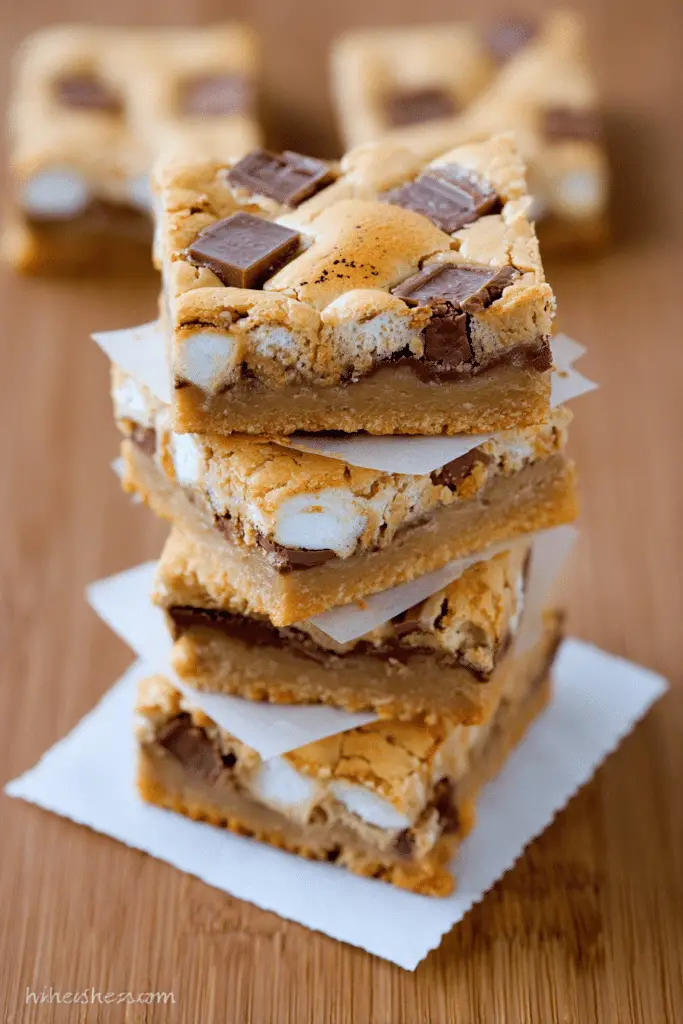
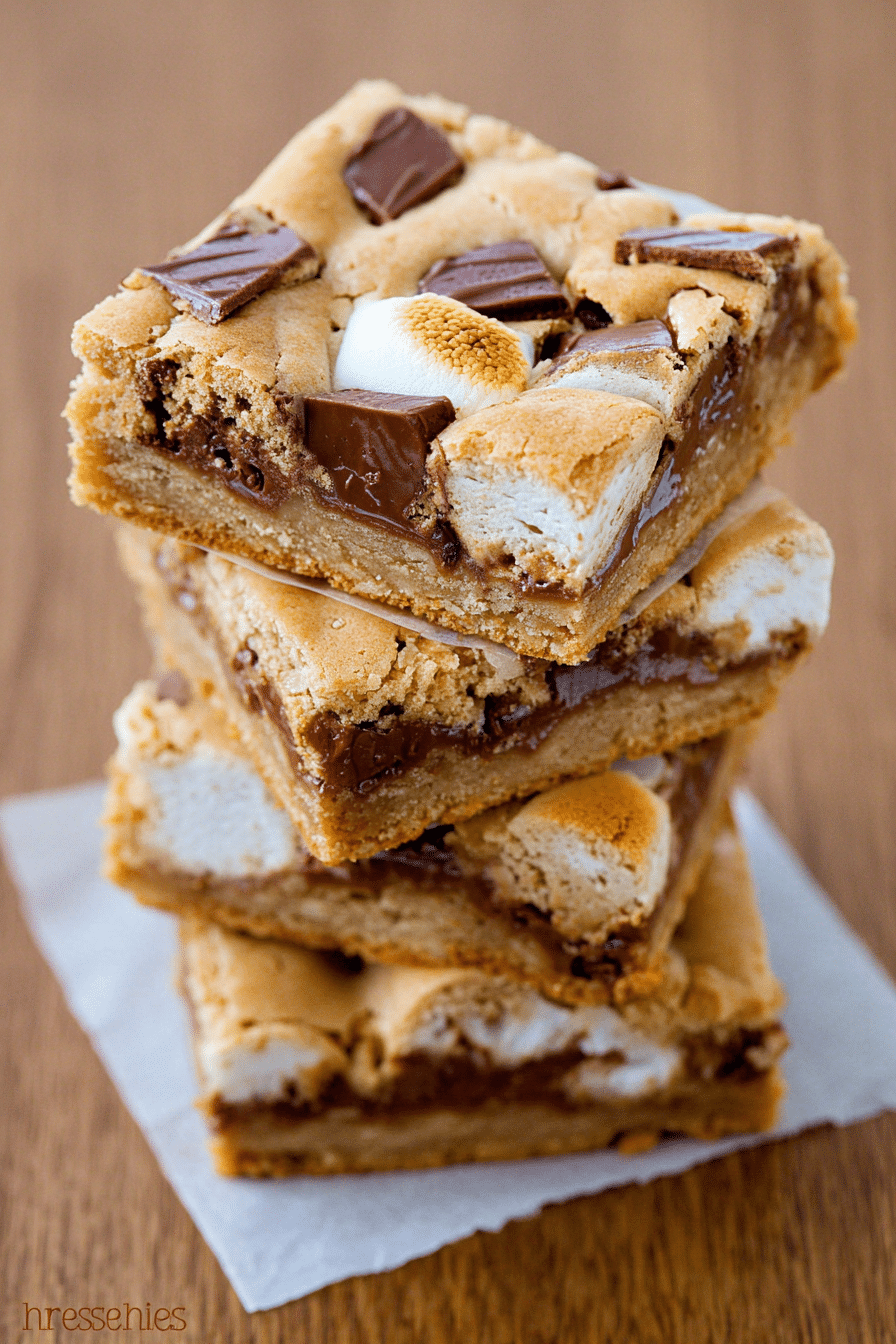
I like to think of these bars as three layers in happy harmony: a crisp graham cracker crust, a thick and chewy cookie-like middle studded with chocolate chips and mini marshmallows, and a top layer of chocolate sections and toasted marshmallows that get delightfully browned in the oven. They’re sweet and soft, with edges that pull away into slightly crisper ridges — the texture contrast is everything. Below I’ll walk you through the ingredients, precise steps (I follow a 9″x13″ pan), and troubleshooting tips I’ve learned the hard way — like the time I didn’t freeze the crust and ended up with a sunken middle. Live and learn, then give people warm squares of joy.
Ingredients You’ll Need for S’mores Bars
Below is a short, conversational ingredient breakdown to keep your shopping list simple. I keep the precise measurements in the step-by-step section so you can follow along while baking.
- Graham crackers – crushed into crumbs to form the buttery, crunchy base; swap in gluten-free graham crackers if needed.
- Salted and unsalted butter – melted; one portion for the crust and more for the cookie layer to add richness and chew.
- Granulated and brown sugar – granulated for sweetness and brown for moisture and that toffee-like depth.
- Eggs – bind the cookie dough and give it structure and tenderness; room temperature works best.
- Vanilla extract – aroma that brightens the whole bar.
- All-purpose flour – the backbone of the dough; for gluten-free, use a 1:1 blend.
- Baking powder – a little lift so the cookie layer is thick but not cakey.
- Salt – balances the sweetness; reduce if using salted butter.
- Semi-sweet chocolate chips – folded into the dough for melty pockets of chocolate.
- Mini marshmallows – folded in and used on top for gooey, toasty bits; vegan marshmallows work if veganizing.
- Hershey-style chocolate bar sections – pressed on top to mimic classic s’mores chocolate; any milk or dark bar works.
- Extra graham pieces – for a scatter on top (optional) to emphasize the s’mores look and add crunch.
Step-by-Step Instructions
I always line my 9″x13″ pan with parchment and leave excess hanging over the sides — it makes removing the whole slab so much easier. Read the steps through once before you start, and preheat the oven so you’re not waiting when the dough is ready.
- Preheat and prep: Preheat your oven to 325°F (160°C). Line a 9″x13″ pan with parchment paper or foil, leaving two opposite sides with overhang for easy lifting. This recipe yields about 24 bars.
- Make the graham crust: Crush about 1 1/2 packages of graham crackers into fine crumbs (I pulse them in a food processor or put them in a zip-top bag and crush with a rolling pin). Stir the crumbs with roughly a half-cup of melted butter until the mixture resembles damp sand. Press the crumbs evenly into the bottom of the prepared pan. Pro tip: press firmly with the bottom of a measuring cup to compact the crust so it holds together after baking. Pop the pan into the freezer while you make the cookie dough — this keeps the crust from getting soggy when the dough hits it.
- Start the cookie dough: In a large bowl or stand mixer, combine both sugars with about 3/4 cup melted unsalted butter (use the amount indicated in the full ingredient list). Beat until smooth and glossy; this step dissolves the sugars into the butter and gives a tender, chewy texture instead of a gritty mouthfeel. Add three room-temperature eggs, one at a time, beating until incorporated, then stir in 1 1/2 teaspoons vanilla extract.
- Combine dry ingredients: In a separate bowl, whisk together 3 cups of all-purpose flour, 2 1/2 teaspoons baking powder, and 1 teaspoon fine sea salt (reduce to 1/2 teaspoon if you used salted butter). This ensures the raising agent and salt are evenly distributed and prevents pockets of baking powder in the dough.
- Bring the dough together: With the mixer on low, add the dry mix to the wet mixture until just combined — stop as soon as there’s no loose flour. Overmixing develops gluten and gives you a tougher bar; aim for a thick, cookie-dough-like texture. Fold in 1 cup semi-sweet chocolate chips and 1 cup mini marshmallows until evenly distributed.
- Assemble in the pan: Take the pan from the freezer. Scoop the cookie dough over the chilled graham crust in mounds. Use an offset spatula or the back of a spoon to gently spread the dough into an even layer. It will be thick — that’s intentional. Don’t press so hard that you smear the crust; you want the cookie layer to sit on top.
- Add the s’mores topping: Arrange 1–2 Hershey-style chocolate bars broken into sections across the top and scatter roughly half a cup of mini marshmallows and a few larger broken graham pieces. Press them into the dough slightly so they adhere but still sit on top to brown.
- Bake: Bake at 325°F for 35–45 minutes. You’re looking for the top to be golden brown and for no visible wet batter. A toothpick inserted into the center should come out with moist crumbs, not raw batter. Watch the marshmallows near the end — they brown quickly.
- Cool fully before cutting: Remove from oven and let the pan cool completely on a wire rack — at least 1 hour. The bars set as they cool; trimming too early yields a gooey, sloppy square. For clean cuts, run a knife around the edges to separate from the pan, lift using the parchment overhang, place the giant slab on a cutting board, and cut into about 24 bars.
Tips for Perfect S’mores Bars
Over the years I’ve learned small details make a big difference. Here are the practical tips that save you from common mistakes and help you nail texture and flavor.
- Freeze the crust – I can’t stress this enough. Chilling the crust before adding the dough prevents it from turning into mush and keeps the bottom pleasantly firm.
- Room-temperature eggs – they emulsify better with the melted butter and sugars, giving a smoother, more even crumb.
- Don’t overmix the flour – stir until just combined to keep bars tender. If your dough looks dry, a spoonful of milk will bring it together; dry dough often means the flour was measured too generously.
- Watch the marshmallows – they can go from perfectly golden to charred in 15–30 seconds. If the tops brown too fast, tent foil over the pan for the last 5–10 minutes.
- Time to know done – remove when the top is golden and a toothpick shows moist crumbs. If it comes out sticky with raw batter, add 5 minutes and check again.
- Cooling matters – these bars will firm up as they cool. Cutting too early leads to messy pieces; aim for at least an hour of cooling.
Creative Variations on S’mores Bars
Once you have the base method down, these bars are practically begging to be riffed on. I test variations seasonally and love how a small swap changes the whole vibe.
- Double chocolate – swap half the flour for cocoa powder and use dark chocolate sections on top for extra richness.
- Peanut butter twist – swirl in a few tablespoons of creamy peanut butter into the dough before baking for a salty-sweet balance.
- Fruit & nut – fold in chopped toasted pecans and dried cherries for a textured, slightly tart bar.
- No-bake version – if you’re short on oven time, press a chocolate-oat crust into the pan, layer with melted chocolate and marshmallow fluff, chill until set, and top with graham crumbs for a fridge-set s’mores slab.
- Vegan or gluten-free – use vegan butter, flax eggs (1 tbsp ground flax + 3 tbsp water per egg), vegan marshmallows, dairy-free chocolate, and a 1:1 gluten-free flour blend as needed. Baking time may change slightly; check early.
If you love extra gooey chocolate, try our gooey s’mores chocolate bars for a decadent spin on this recipe.
For a portable party treat, consider baking S’mores cupcakes inspired by the same classic flavors.
If you want to go all-out indulgent, our deep-fried s’mores show how to turn the classic into a crispy, carnival-style dessert.
Short on oven time? Try a s’mores-inspired twist on our no-bake chocolate oat bars for an easy, fridge-set option.
Serving Suggestions and Pairings
I serve these warm when possible — the chocolate is melty and the marshmallows are pillowy. If you’re bringing them to a gathering, you can warm individual bars for 8–10 seconds in the microwave to revive that just-out-of-the-oven feel.
- Warm vs. cold – warm bars are gooey and indulgent; chilled bars slice cleaner and are easy to pack for picnics.
- Plating ideas – stack two bars at a slight angle and dust with a little powdered sugar for a pretty serving. Add a small ramekin of extra chocolate sauce or peanut butter on the side for dipping.
- Beverage pairings – a cold glass of milk is classic. For adults, try a boozy hot chocolate or a coffee stout to match the bar’s roasted, toasty notes. For summer parties, a vanilla milkshake is surprisingly complementary.
- Occasions – these shine at backyard BBQs, bake sales, classroom parties, or as an easy after-dinner dessert when you want a familiar, comforting bite.
Nutritional Information
Per the recipe’s yield (about 24 bars), the approximate nutrition per serving is:
- Calories – 248 kcal
- Fat – 5 g
- Carbohydrates – 47 g
- Protein – 4 g
- Allergens – contains wheat, dairy, and eggs unless substituted. Also may contain nuts if using add-ins.
Healthier modifications: reduce sugar slightly, use dark chocolate to lower sweetness and increase antioxidants, or swap in part whole wheat flour for more fiber. Keep in mind texture changes — darker chocolate and whole-grain flours will alter sweetness and chew.
FAQs about S’mores Bars
How should I store s’mores bars and how long do they last?
Let the bars cool fully (at least 1 hour). Store in an airtight container at room temperature for up to 2 days for best texture. Refrigerate up to 5 days (marshmallows will firm up). For longer storage, wrap tightly and freeze up to 2 months — thaw at room temperature and warm briefly (10–20 seconds in the microwave) to revive the gooeyness.
Can I make these s’mores bars ahead of time or freeze them before baking?
Yes. You can assemble the crust and cookie dough and refrigerate the pan, covered, for up to 24 hours before baking. You can also freeze the unbaked assembled pan (wrap tightly) for up to 1 month — bake from frozen and add about 8–12 minutes to the baking time. Baked bars freeze well up to 2 months.
How do I know when the bars are done and how do I avoid over-browning the marshmallows?
Bake at 325°F for 35–45 minutes, until the top is golden and you don’t see wet batter (a toothpick may come out with moist crumbs, not raw batter). Marshmallows brown quickly under direct heat — if the topping is browning too fast, tent the pan with foil for the last few minutes. To get a toasted-marshmallow finish, use the oven broiler for 10–20 seconds while watching closely.
Can I make gluten-free or vegan s’mores bars?
Yes. For gluten-free, use gluten-free graham crackers and a 1:1 gluten-free flour blend. For vegan, swap in vegan butter, a flax or commercial egg replacer, dairy-free chocolate, and vegan marshmallows (e.g., Dandies). Texture and baking time may vary slightly, so watch the bars closely near the end of baking.
What chocolate works best — can I use alternatives to Hershey bars?
You can use the Hershey sections called for, or swap for Dove, Ghirardelli, or any milk/dark chocolate you like. Use chopped chocolate (about 8 oz ≈ 1 1/3 cups) or chocolate chips (recipe uses 1 cup chips plus 1–2 bar sections on top). Higher-quality chocolate will give a richer flavor.
Conclusion
These s’mores bars are a reliably comforting, crowd-pleasing treat that preserves the campfire magic in a neat, portable form. I make them when friends are coming over, when I want a dessert that’s easy to portion, or when I need that exact toasted-marshmallow nostalgia without the fuss of a fire. They’re forgiving, adaptable, and deliciously shareable. Try the basic version first, then experiment with a swirl, swap, or topping — you’ll find a favorite fast. If you make these, I’d love to hear what twist you tried and how they turned out; there’s nothing I enjoy more than swapping notes about toasted marshmallows and chocolate thickness. Happy baking — and don’t forget to let them cool before cutting!
S'mores Bars
Ingredients
Method
- Preheat oven to 325°F and line a 9"x13" baking pan with parchment paper (or foil). Leave some paper hanging over the sides so you can easily pull the bars out of the pan after baking.
- Crush graham crackers, then combine ½ cup melted butter with crumbs and stir until well combined. Pour mixture into prepared pan, and press evenly into the bottom of the pan. Put entire pan into the freezer while you make the cookie dough.
- In a large mixer, blend together both sugars and the melted butter. Add eggs (one at a time) and vanilla and continue to blend until well combined.
- In a separate bowl, whisk together flour, baking powder and salt. Then, while the mixer is on low, slowly add the flour to the butter/sugar mixture. Stop the mixer immediately when you have added all the flour. Add the marshmallows and chocolate chips and fold together until all of the ingredients are well combined.
- Retrieve the baking pan from the freezer and scoop the dough on top of the prepared crust. Use an offset spatula to carefully spread until evenly distributed.
- Top the dough with the toppings listed, pressing them into the dough slightly.
- Bake 35-45 minutes, or until the top is golden brown, and there is no wet batter visible.
- Remove from oven and allow to cool FULLY before cutting (1 hour or more). For easiest cutting, run a knife around any edges that are touching the sides of the pan, then pull up on the parchment paper and place giant bar on a cutting board.