I make this strawberry cheesecake whenever friends gather for a special dinner because it dresses the table without demanding a day of fuss. Over the years I’ve learned which shortcuts keep the texture silky and the topping glossy so it reads as elegant on the plate — even when you’re serving a crowd.
In my kitchen this cheesecake has become a celebratory staple: the crust offers a buttery anchor, the filling stays lusciously smooth, and a vibrant strawberry topping brings the kind of color that stops conversation mid-sentence. I love how the scent of vanilla and warm butter drifts through the house as it cools.
I’ve baked this version countless times for parties large and small, and the adjustments I share below are the things I wish someone had told me the first time I tried to skip a water bath. Simple techniques mean you can focus on the guest list, not the oven.
A fuss-free centerpiece: why this strawberry cheesecake works for parties
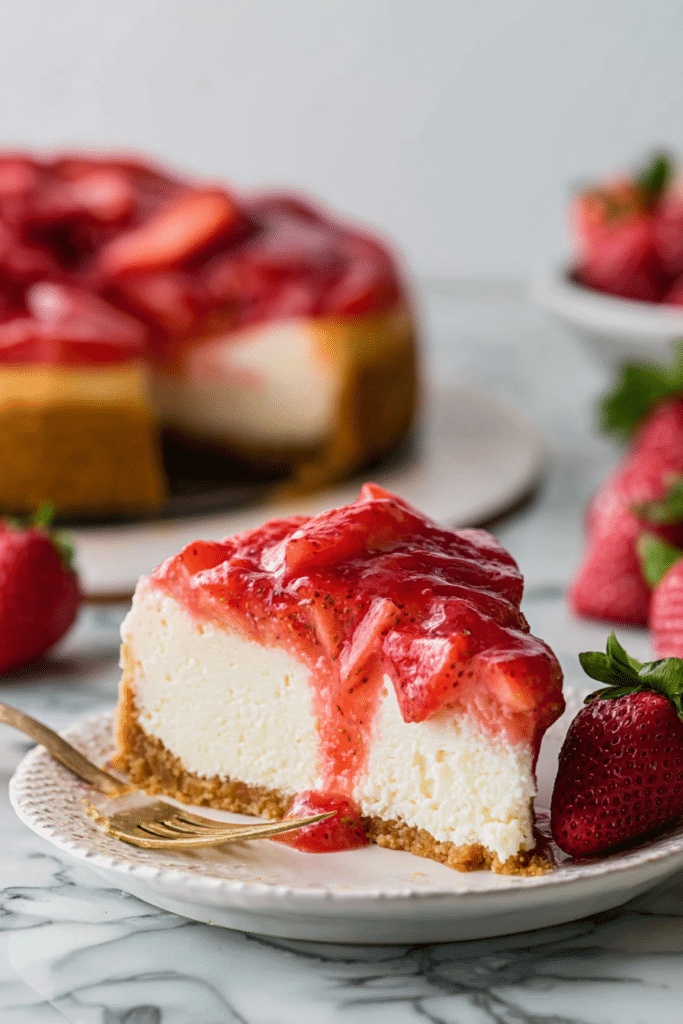
Cheesecake is a perennial favorite because it feels special yet slices into tidy portions that scale easily. This strawberry-topped version pairs a classic, creamy vanilla filling with a bright, glossy fruit crown that reads like celebration on a plate. The contrast in textures — a slightly crisp crust, velvet filling, and juicy fruit — keeps every bite interesting.
For hosts, it’s practical: the cake can be made a day ahead, chilled for clean slices, and transported with minimal drama. When guests arrive, a quick brush of shine on the strawberries and a few scattered mint leaves turn a homemade dessert into something that looks professionally plated. Visualize a ring of brilliant red berries glistening under warm light while the air carries a subtle vanilla scent.
Everything You Need for Strawberry Cheesecake
- Springform pan — makes unmolding clean and simple for a polished presentation.
- Electric mixer — a paddle attachment or hand mixer helps achieve a lump-free filling without overworking it.
- Mixing bowls and a rubber spatula — for scraping the bowl clean so no lumps remain.
- Small saucepan — for cooking the strawberry topping until glossy and slightly thickened.
- Fine-mesh sieve or strainer (optional) — handy if you prefer a seed-free strawberry sauce.
- Quality ingredients — full-fat cream cheese, ripe strawberries, and real vanilla make a noticeable difference in taste and texture; source berries at peak season when possible for the brightest flavor.
Ingredient Discussion
- Graham cracker crumbs – Provide a buttery, slightly sweet base; swap with gluten-free crumbs for an allergen-free crust.
- Sugar – Sweetens both crust and filling; you can experiment with lower-calorie sweeteners but expect some change in texture.
- Brown sugar – Adds depth to the crust’s flavor and a hint of caramel note.
- Butter – Binds the crust and gives it richness; use unsalted to control seasoning.
- Cream cheese – The structural and flavor heart of the cheesecake; full-fat gives the creamiest result.
- Sour cream – Lightens the texture and adds a subtle tang that balances the sweetness.
- Eggs – Provide structure; add them gently to avoid incorporating too much air.
- Vanilla – Aromatic backbone of the filling; real vanilla extract is worth the splurge.
- Strawberries – Use ripe, fragrant berries for the topping; frozen can work in a pinch but may require draining.
- Cornstarch – Thickens the strawberry sauce without clouding its color.
- Lemon juice – Brightens the fruit topping and keeps the flavors lively.
The secret to a crack-free cheesecake without a water bath
- Start with room-temperature cream cheese and eggs so they blend smoothly; lumps force you to overmix, which traps air and leads to cracks.
- Mix on low speed and stop as soon as the ingredients come together — you want a homogeneous batter, not a mousse. I learned the hard way that the quieter you mix, the flatter the top will be.
- Bake at a moderate temperature and avoid sudden temperature changes; a lower oven temperature lets the center set gently while the edges finish without shrinking away.
- Resist opening the oven door during baking; each peek releases heat and can cause the surface to collapse.
- Cool slowly on the counter before chilling in the refrigerator; a gradual temperature drop reduces the chance of surface fissures.
How to get a perfectly smooth, velvety cheesecake texture
- Beat cream cheese and sugar until completely smooth at low speed — scrape the bowl often to ensure no pockets of cheese or sugar remain.
- Fold in sour cream and vanilla with gentle strokes; sour cream adds silkiness while keeping the filling tender.
- Add eggs one at a time and stir just until incorporated to avoid over-aeration; fewer bubbles equal a denser, creamier mouthfeel.
- After baking, allow the cake to cool to room temperature before refrigerating so the center finishes setting without a rubbery edge.
- Chill long enough for the flavors to meld; firm, cold cheesecake slices with a satin surface are the goal.
Choosing and preparing strawberries for maximum flavor and shine
I always buy the ripest berries I can find for topping — they make the most difference. One memorable summer I used underripe berries and learned that no amount of sugar can fully compensate for a lack of flavor; ever since, ripe berries are non-negotiable in my market routine.
- Select strawberries that are bright red, fragrant, and free from mushy spots; the aroma is the best indicator of flavor.
- Wash them gently and hull just before use to preserve their texture and prevent waterlogging.
- For a glossy, saucy topping, cook half the berries with a bit of sugar, cornstarch, and lemon until they release their juices and thicken, then fold in the remaining fresh berries to keep shape and texture.
- If you want a seed-free sheen, push the cooked berries through a fine-mesh sieve before adding the whole fruit back in.
If you enjoy pairing desserts, also consider pairing your cheesecake with a fruity dessert, like a lime mousse cheesecake for a refreshing finish.
How to Make Strawberry Cheesecake (Step-by-Step)
- Preheat your oven and prepare the crust by combining crumbs, sugar, and melted butter, then press the mixture into the base and up the sides of a springform pan.
- Beat the softened cream cheese with sugar until smooth, then add sour cream and vanilla. Incorporate the eggs one at a time, mixing only until combined.
- Pour the batter into the prepared pan and bake at a moderate temperature until the center is slightly jiggly but mostly set; avoid overbaking to preserve creaminess.
- Cool the cheesecake at room temperature until it loses most of its heat, then refrigerate for several hours or overnight so it sets fully.
- While the cake chills, make the strawberry topping on the stovetop by thickening half the berries with sugar, cornstarch, and lemon, then stirring in the remaining fresh berries and a little butter for shine. Chill the topping until lukewarm before layering over the set cheesecake.
- Slice with a hot, clean knife for neat portions; wipe the blade between cuts for pristine edges.
For a fun twist, consider making strawberry cheesecake cupcakes that are perfect for parties.
Pro Tip for strawberry cheesecake: Chill overnight for clean slices
- Chill the cheesecake for at least six hours, but preferably overnight — cold cheesecake slices hold their shape and cut cleanly.
- Cover the cake gently before refrigerating to protect the topping; I wrap the base with plastic wrap and place a loose tent of foil over the top if transporting.
- Allow chilled slices to sit at room temperature for a few minutes before serving so the flavors wake up without the filling becoming soft.
How to Store, Freeze, and Serve Strawberry Cheesecake
- Refrigerate leftover cheesecake in an airtight container or wrapped tightly; it keeps well for up to a week without becoming soggy if the topping is chilled before assembly.
- To freeze, wrap individual slices tightly in plastic wrap and then foil; frozen slices can be stored for several months and thaw in the refrigerator overnight.
- When serving, garnish with fresh whole berries, a dusting of powdered sugar, or small mint leaves for a polished presentation. For an upscale look, spoon a little extra warm strawberry sauce at the base of each slice.
Alternative Dietary Swaps for Strawberry Cheesecake
- Gluten-free crust: Use certified gluten-free cracker crumbs or finely ground nuts as a direct substitute for the graham crumbs.
- Dairy-free option: Replace cream cheese and sour cream with a high-quality dairy-free cream cheese and cultured coconut yogurt; expect a slightly different texture but excellent flavor.
- Lower-sugar approaches: Substitute part of the sugar with a granulated erythritol or another baking-friendly sweetener, and adjust to taste; note that sweetness affects set and mouthfeel.
- Nut-free crust: Use cookie crumbs or graham-style crackers that are made in a nut-free facility to avoid cross-contact for sensitive guests.
Creative Twists on Traditional Strawberry Cheesecake
- Lemon-strawberry: Add fresh lemon zest to the filling for a bright citrus lift that pairs beautifully with the fruit topping.
- Chocolate ripple: Swirl a thin chocolate ganache into the batter before baking for elegant marbling and a chocolate-strawberry combination.
- Roasted strawberries: Roast the strawberries with a touch of sugar and balsamic for a deeper, almost caramelized topping that’s unexpectedly sophisticated.
- For a seasonal spin, you might also enjoy a rich pumpkin cheesecake or try a playful strawberry shortcake cheesecake for layered texture and nostalgia.
Troubleshooting
- If your cheesecake cracked: I recommend that you check mixing speed and cooling method — cool the cake slowly and avoid overbeating the batter next time.
- If the center is too soft after chilling: Let it chill longer; sometimes the oven finish feels set but the center needs more time to firm in the fridge.
- If the crust becomes soggy: Blind-bake it a little longer or press it more compactly into the pan to create a sturdier barrier between filling and crust.
- If the topping is runny: Increase the cornstarch slightly and cook until the sauce visibly thickens; let it cool before spreading so it doesn’t seep into the cake.
Serve this cheesecake centered on a cake stand so the strawberry crown can shine — it’s the kind of dessert that invites lingering conversation and a second helping. A well-chilled slice, a glass of something sparkling, and the right company make this simple, elegant dessert the star of the evening.
Frequently Asked Questions
Can I use frozen strawberries for the topping?
Absolutely! Frozen strawberries work great for the topping. Just make sure to thaw them and drain any excess liquid before adding them to the sauce.
How long should I chill the cheesecake before serving?
It’s best to chill the cheesecake for at least 6 hours, but overnight is ideal for the best flavor and clean slices.
What is the best way to prevent cracks in my cheesecake?
To prevent cracks, avoid overmixing the batter and don’t open the oven door while baking. This recipe doesn’t require a water bath, so follow the baking instructions closely!
How should I store any leftovers?
You can store leftovers in an airtight container in the refrigerator for up to a week. If you plan to keep it longer, consider freezing individual slices wrapped tightly.
Can I make this cheesecake gluten-free?
Yes, just substitute the graham cracker crumbs with gluten-free crumbs, and you’ll have a delicious gluten-free strawberry cheesecake!

Strawberry Cheesecake
Ingredients
Method
- Preheat your oven to 325F (160C).
- In a medium-sized bowl, stir together the graham cracker crumbs, granulated sugar, and brown sugar. Stir in the melted butter until all of the graham cracker crumbs are moistened.
- Press the graham cracker mixture evenly into the bottom and up the sides of a 9” springform pan. Use the bottom and sides of a glass to help do this. Set aside.
- In a large mixing bowl, combine the softened cream cheese and sugar using an electric mixer on medium-low speed until smooth, creamy, and completely combined. Scrape the side and bottom of the bowl with a spatula to ensure the ingredients are thoroughly combined.
- Stir in the sour cream and vanilla extract until just combined.
- Add the eggs, one at a time, stirring until just combined after each addition. Do not over-mix or cheesecake will puff in the oven when baking.
- Pour the batter evenly into the prepared springform pan and bake at 325F (160C) for 45-50 minutes. The center will be slightly jiggly but the cheesecake should be mostly set.
- Allow the cheesecake to cool at room temperature until it's no longer warm then transfer it to the refrigerator to chill for at least 6 hours. Preferably, let it sit overnight. Do not remove the springform collar until you are ready to serve.
- In a small saucepan, whisk together the sugar and cornstarch. Add half of the strawberries, the water, and the lemon juice and set the stovetop to medium/low heat. Stir constantly until the strawberries release their juices and begin to fall apart easily when pierced with a fork and the sauce thickens.
- Remove the sauce from heat, add the remaining strawberries and butter and stir until combined. Pour the mixture into a heatproof bowl and let it cool until no longer warm before pouring over set cheesecake.
- Serve immediately or let topping set for at least an hour in the fridge for neat slicing.