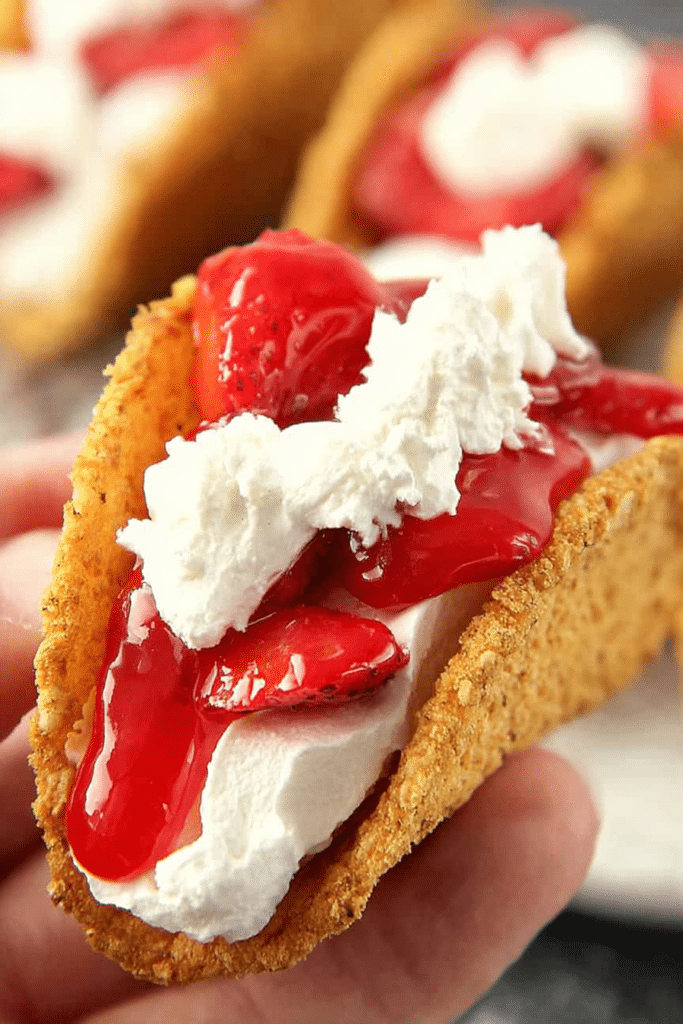
I first made these strawberry cheesecake tacos on a late spring afternoon when the strawberries at the farmers’ market were impossibly sweet and my kids begged for something that looked like tacos but tasted like dessert. The idea of folding cheesecake into a taco shell sounded silly at first, but after a few rounds of testing — frying, baking, chilling — I landed on a method that gives you crisped, lightly golden shells and a silky cream cheese filling punctuated by a bright, slightly jammy strawberry topping. The aroma in my kitchen while the shells baked was buttery and warm, and the strawberry filling smelled intensely of summer: sharp at first then mellow and jammy as it reduced.
If you’re a fan of strawberries, you might also enjoy our strawberry truffle brownies, another delightful dessert option perfect for summer gatherings.
Making strawberry cheesecake tacos is part dessert, part craft project — and all comfort. They’re playful, portable, and surprisingly grown-up when you balance the richness of the cream cheese with a squeeze of lemon and a hit of vanilla. If you like textures — a little crisp, a little creamy, a little sticky — these will hit every note.
Ingredients Needed for the Tacos
- 8-inch tortillas – the vessel for the taco shell; flour tortillas crisp up nicely when coated and baked, but you can use gluten-free wraps instead.
- Graham cracker crumbs – provide that buttery, crunchy exterior and recreate the classic cheesecake crust flavor.
- Melted butter – helps the crumbs stick and gives the shells a toasted, rich flavor; swap with coconut oil for a dairy-free option.
- Fresh strawberries – the heart of the topping; they should smell fragrant and be slightly firm so the compote keeps some texture.
- Sugar – sweetens the strawberries and brightens the cream cheese; for low-sugar versions, use a sugar substitute that measures like sugar.
- Cornstarch – thickens the strawberry mixture quickly so it’s spoonable but still slightly chunky.
- Cream cheese – the creamy base for the filling; room temperature cream cheese whips up smooth and airy.
- Heavy cream – lightens the cream cheese into a pipe-able filling; for a lighter texture, you could use a stabilized whipped topping.
- Lemon zest – brightens the filling and cuts through the richness; a little goes a long way.
- Vanilla – rounds the flavor and adds warmth to the filling; use pure vanilla extract if possible.
- Powdered sugar – stabilizes and sweetens the cream cheese filling without gritty texture; for sugar-free, use a powdered sweetener alternative.
Full measured ingredient list (what I used when testing this recipe):
- About five 8-inch tortillas (to make roughly 20 shells)
- Graham cracker crumbs — around a cup
- Melted butter — roughly a quarter cup
- Fresh strawberries — about a cup, chopped
- Sugar for the strawberries — a few tablespoons
- Cornstarch — one tablespoon (dissolved in cold water)
- Heavy cream — about a cup
- Cream cheese — a block, softened
- Lemon zest and vanilla — a teaspoon each
- Powdered sugar — a few tablespoons to taste
Step-by-Step Instructions
Prep time: about 20 minutes. Oven time: about 10 minutes. Total time: roughly 30 minutes. Yield: roughly 20 small tacos depending on how many rounds you cut from each tortilla.
Here’s the order I follow in the kitchen to keep things smooth: make the shells first so they have time to cool, then cook the strawberry mixture so it can chill, and finally whip the cream cheese filling and assemble. Doing it this way prevents the filling from getting watery and keeps the shells crisp.
- Preheat the oven to 400°F. While the oven heats, cut rounds from the tortillas using a cookie cutter (or a small bowl). I usually get 4–5 rounds per tortilla; pressing the cutter straight down gives even circles. If the tortillas are stiff, microwave them wrapped in a damp towel for 10–12 seconds so they cut cleanly.
- Brush each round lightly with melted butter and then press into graham cracker crumbs so they’re evenly coated. The butter is what makes the crumbs adhere — don’t skip it. If you skip the butter and use oil instead, the crumbs won’t brown as nicely.
- To shape the shells, flip an empty muffin tin upside down and drape the coated tortilla rounds between the inverted cups so each round forms a shallow taco cup. Baking them directly in the muffin cups can make the edges too brown; the inverted method gives a gentle curve and even color.
- Bake for about 8–12 minutes until just golden. Watch closely the first time you make these — ovens vary. You want a light golden color; too dark and the shells taste burnt and brittle. When they come out, they’ll be warm, slightly crackly, and smell buttery with a faint graham note. Let them cool completely in the pan so they keep their shape.
- While the shells are cooling, make the strawberry filling. In a small pot combine the chopped strawberries with a couple tablespoons of sugar and a splash of water. Bring to a boil and reduce to a simmer — you’ll notice the strawberries soften and release juices, and the smell will change from sharp to deep and fruity. Dissolve the cornstarch in cold water and stir it into the strawberry mix — then bring it back to a boil, stirring constantly. The mixture will thicken and become glossy but remain slightly chunky. Remove from heat and let cool completely; it thickens more as it cools, so don’t overcook it.
- Make the cheesecake filling: Beat the softened cream cheese with powdered sugar, lemon zest, and vanilla until smooth. The key here is to start with room-temperature cream cheese; if it’s too cold you’ll end up with lumps. Add the heavy cream and beat on medium-high until it thickens and becomes pipe-able — you’re aiming for a texture that’s airy but holds shape, like a loose frosting. Chill for about 30 minutes if the mixture seems too soft. The chilled filling tastes cleaner and is easier to pipe.
- Transfer the cream cheese filling to a piping bag (or use a spoon) and fill each cooled taco shell. Top each with a spoonful of the chilled strawberry mixture — I use about a half teaspoon so one small burst of strawberry sits on each taco. Finish with an extra sprinkle of graham crumbs or a tiny mint leaf for color.
- Serve immediately. If you need to wait, keep filled tacos in the fridge for up to a few hours, but note that the shells will soften over time as they absorb moisture from the filling. For best texture, store shells and fillings separately and assemble right before serving.
For a quick dessert option, consider making no-bake pumpkin cheesecake balls as an alternative to our strawberry cheesecake tacos.
Troubleshooting notes from my tests: if the strawberry topping is too runny, it either didn’t reduce long enough or you added too much water — simmer a little longer to concentrate the juices. If the cream cheese filling is grainy, the cream cheese was probably too cold; beat it on low for a moment to smooth, or warm the bowl slightly. If your shells are soggy the next day, that’s normal — they’re meant to be crisp fresh from the oven.
Quick Preparation Tips
Want these on the table fast? I get it. Here are shortcuts that still taste home-made.
- Use store-bought mini tart shells or pre-baked phyllo cups if you’re short on time — they skip the shaping step entirely and still deliver crunch.
- Buy pre-made graham cracker crust crumbs or cookie crumbs and mix with melted butter. If you’re in a real hurry, pressing crushed cookies into a shallow baking cup and warming them briefly will do the trick.
- No-bake option: skip baking the shells and instead fold the cream cheese filling into softened mascarpone or stabilized whipped cream and serve in crisp waffle cones or edible cups.
- Make it in under 30 minutes: use pre-chopped strawberries and a stand mixer for the filling; while the mixer whips, crisp the shells. Assembly is the only hands-on part left.
Customizing Your Tacos: Filling Variations
These tacos are a canvas. Swap the filling, top them differently, and they become something new.
Experiment with different flavors by trying a classic tiramisu filling for a unique twist on your tacos.
- Chocolate ganache – rich and satisfying; spoon a thin layer into the shell before piping the cream cheese for a two-tone filling.
- Berry compote – swap strawberries for blueberries or raspberries; cook down with just enough sugar to thicken.
- Nut butter cream – blend cream cheese with almond or peanut butter for a nutty variation (not nut-free).
- Vegan / dairy-free – use vegan cream cheese and coconut cream whipped until thick; coconut oil helps stabilize the texture.
- Nut-free – avoid cookie crusts with nuts and use graham-style crumbs made from wheat or gluten-free substitutes.
- Low-sugar – use powdered erythritol for the cream and a sugar substitute for the strawberry topping; reduce the water to keep consistency.
Presentation Tips for Serving
Part of the joy here is how charming these look on a plate. I often lay them in a row on a long tray so guests can pick one up like a savory taco — only it’s dessert.
- Arrange tacos on a flat platter with alternating colors of fruit on top for contrast.
- Garnish with tiny mint leaves or lemon zest curls for color and a fresh scent — zest brightens aroma the moment the plate reaches the table.
- Sprinkle extra graham crumbs around the plate for a rustic look and added crunch when eaten together with bites of taco.
- For parties, set up an assembly station: shells on one tray, cream cheese filling in a piping bag, and small bowls of different toppings so people can build their own.
Seasonal Flavor Ideas
These tacos are adaptable through the year. Use the season’s best produce and a slight shift in spices and you’ve got a new dessert.
- Spring / Summer – strawberries, raspberries, or a mixed berry compote. Serve slightly chilled for a bright, refreshing dessert.
- Fall – swap strawberries for a spiced apple compote or a pumpkin cheesecake filling with warm spices like cinnamon and nutmeg.
- Winter – poached pears with a drizzle of caramel and a splash of vanilla make a cozy version; add a pinch of cardamom for complexity.
- Holiday – cranberry-orange compote with an orange-zested cream cheese filling is festive and tart.
Conclusion and Serving Suggestions
These strawberry cheesecake tacos are the kind of recipe that sparks smiles — they look whimsical, but the flavors are classic and reliable. After testing them multiple times, I learned that chilling the cream cheese filling briefly makes assembly far easier, and shaping the shells over the inverted muffin tin gives the most consistent curve. Serve them right after assembly for maximum crunch, or keep shells and fillings separate if you have to prep ahead.
For more strawberry-inspired treats, try our strawberry cheesecake cupcakes which make for a delightful addition to any dessert spread.
Great occasions for these: summer barbecues, kids’ parties (they love the taco angle), bridal showers, or a casual dinner where you want a simple but showy dessert. They’re easy to scale up for a crowd because the components can be made ahead and assembled quickly.
FAQ
Can I make these tacos gluten-free?
Yes! You can use gluten-free tortillas instead of regular ones, and follow the rest of the recipe as normal.
How long do strawberry cheesecake tacos last?
These tacos are best enjoyed fresh, but you can store leftovers in the refrigerator for up to 2 days. Just keep the filling and taco shells separate until you’re ready to serve.
Can I prepare the filling in advance?
Absolutely! You can make the cream cheese filling and strawberry mixture a day ahead and store them in the fridge. Assemble the tacos right before serving for the best texture.
Are there alternative fillings I can use?
Definitely! You can experiment with chocolate ganache, different fruits like blueberries or raspberries, or even a nut-based cream for a twist.
What occasions are these tacos suitable for?
These fun dessert tacos are perfect for summer parties, family gatherings, or even just a special treat at home. They’re sure to impress your guests!

Strawberry Cheesecake Tacos
Ingredients
Method
- Pre-heat oven to 400F. Cut rounds out of each tortilla shell with a cookie cutter to get about 20 shells. Dip each into melted butter then coat in graham cracker crumbs.
- Flip a muffin tin upside down. Place the tortilla pieces in between muffin cups. Bake 10 minutes until just golden brown. Let cool in pan.
- Make the strawberry Filling: In a small pot pour water, add sugar and strawberries. Bring to a boil and reduce to a simmer to soften the strawberries.
- Dissolve cornstarch in water and pour into strawberry mix and bring to a boil, stirring constantly. Remove to cool completely.
- Beat cream cheese, heavy cream, powdered sugar, lemon zest and vanilla for 2 minutes, using medium speed, until it thickens. Chill in the fridge for 30 minutes. Transfer to a piping bag.
- Fill the taco shells with cream cheese filling and top with 1/2 tsp strawberry filling. Sprinkle with additional graham cracker crumbs, optional! Enjoy!