I make these strawberry crumb bars with my kids all the time — it’s one of those recipes that smells like summer and feels like play. I still remember the first time my little one pressed the crumbly dough into the pan and looked up with flour on their nose: that crunchy-top aroma drifting through my kitchen made us both grin. Baking together has become our ritual on rainy afternoons and slow weekends.
In my kitchen this recipe is a lesson, a snack, and a bonding activity all rolled into one. The bright red strawberries, the soft pat of cold butter you grate or cut in front of the kids, and the golden crumbs coming out of the oven give immediate sensory rewards: color, smell, texture. I like to talk through the steps with the kids — what we see, what we touch, and what will happen in the oven — so the process is as fun as the result.
These bars are forgiving, and that’s part of their charm for families. Ingredients are easy to find at any grocery store, and there are simple swaps for allergies or dietary preferences. I’ll share small science moments you can demonstrate to children (like why butter must be cold) and plenty of kid-safe jobs so everyone has a role. By the time we cut the first square, everyone has earned a bite.
Before we jump into the how-to and tips, make sure you have your workspace prepped: bowls, measuring cups, a sturdy pan, and a safe place for kids to stand and help. If you want an extra fruity layer, try adding a spoonful of classic strawberry jam to the filling — my kids always ask for it.
Why These Strawberry Crumb Bars Are Perfect for Baking with Kids
These bars are simple, tactile, and short on fussy steps, which makes them ideal for children. The dough is crumbly and forgiving, so little hands can help without needing precision. The strawberry filling is bright and sweet, with a texture kids recognize and love. The whole project offers sensory play — measuring, squeezing, patting, and sprinkling — which keeps children engaged.
Making these strawberry crumb bars is also quick enough to hold a child’s attention: prep is short and the oven does the rest. Studies and parenting experts often highlight cooking as quality time that builds both confidence and practical skills; I’ve seen shy kids light up when they press the crust into the pan or stir the fruit mixture themselves.
Everything You Need for Strawberry Crumb Bars
Gathering everything before you start keeps the experience smooth for kids. Below I list ingredients and tools in an easy, conversational way so you can explain the purpose of each item to little helpers. If you like an extra jammy layer, try the tip above and add a bit of classic strawberry jam to the filling for extra sweetness and color.
- All-purpose flour – The backbone of the crust and topping; it gives structure. For gluten-free, use a 1:1 gluten-free baking blend.
- Sugar – Sweetens both crust and filling; brown sugar or coconut sugar can add depth.
- Baking powder – Gives a tiny lift to the crust so it isn’t too dense.
- Salt – Balances sweetness and enhances flavor.
- Butter – Provides richness and creates the crumbly texture; plant-based butter or coconut oil works for dairy-free versions (texture may vary).
- Egg – Binds the crumbly dough together; for a vegan swap, use a flax “egg” or a commercial egg replacer.
- Vanilla – Adds warm, familiar flavor kids often love.
- Fresh strawberries – The star ingredient; they add bright color, natural sweetness, and a juicy texture. Frozen strawberries work fine if thawed and drained.
- Cornstarch – Thickens the fruit filling so it isn’t runny; arrowroot is a good alternative.
- Mixing bowls, measuring cups, pastry cutter or fork, baking pan, parchment paper – Tools that are safe and fun for kids to use; measuring and pouring are great learning moments.
Make sure everything is prepped and within reach before inviting kids to help — this keeps the flow playful and prevents frustration. For those with gluten sensitivities or vegan preferences, I included swaps above so you can adapt easily.
Kid-Safe Tasks: What Children Can Do at Every Step
Assigning safe, age-appropriate tasks keeps kids involved and proud of the final bars. Always supervise around knives, heat, and the oven.
- Toddlers (2–4) – Washing strawberries, dropping pre-measured ingredients into a bowl, stirring with a spoon, or pressing small pieces of crumb on top.
- Young children (5–8) – Measuring dry ingredients with your guidance, mashing soft strawberries slightly, mixing the filling, and patting the base into the pan.
- Older kids (9–12) – Grating or cutting cold butter with a safe grater, using a pastry cutter under supervision, cracking an egg, and helping to time the bake.
- General safety tips – Keep knives and hot pans to adult hands, use oven mitts, insist on washing hands before and after handling fruit, and explain why the oven must be handled by adults only.
If your kids enjoy baking, they might also love making a strawberry cheesecake on another occasion!
The Secret to the Perfect Crumbly Topping (and How Kids Help)
The topping’s texture is everything — it should be tender, not greasy, and bake to a beautiful golden brown. Getting kids involved in the tactile process of creating crumbs is a joy: they can help break the butter into the flour and watch as big pieces become small, sandy crumbs.
- Cold butter is key – Cut or grate very cold butter into the flour for pea-sized pieces; these little chunks create that delicate crumb as they bake.
- How to cut butter – Use a fork, pastry cutter, or pulse in a food processor until the mixture looks like coarse sand with pea-sized bits; kids can help pulse the machine under supervision or use a fork to mash gently.
- Variations – Stir in chopped nuts or rolled oats to add crunch; for a nuttier flavor, add a bit of almond meal to the crumble.
- If the topping won’t come together – Add a touch more cold butter or a splash of beaten egg and press; if it seems greasy, chill the bowl briefly until firm.
Kids love making the crumbs and sprinkling them over the berries — it’s a great sensory job that results in those satisfying crackly edges after baking. Listen for the little crunch when you cut into a baked bar; it’s the sound of success.
Why Butter Temperature Matters — Teach the Science While You Bake
Explaining the “why” in simple terms makes baking educational and fun. I use quick, hands-on demos so kids can feel and see the difference between cold and room-temperature butter.
- Cold butter – Creates pockets of fat that melt slowly in the oven, leaving tiny air spaces that give the topping a crumbly, flaky texture.
- Room-temperature butter – Blends too smoothly with flour and yields a denser, more cookie-like topping.
- Melting and texture – As the butter melts during baking, steam forms and creates lift; that’s why you want visible little butter pieces in the dough before it goes into the oven.
- Quick chilling tips – Cube butter and pop it in the freezer for a few minutes, or grate cold butter with a box grater; teach kids to feel how firm the butter is before using it.
These short science moments — feeling the firm butter, seeing pea-sized crumbs, and smelling the buttery aroma as it bakes — make the lesson stick for curious kids.
How to Make Strawberry Crumb Bars (Step-by-Step)
Follow these steps with your children; I’ve added notes about where kids can safely help. Use an oven thermometer if your oven runs hot or cold, and check the topping for light golden color to gauge doneness.
- Preheat the oven to a moderate baking temperature and line an 8×8 pan with parchment so kids can help lift the finished bars out.
- Mix dry ingredients for the crust and topping in a bowl until combined; let younger children stir dry ingredients.
- Cut cold butter into the dry mix until it looks like coarse crumbs with pea-sized pieces; this is a great step for older kids to help with a pastry cutter or for little ones to observe.
- Beat an egg with vanilla and stir into the crumb mixture until evenly moistened; adult handles the egg step for safety with children nearby.
- Press half of the crumb mixture firmly and evenly into the bottom of the prepared pan; this is a fun job for a small helper to press with clean hands.
- Toss chopped strawberries with sugar and a thickener until coated, then spread evenly over the crust; kids can stir the fruit mixture and spoon it into the pan.
- Crumble the remaining topping evenly over the fruit layer, leaving some larger crumbs for texture; kids enjoy sprinkling this part.
- Bake until the top is lightly golden and the filling is set to the touch — total bake time will vary by oven, so start checking a bit early if your oven runs hot.
- Cool completely on a rack, then chill briefly before cutting into squares for cleaner slices; adult should handle the slicing with a sharp knife or pizza cutter.
Once you master these bars, you might want to try your hand at a delicious strawberry tart as a next project with older kids.
Pro Tip for Strawberry Crumb Bars: Make-Ahead, Freezing & Healthier Swaps
These bars are very make-ahead friendly, which is a lifesaver for busy families. Bake them a day ahead or freeze portions for quick snacks. For a deeper dive into long-term keeping, see tips on storing and freezing below and check this guide if you want more on preserving desserts: storing and freezing tips.
Pro-Tips:
- Chill the bars before slicing for cleaner cuts — I refrigerate mine until they’re firm to the touch.
- If using frozen strawberries, thaw and drain well to avoid a soggy filling.
- For extra flavor, fold a little lemon zest into the strawberry mixture — kids notice the bright lift in flavor.
Troubleshooting:
- Soggy filling — make sure fruit is not overly juicy; toss with a thickener and a little sugar and drain excess liquid.
- Topping too dense — the butter was likely too warm; chill the dough and try again or add a bit more cold butter and re-chill.
- Bars fall apart — press the crust firmly and allow full cooling before slicing; a short chill in the fridge helps firm them up.
Variations (Healthy & Allergy-Friendly Swaps):
- Use whole-grain or oat flour blends for a heartier crust; texture will be slightly denser.
- Substitute coconut oil or vegan butter to make dairy-free bars (expect a modest texture change).
- Swap refined sugar for honey or maple syrup in the filling for a less refined sweetness; reduce other liquids slightly if using liquid sweeteners.
- Make them gluten-free with a cup-for-cup GF baking mix and add a tablespoon of xanthan gum if your blend lacks binding agents.
How to Store, Freeze, and Serve Strawberry Crumb Bars
Proper storage keeps the bars tasting fresh and maintains texture. I usually slice the chilled bars, stack them in an airtight container with parchment between layers, and keep them in the fridge for easy snacking during the week.
- Refrigerator – Store in an airtight container; they stay best for up to a week, sometimes ten days if well wrapped.
- Freezer – Wrap bars individually or layer with parchment and place in a freezer-safe container; freeze for up to three months. Thaw in the refrigerator overnight for best texture.
- Serving – Serve chilled or at cool room temperature; add a dollop of whipped cream, a scoop of vanilla ice cream, or a sprinkle of powdered sugar for special occasions.
- Containers – Use airtight boxes or glass containers with tight lids; parchment between layers prevents sticking.
Storing them well preserves the buttery crunch and fruity center. If you plan to freeze, flash-freeze single pieces on a tray then transfer to a bag to prevent crushing.
Frequently Asked Questions
Can I use frozen strawberries instead of fresh ones?
Absolutely! Frozen strawberries work great in this recipe. Just make sure to thaw and drain any excess liquid before using them.
How should I store the strawberry crumb bars?
Store the bars in an airtight container in the refrigerator. They’re best enjoyed within a week, but can last up to 10 days.
Can I make these crumb bars ahead of time?
Yes, these bars can be made ahead! You can also freeze them for up to three months. Just be sure to wrap them well!
What can I substitute for butter in this recipe?
You can use coconut oil or a plant-based butter substitute for a dairy-free option, but the texture may vary slightly.
What is the best way to cut these bars once they’re baked?
Let the bars cool completely before cutting. Using a sharp knife or a pizza cutter will give you clean, even slices.

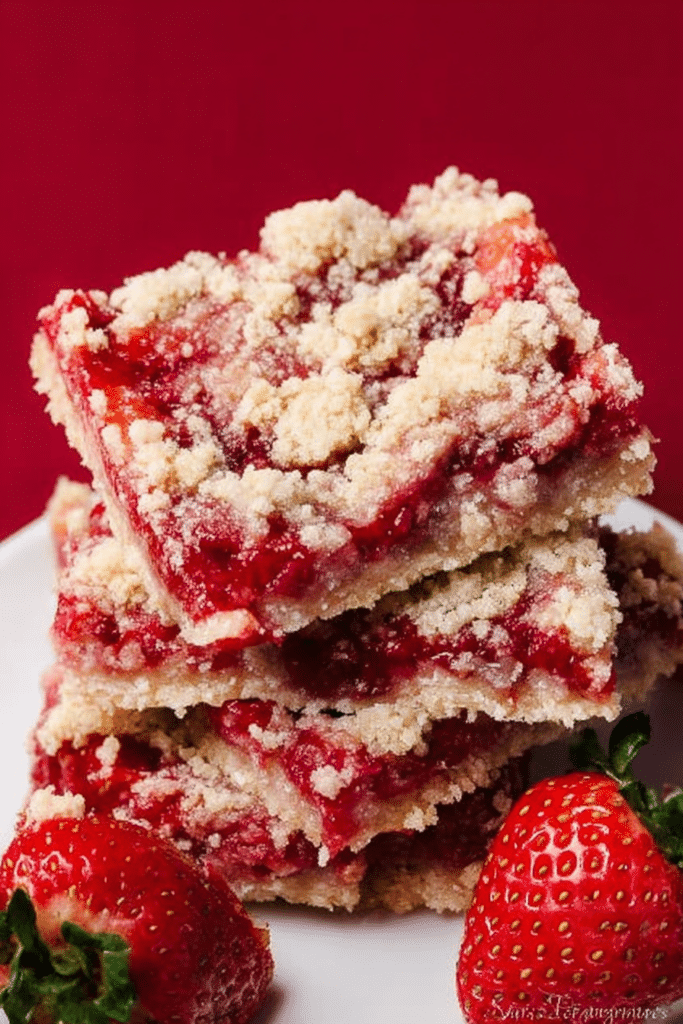
Strawberry Crumb Bars
Ingredients
Method
- Preheat the oven to 375 degrees F.
- Place parchment paper on the bottom of the 8x8 pan that hangs over the side of the pan.
- In a medium bowl, stir together 1/2 cup white sugar, flour, baking powder and salt.
- Using a fork or a pastry cutter, cut the butter into the flour mixture until it is crumbly.
- In a separate bowl, beat an egg and add the egg and vanilla to the flour mixture, and combine.
- Pat half of the dough into the bottom of the prepared pan.
- In another bowl, stir together 1/3 cup sugar and cornstarch, and mix in the strawberries.
- Spoon the strawberry mixture over the bottom crust.
- Crumble the remaining dough over the strawberry filling.
- Bake for 45 minutes or until golden brown. Cool completely before cutting into squares.