- Prep
- 20 min
- Cook
- 60 min
- Total
- 80 min
- Serves
- 8
- Calories
- 250 kcal
On this page12 quick jumps
TOC
12 quick jumps
Introduction
I make this strawberry ice cream whenever the strawberries at the market look impossibly red and sweet. It started as a quick experiment the first year my patch produced more berries than we could eat, and now it's my go-to when I want an easy, show-stopping dessert with almost no hands-on time.
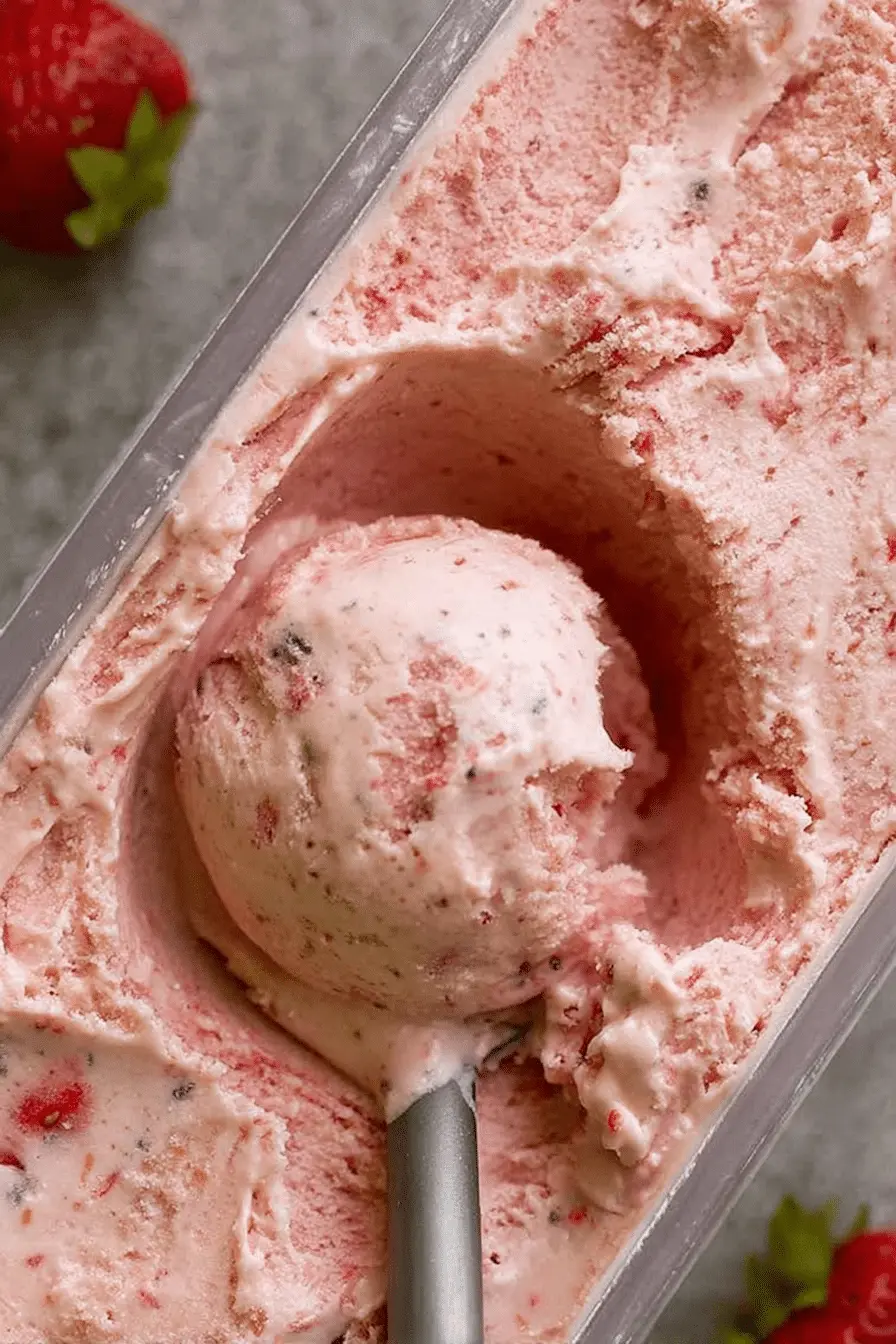
What I love most is the texture: thick, creamy and smooth, not icy. Roasting the strawberries first concentrates their sweetness and adds those lightly caramelised notes that feel a little grown-up but still homey. The pink colour is vibrant, and the aroma while the berries roast fills my kitchen in a way that makes everyone curious about what's coming out of the oven.
There’s very little fuss here — you do a short roast, blitz the berries, fold them into lightly whipped cream and sweetened condensed milk, and then freeze. The active work takes under half an hour; most of the time is hands-off while the ice cream sets in the freezer. If you want a simple companion treat to serve with scoops, you might also enjoy making homemade strawberry truffles while the ice cream freezes.
I’ll walk you through why this method works, how to avoid iciness, and a few easy ways to customize it depending on the strawberries you have on hand.
Why this no-churn strawberry ice cream is perfect for busy home cooks
This recipe saves time and fuss because it doesn’t require an ice cream maker or complicated custards. You get deep strawberry flavour and a silky mouthfeel with minimal technique. The active time is short: roast, blitz, fold — and the freezer does the rest.
For busy cooks, the appeal is the predictable outcome: a scoopable, creamy ice cream that’s suitable for cones or bowls without constant monitoring. You’re using pantry-friendly shortcuts like sweetened condensed milk to provide structure and sweetness, and whipped cream for aeration — both of which keep the texture rich but simple to achieve.
Picture the finished ice cream: a pale rose-pink, flecked with tiny ruby specks from roasted berries, releasing a sweet, warm strawberry scent as it softens slightly on your spoon.
Everything You Need for Strawberry Ice Cream
Use ripe, fragrant strawberries whenever possible — they make the biggest difference. Below I explain each key ingredient and why it matters or what to use instead if you need a swap.
- Strawberries – The star of the show. Ripe, fragrant berries give the best flavor; underripe fruit will be tart and can make the ice cream taste flat.
- White sugar – A little sugar helps the berries release juice while roasting and boosts the caramelisation on the surface.
- Vanilla extract – Optional, but a small splash rounds out the strawberry flavor and adds warmth.
- Sweetened condensed milk – Critical for texture and sweetness. It creates a dense, scoopable structure without churning because it contains sugar and milk solids that lower freezing point and keep the mixture soft.
- Full-fat cream (for whipping) – Whips up into stable peaks and, when folded in, traps air that gives the ice cream its light, creamy body.
While preparing your strawberry ice cream, you might also enjoy making homemade strawberry truffles as a delicious treat.
The Secret to a Silky, Non-Icy Texture
A few simple physics-and-technique points explain why this no-churn method works so well:
- Air is your friend: Whipping the cream until it holds stiff peaks and then folding it gently into the strawberry-condensed milk mixture traps air. That trapped air creates a soft, scoopable texture once frozen.
- Gentle folding preserves structure: If you beat the mixture hard, you’ll deflate the cream and lose the aeration that prevents iciness. Aim for slow, deliberate folds until the color is mostly even with a few streaks remaining.
- Roasting reduces water activity: Roasting the berries concentrates sugars, reduces excess water, and caramelises surface flavors — all of which reduce the chance of ice crystals forming and intensify the strawberry flavor.
Why Roasting Strawberries Makes a Better Ice Cream
Roasting is a low-effort step that changes the berries in three welcome ways: the heat draws out and concentrates juices, sugars caramelise and add depth, and the aroma becomes richer and more complex. These transformations give the finished ice cream a fuller, slightly cooked-strawberry flavor that still reads as fresh.
Texturally, roasting softens the berries and releases syrupy juices that blend smoothly with the condensed milk. The caramelised bits that remain on the tray add little pockets of intensified flavour if you scrape them into the puree.
Roasting also fills the kitchen with a warm strawberry scent that makes the whole process feel a little indulgent. If you like the idea of pairing roasted strawberry flavor with other treats, try adding roasted berries to a crunchy snack mix like strawberry shortcake puppy chow for a dessert board twist.
Fresh vs Frozen Strawberries: When to Use Each
Fresh, in-season strawberries are the first choice: they’re brighter, sweeter, and roast beautifully. But frozen berries are a perfectly acceptable shortcut when fresh aren’t available or when you want to make the ice cream out of season.
Key differences to keep in mind:
- Fresh strawberries give the best texture and aroma when roasted; the flesh retains a little body and the caramelisation is cleaner.
- Frozen strawberries work well if you thaw and drain them first, removing excess water so the roast step doesn’t steam the fruit instead of caramelising it.
- Storage tip for fresh berries: Keep them dry and in a single layer in the fridge. Use them quickly or hull and freeze them for later — if you have extra, consider making classic strawberry jam to preserve the season.
How to Make Strawberry Ice Cream (Step-by-Step)
- Preheat your oven and arrange the strawberries on a baking tray. Sprinkle the small amount of sugar over them and toss so they’re evenly coated.
- Roast the berries until they have released their juices and begun to caramelise — check and rotate the tray halfway through roasting to ensure even colour. Don’t let the juices burn on the tray; you want soft, syrupy fruit.
- Remove the tray and, while still warm, scrape every bit of fruit and the caramelised juices into a food processor or blender. Blitz until as smooth as possible; a few caramelised flecks are fine.
- Let the puree cool completely, then mix in the sweetened condensed milk and vanilla. Beat briefly to aerate and combine.
- Whip the cream in a separate bowl to stiff peaks. Add a spoonful of whipped cream to the strawberry mixture and fold gently to lighten it. Repeat with a second spoonful.
- Tip the strawberry mixture into the remaining whipped cream and fold just enough to make it largely uniform in colour — a few pale streaks are okay.
- Pour the combined mixture into a freezer-safe container, smooth the top, press a sheet of baking paper onto the surface to prevent ice crystals, cover, and freeze for at least 12 hours.
- When serving, let the ice cream sit at room temperature for a few minutes to soften for easier scooping, then serve in cones or bowls.
Pro Tip for strawberry ice cream: Roast berries and fold gently to prevent iciness
- Roast the berries until they’re syrupy and just beginning to caramelise — that concentrated syrup cuts down on free water that can form crystals.
- Fold, don’t beat. Stirring vigorously deflates the whipped cream and increases iciness; aim for slow, wide turns with a spatula.
- Press a sheet of baking paper directly onto the surface of the ice cream before covering — this reduces air exposure and surface ice formation.
Note to writer: Generate the Pro-Tips, Troubleshooting, and Variations sections as bulleted lists for easy scanning.
How to Store, Freeze and Customize Your Strawberry Ice Cream
Proper storage keeps the texture fresh and the flavor bright. Freeze the ice cream in an airtight container placed toward the back of the freezer where temperatures are most stable. A layer of baking paper pressed onto the surface before sealing helps prevent ice crystals.
- Storage tips – Keep in an airtight container and try to consume within 2–4 weeks for best flavour and texture. If you’ll be scooping a lot, divide into smaller containers so the whole batch isn’t repeatedly exposed to air.
- Variations – Try adding fresh herbs like mint or basil for brightness, a sprinkle of finely chopped dark chocolate, or a swirl of balsamic reduction for a grown-up twist. For more dessert ideas, consider serving scoops alongside strawberry cheesecake cupcakes.
- Dairy-free options – Use full-fat coconut cream whipped until fluffy and a dairy-free condensed milk alternative to recreate the structure. The texture will be slightly different but still deeply satisfying.
Troubleshooting (from my kitchen):
- If the ice cream tastes watery, the berries were likely under-roasted or too much liquid was added; roast longer next time and drain excess juices before blending.
- If it’s icy, you may have over-deflated the whipped cream; next batch, fold more gently and press baking paper onto the surface before freezing.
- If the flavor feels flat, use riper strawberries or add a touch more vanilla to round the profile.
Frequently Asked Questions
Do I need an ice cream maker to make this strawberry ice cream?
No, this is a no-churn recipe! You don't need an ice cream maker to create this delicious strawberry ice cream.
Can I use frozen strawberries instead of fresh ones?
While fresh strawberries are recommended for the best flavor, you can use frozen strawberries in a pinch. Just make sure to thaw and drain excess moisture before roasting.
How long does it take to freeze the ice cream?
You'll need to freeze the strawberry mixture for at least 12 hours for it to set properly.
What can I do if my ice cream turns out too icy?
Make sure to roast your strawberries well to caramelize them and fold the mixtures gently to incorporate air without deflating them, which helps reduce iciness.
Can I customize the recipe with other flavors?
Absolutely! You can add different flavors by mixing in pureed fruits, chocolate, or even extracts. Just make sure to keep the ratios balanced.
Ingredients
- 1 kgripe strawberries, hulled and halved
- 1 tbspwhite sugar
- 1 tspvanilla extract (optional)
- 1 cansweetened condensed milk (395g / 13 oz)
- 2 cupsfull fat cream for whipping
Instructions
- 1
Preheat oven to 160°C/320°F (140°C fan) with shelf in the middle.
- 2
Pile strawberries on a tray. Sprinkle over sugar. Toss through, then spread strawberries out on tray.
- 3
Roast for 45 minutes, rotating tray halfway. Remove from oven, toss strawberries, then return to oven for 15 minutes.
- 4
Remove from oven, use spatula to scrape into a food processor, being sure to get all the juices and caramelized bits off the tray.
The best recipes reward patience — don't rush the sear.
- 5
Blitz until smooth as possible, scrape into bowl then cool completely.
- 6
Add condensed milk and vanilla into strawberries. Beat well for 1 1/2 minutes on high to aerate and combine.
- 7
Place cream in another bowl and beat into stiff peaks - about 3 minutes on high.
- 8
Add a dollop of cream into the strawberry mixture. Fold through gently. Repeat until mostly mixed through.
- 9
Tip strawberry mixture into the cream bowl. Gently fold through until it's a uniform pink colour.
- 10
Pour mixture into a container, smooth top, cover, and freeze for 12+ hours.
- 11
Remove from freezer, scoop with ice cream scooper, and serve in cones or bowls!
Recipe Card
The Strawberry Ice Cream I Make Every Summer — No-Churn
Keep it handy for later, send it to someone cooking with you, or open the clean print view.
- Prep
- 20 min
- Total
- 80 min
- Serves
- 8
You might also like
How I Make Quick Blueberry Lemon Jam — Canning in 1 Hour
May 21, 2026
The 5-Ingredient Japanese Jelly Dessert I Make All Summer
May 21, 2026
The Homemade Peachy Gummies My Kids Love — Fun, Simple Treat
May 21, 2026
How I Make Green Tea Lemon Ginger Gummies for Daily Immune Support
May 21, 2026
Reviews
Be the first to review this.