
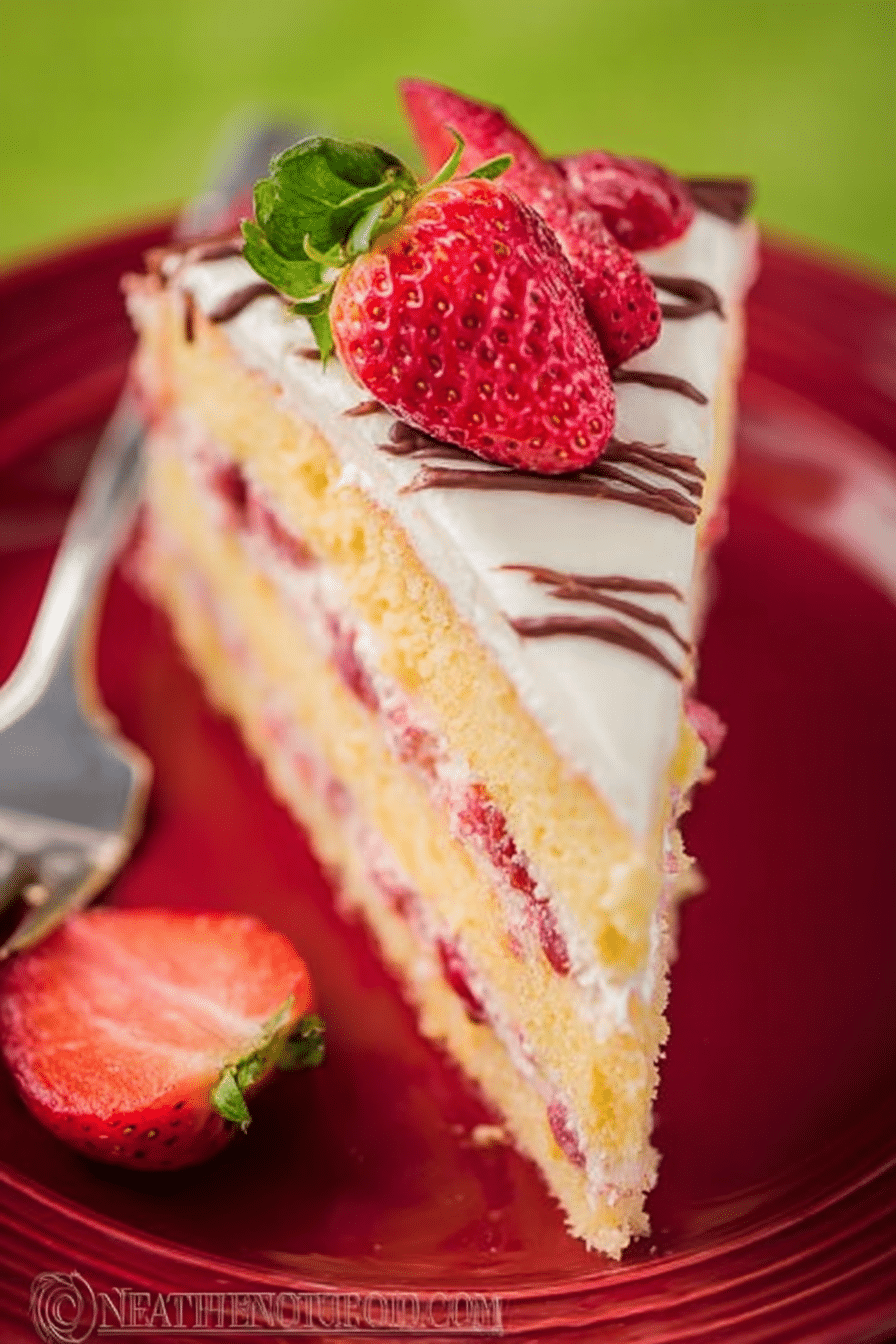
I still remember the first time I brought this strawberry layer cake to a family gathering: the room went quiet for a beat while everyone took in the tall, pink-streaked layers, then the first slice disappeared in seconds. I make it when I want something that looks like a celebration before it’s even cut—bright red strawberries peeking between pale cream-cheese frosting, a glossy top crowned with fresh berries.
In my kitchen this cake has become my go-to when it’s time to mark an occasion. I’ve baked it through humid summers and chilly winters, and the recipe’s forgiving nature—when you know the little tricks—means it behaves at every party. I’ve learned which steps hold up under pressure and which ones are worth the extra two minutes of attention.
Over the years I’ve refined the method so the layers stay tall and even, the strawberry filling stays vibrant instead of running, and the frosting stays airy but stable. I’ll share the exact techniques I use, the tools that make assembly easier, and a few swaps for guests with dietary needs—so you can serve a cake that looks like it came from a boutique bakery, right from your home oven.
Why this strawberry layer cake is perfect for your next celebration
This cake reads as a celebration at first glance: tall, even layers marked with ribbons of strawberry, a cool, pale frosting, and a glossy crown of fresh berries. The contrast between the lightly sweet cream-cheese frosting and bright, slightly tart strawberries keeps each slice lively on the palate rather than cloying. It’s versatile—dress it simply for a summer brunch or embellish it with chocolate and edible flowers for an elegant dinner party.
Visually, the way pale cake gives way to coral-pink fruit creates a moment of anticipation as you slice. Texturally, the soft crumb, silky frosting, and gentle pop of fresh strawberries make every forkful feel special. That combination—visual drama plus balanced flavor—is why I reach for this cake when I want guests to remember an event.
Everything You Need for Strawberry Layer Cake
Below I describe the ingredients by purpose so you understand what each one does and how you can swap intelligently. I’ve also listed the tools that help you get clean, even layers without stress.
- All-purpose flour – Provides structure to the layers; a reliable, neutral canvas that keeps crumb tender.
- Eggs (room temperature) – Build volume when beaten with sugar and help the cake rise; they also add richness.
- Granulated sugar – Sweetens and stabilizes the whipped eggs; controls browning.
- Heavy cream – Whipped into the cream-cheese frosting for lightness and a silky mouthfeel.
- Cream cheese – The tangy backbone of the frosting; balances strawberry sweetness and keeps the finish elegant.
- Fresh strawberries – Use the ripest you can find for the brightest color and flavor; they provide the fresh fruit ribbon between layers.
- Cornstarch or powdered stabilizer (optional) – Keeps the strawberry filling from becoming watery; useful if fruit is very juicy.
- Chocolate (optional) – For a decorative drip or shavings on top—adds a bit of richness if you want contrast.
Tools I rely on:
- Electric mixer – For whipping eggs and cream to stable peaks.
- 9×13″ pans (or two pans) – Baking layers separately gives the clean, tall profile this cake is known for.
- Parchment paper and a thin spatula – For lifting delicate layers without tearing.
- Offset spatula and bench scraper – For smooth frosting and neat sides.
- Food processor or blender – To puree the strawberries to your preferred texture.
If you want a sweet treat to pair with leftovers or to serve alongside your slices, don’t forget to check out our homemade strawberry cream puffs—they’re a delightful companion to this cake.
The secret to tall, even layers every time
- Whisk eggs and sugar on high until the mixture is pale, thick, and ribbon-like when the whisk is lifted; that volume is what gives the cake height without heavy leaveners.
- Sift the flour and fold it in gently with a spatula; use slow, wide strokes to preserve the trapped air. Scrape the bottom to catch any streaks of flour, but stop as soon as the batter is homogeneous.
- Bake layers separately and avoid greasing the sides of the pan—this helps sides cling and rise straight instead of spreading and becoming misshapen.
- Calibrate your oven with an oven thermometer and rotate pans if your oven has hot spots; even an extra minute of uneven heat can alter rise and color.
- Cool layers in the pans briefly, then release them gently and cool completely on a rack before trimming or slicing; warm cakes compress easily under a knife or bench scraper.
How to keep strawberry filling bright, not watery
The goal is vivid color and concentrated strawberry flavor without a pool of juice seeping into the frosting. Think of the filling as a thickened compote rather than a beverage.
- Choose ripe but not overripe berries—too-ripe fruit sheds more juice. Cold berries also release less liquid while assembling, so keep them chilled until you’re ready to process.
- Pulse the strawberries to a chunky-applesauce texture rather than a smooth purée so there’s body to the filling; if you need more stability, sprinkle a small amount of cornstarch into the fruit and heat briefly to activate it before cooling.
- Macerate with just enough sugar and a squeeze of lemon to lift the fruit’s brightness—acid keeps the color vivid and balances sweetness.
- Chill the filling before assembly. Cold filling is less likely to bleed into the frosting and helps layers remain distinct.
- For a sweetener alternative that also adds body, consider using a spoonful of classic strawberry jam mixed into your chopped berries—it builds thickness and deepens flavor without watering down the color.
Why room-temperature eggs and cream change the texture
When eggs and cream are at room temperature they incorporate air more readily. For eggs beaten with sugar, that means a lighter, more voluminous foam that translates into taller cake layers. For cream used in frosting, room temperature helps it emulsify and whip to a silkier, more stable texture, so your frosting spreads smoothly instead of breaking or becoming grainy.
Fat behaves differently at different temperatures: room-temperature butter or cream blends more uniformly into dairy-based frostings, which prevents pockets of cold fat from creating an uneven crumb. In short, temperature affects emulsification and aeration—both crucial for a tender crumb and a glossy, stable frosting.
How to Make Strawberry Layer Cake (Step-by-Step)
- Prepare pans: line only the bottoms with parchment for easy release; avoid greasing the sides so cakes rise straight.
- Beat the eggs and sugar on high until pale and tripled in volume—this is the main leavening for the cake.
- Sift and fold in the flour gently until no streaks remain; overworking will deflate the batter.
- Divide batter between prepared pans and bake until the tops are golden and a toothpick comes out clean; let cool briefly in pan, then release to a rack and cool completely before handling.
- While the first cake bakes, pulse the strawberries to a chunky puree and chill the mixture; prepare the frosting by beating cream cheese smooth, then folding in whipped cream until airy.
- Trim and, if desired, split the layers horizontally for more ribboned strata. Place the bottom layer on your serving plate and spread with a portion of the strawberry filling, followed by a thin layer of frosting to act as adhesive between fruit and cake.
- Repeat the layering sequence—cake, strawberry, frosting—until assembled. Reserve some frosting for the exterior; crumb-coat first, chill briefly, then finish with a smooth outer coat.
- Decorate the top with fresh strawberries and, if using, melted chocolate or shavings. Chill to set the layers before slicing and serving to ensure clean cuts and stable structure.
Pro Tip for strawberry layer cake: a gluten-free swap that holds up
- I recommend using a commercially formulated 1-to-1 gluten-free flour blend that includes a binding agent like xanthan gum; these blends mimic the structure of all-purpose flour and give the cake height without crumbling.
- Expect a slightly different crumb—often a bit denser and more tender. I compensate by ensuring the egg foam is well-whipped and by gently warming the gluten-free batter for a minute longer in the oven if needed.
- Test a single layer first to dial in bake time for your oven and blend; once you know how the blend behaves, you’ll reproduce bakery-quality layers reliably.
How to store, make-ahead, and serve your strawberry layer cake
- Refrigerate the cake in an airtight cake carrier or loosely tented with plastic wrap to protect it from absorbing fridge odors; it keeps well for 2–3 days with the fruit and frosting intact.
- Make-ahead options: bake and freeze unfilled cooled layers wrapped tightly, then thaw overnight in the refrigerator before assembling. You can also prepare the strawberry filling and freeze it in a sealed container; thaw in the fridge and drain any excess liquid before use.
- For transport, stabilize the cake with a thin collar of parchment around the sides and chill until the frosting firms; carry on a flat surface to prevent shifting.
- Serve slices slightly chilled so the frosting holds its shape, but not so cold that the flavors are muted—bring to just below room temperature for the best aroma and texture.
Variations and Seasonal Tips
- Brighten the filling with a little orange or lemon zest for a citrus lift that complements the strawberries’ sweetness.
- Add a subtle herbal note—small amounts of chopped basil or mint folded into the strawberry filling awaken the flavor without overpowering the cake.
- In cooler months, swap half the fresh strawberries for roasted berries or a cooked-down compote to concentrate flavor and reduce excess juice.
- For those who can’t get enough strawberry flavors, our strawberry cheesecake is another great dessert to try—pairing small slices of each makes for an impressive dessert spread.
Troubleshooting common mistakes
- Dense cake: I’ve found this usually means the eggs weren’t whipped long enough or the flour was overfolded. Beat the eggs to a pale, ribbon stage and fold gently.
- Watery filling: If I’ve used very juicy berries, I add a little cornstarch and chill the filling before assembly to firm it up and prevent bleeding.
- Frosting that won’t hold shape: Make sure your cream-cheese is soft but not warm; if it’s too soft, chill briefly and re-whip. Adding a small amount of stabilized whipped cream can help.
- Uneven layers: If I see one side higher than the other, I trim lightly with a serrated knife and level the layer before stacking—small corrections make a big visual difference.
- Dry cake: Overbaking is usually the culprit. I start checking for doneness a few minutes before the expected finish and rely on a toothpick or the spring-back method rather than the clock alone.
Frequently Asked Questions
What makes this strawberry layer cake perfect for celebrations?
This cake is not only visually stunning with its beautiful layers and fresh strawberries, but it also offers a delicious blend of flavors and textures that will impress your guests at any gathering.
Can I make this cake gluten-free?
Yes! You can substitute the all-purpose flour with a gluten-free flour blend to make this cake suitable for gluten-free diets.
How do I ensure my cake layers are tall and even?
To achieve tall, even layers, make sure to beat your eggs and sugar until they are fluffy and fully incorporated before adding the flour. Also, try to avoid overmixing the batter once the flour is added.
What can I do if my strawberry filling becomes watery?
To prevent a watery filling, make sure to blend the strawberries to a chunky consistency and consider adding a little cornstarch to help thicken the mixture.
How should I store any leftover strawberry layer cake?
Store any leftover cake in an airtight container in the refrigerator to keep it fresh. It can also be frozen for longer storage; just wrap it tightly in plastic wrap.
Strawberry Layer Cake
Ingredients
Method
- Grease and line the bottom of a 9x13" cake pan with parchment paper.
- In a mixer, whisk together 6 eggs and 1 cup sugar on high speed for 10 min.
- Sift in 1 cup all-purpose flour and gently fold until incorporated.
- Transfer to the lined baking pan and bake until golden, about 17-20 min.
- Let the baked cake cool to room temperature before removing the parchment paper.
- Blend strawberries to a chunky applesauce consistency.
- Beat cream cheese with sugar until smooth, then add whipping cream.
- Layer the cake with strawberry puree and cream cheese frosting.
- Decorate with fresh strawberries and melted chocolate if desired.