
I learned this Japanese cheesecake trick the hard way: after a few sad, sunken cakes I focused on technique instead of just ingredients. Over many bakes I kept the light, fluffy interior while trimming calories by swapping in reduced-fat cream cheese and relying on whipped egg whites for structure. The result is a cloud-like cake that still smells of vanilla and a bright touch of lemon, yet comes in at about 160 calories per slice.
In my kitchen this became the go-to dessert for guests who are watching calories but refuse to compromise on texture. It doesn’t taste like a “diet” cake — the top takes on a gentle golden blush in the oven while the center remains pillowy and barely jiggles. I love pulling it from the water bath and letting that warm, citrusy aroma fill the room.
I’ll walk you through why the reduced-fat swap works, which techniques protect the airy structure, and how to avoid the collapse that trips up many bakers. I also include a few no-bake-friendly variation ideas later if you prefer to skip the oven entirely on busy days.
Read on for the equipment and ingredient basics, the step-by-step method, and my pro tips for keeping this cheesecake tall, tender, and reliably light every single time.
Why this viral Japanese cheesecake hack is perfect for guilt-free desserts
Low-calorie desserts matter when you want something that satisfies without undoing your progress. This cheesecake delivers a real dessert experience — silky cream cheese flavor with a marshmallow-like lift — while keeping calories restrained by focusing on aeration rather than heavy fats. The viral appeal comes from that surprising texture: you expect dense cheesecake, and instead you get a cloud that melts on the tongue.
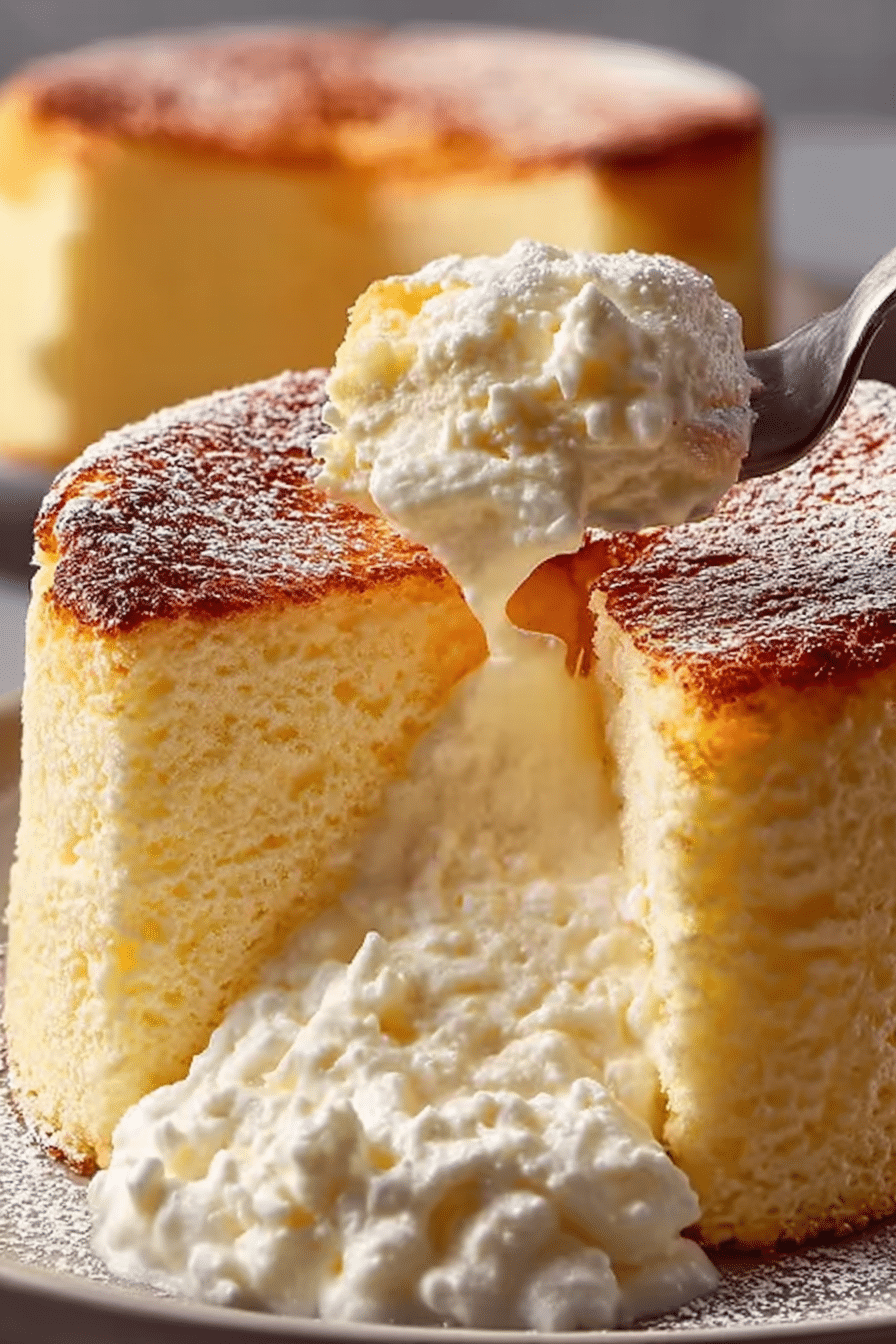
Sensory note: you’ll notice a soft vanilla scent with a clean lemon edge as soon as you open the oven. The first slice reveals a pale, custardy interior with a soft spring when pressed gently — a joyful contrast to the thin, golden top.
Everything You Need for Viral Japanese Cheesecake Hack
Lay everything out on your counter so you can see it all at once — it keeps the process calm and predictable. Below are the ingredients and tools you’ll rely on; I also mention easy substitutions if you have dietary preferences.
- Reduced-fat cream cheese – The creamy base that lowers calories while still offering that classic tang; choose a block-style variety for better texture.
- Eggs (separated) – Yolks enrich the batter; whites are whipped into a meringue that creates the cloud-like lift.
- Milk or unsweetened non-dairy milk – Adds moisture and silk without adding heavy fat; use what you prefer.
- Vanilla extract – Aromatic backbone; pure vanilla gives the cleanest flavor.
- Lemon juice (or a little zest) – Brightens the rich base and balances sweetness.
- Cornstarch – Stabilizes the batter so it sets softly without becoming rubbery.
- Monk fruit sweetener or granulated sugar – Sweetens the meringue; choose a granulated blend made for baking if you want lower calories.
- Cream of tartar and a pinch of salt – Help the egg whites reach stable peaks and improve volume.
- Springform pan and parchment – A 7-inch springform works beautifully; line bottom and sides to prevent sticking.
- Roasting pan or large baking tray – For the water bath; even gentle heat is crucial.
- Electric mixer and rubber spatula – The mixer whips stable egg whites; the spatula lets you fold gently without deflating the batter.
The Secret to the Cloud‑Like Texture
The airy texture is all about air management: you whip tens of tiny air bubbles into egg whites, then fold them into a dense cream-cheese base so those bubbles stay intact during baking. The contrast between the silky base and the frothy meringue is what gives the cake its lift. Visual transformation: the base starts glossy and thick, and after adding whipped whites it lightens dramatically — from heavy to almost mousse-like.
The water bath is the other unsung hero. It wraps the pan in gentle, even heat so the outside doesn’t overbake while the center sets slowly. That slow set keeps cracks and dryness at bay and helps keep the center soft rather than rubbery.
Why Reduced‑Fat Cream Cheese (and Whipped Egg Whites) Work
Reduced-fat cream cheese trims calories by cutting the fat content while still contributing the tang and creaminess you expect. When properly softened and beaten until smooth, it gives a silky base that pairs beautifully with whipped egg whites — the whites provide lift plus a protein boost without the extra fat.
Egg whites are mostly protein, so this cake ends up higher in protein per slice than a typical rich cheesecake. If you need alternative products, a high-quality low-fat cream cheese or a cultured plant-based cream cheese can work; the texture will vary, so adjust whipping and folding carefully.
Full Nutrition Breakdown: Calories, Protein & Macros per Slice
This recipe yields about eight slices. Per slice, the approximate nutrition is:
- Calories: ~160 calories
- Protein: ~9 g — thanks mainly to the eggs
- Fat: ~6 g — reduced by using lower-fat cream cheese
- Carbohydrates: ~18 g — from the sweetener and any starch
Why this matters for weight-loss goals: the combination of moderate protein and low-to-moderate fat helps you feel satisfied without a heavy calorie load. The eggs also contribute micronutrients like B vitamins and selenium, while dairy adds small amounts of calcium and vitamin D depending on the product you use.
For those tracking similar recipes, you might also enjoy a lighter baked treat like a blueberry cream cheese loaf that aligns with comparable nutrition profiles.
How to Make Viral Japanese Cheesecake Hack (Step‑by‑Step)
Follow these steps carefully and keep an eye on texture rather than timing alone. Use gentle folding and a steady water bath for the best result.
- Preheat your oven to a moderate temperature appropriate for gentle baking and prepare a 7-inch springform pan by lining bottom and sides with parchment. Position a larger roasting pan nearby for the water bath.
- Beat the softened reduced‑fat cream cheese in a medium bowl until fully smooth and free of lumps; aim for a creamy, silky texture before adding other ingredients.
- Add the egg yolks, milk, vanilla, a splash of lemon juice, and cornstarch to the cream cheese. Mix on medium speed until the mixture is homogeneous and glossy; set this base aside.
- In a separate large, completely clean bowl, begin beating the egg whites with cream of tartar and a pinch of salt until foamy.
- Gradually sprinkle in your monk fruit sweetener (or sugar) while continuing to beat. Increase the mixer speed and whip until soft-to-medium peaks form — the peaks should bend slightly at the tips.
- Fold one-third of the whipped egg whites into the cream cheese base using a spatula, stirring in gentle circular motions to lighten the batter.
- Add the remaining egg whites in two additions, folding carefully from the bottom up and rotating the bowl. Stop folding when no white streaks remain; a few small air pockets are fine — over-folding will deflate the batter.
- Pour the batter into the prepared springform pan and tap the pan gently on the counter a couple of times to release large bubbles.
- Place the cake pan inside the larger roasting pan and carefully pour hot water into the outer pan until it comes about halfway up the sides of the cake pan to create a water bath.
- Bake until the top is lightly golden and the center still jiggles slightly when you move the pan; the cake should be set but not completely firm — this usually takes under an hour depending on your oven.
- Turn off the oven, crack the door open about four inches, and allow the cake to cool gradually inside for 30 minutes — this slow cooldown reduces the chance of collapse.
- Remove the cake from the oven and water bath, cool to room temperature on a wire rack, then cover and refrigerate for at least three hours or overnight to let the texture firm up before slicing.
- Run a thin knife around the edges before releasing the springform and slice with a clean knife, wiping between cuts for neat slices.
Pro Tip for viral japanese cheesecake hack: Preventing Collapse & Sinking
Note: Pro-Tips, Troubleshooting, and Variations are presented as bulleted lists for easy scanning.
- I always make sure the cream cheese is completely smooth before adding yolks — lumps demand more mixing later and can deflate the batter.
- Whip egg whites to soft-to-medium peaks; over-whipping makes them dry and harder to fold in without breaking the structure.
- Fold with a light hand: use wide arcs from the bottom to the top and stop as soon as the batter looks uniform.
- Use a hot but not boiling water bath and pour it carefully to avoid splashing into the cake pan.
- Cool gradually: leaving the cake in the oven with the door ajar prevents a sudden temperature change that often causes sinking.
- If your oven runs hot, rotate the pan halfway through baking or lower the temperature slightly and extend bake time for a gentler set.
How to Store, Make‑Ahead & Easy Variations
- To store: keep the cheesecake covered in the refrigerator for up to 4 days; wrap lightly to avoid drying the top.
- To freeze: slice into portions, wrap individually, and freeze for up to one month; thaw in the refrigerator overnight before serving.
- Make-ahead: you can bake the cake a day ahead and refrigerate; chilling overnight improves sliceability and flavor melding.
- No-bake variation: try a chilled mascarpone-and-gelatin base folded with whipped egg whites or stabilized whipped cream for a similar mouthfeel without an oven.
- Flavor swaps: fold in a little citrus zest, matcha powder, or a spoonful of fruit purée to vary the profile while keeping the technique the same.
- If you’re planning a full meal, consider our sweet and spicy honey sriracha baked salmon for a delicious main course alongside the cheesecake.
Ideas for Garnishing or Pairing the Cheesecake with Other Desserts
Simple garnishes let the texture shine: a dusting of powdered monk fruit blend, a few fresh berries, or a light berry coulis. For a citrus accent, a few thin strips of lemon zest placed atop each slice bring brightness without extra calories.
For a dessert spread, pair slices with lighter fruit-forward bites — I like offering a tangy mini tart or a simple fruit compote. For inspiration, try serving the cheesecake alongside mini pineapple upside-down cheesecakes or a fruit-forward crumble for guests who want to sample multiple small desserts.
Or consider enhancing your dessert experience by pairing it with a blueberry crumble cheesecake for a burst of complementary flavor.
User Modifications and Variations
- Swap sweeteners: many readers use erythritol or a monk fruit blend — adjust to taste and watch for cooling effects some sugar substitutes can add.
- Make it dairy-free: try a cultured plant-based cream cheese and a non-dairy milk; expect a slightly different mouthfeel and increase vigilance when whipping and folding.
- Boost protein: add a scoop of neutral-flavored protein powder to the yolk mixture, but keep an eye on texture and fold carefully.
- Share your tweaks: I encourage you to experiment and post photos or notes — community tips often reveal the best little tweaks for different ovens and ingredient brands.
Frequently Asked Questions
What makes this Japanese cheesecake recipe a guilt-free dessert?
This viral Japanese cheesecake hack is guilt-free because it uses reduced-fat cream cheese and whipped egg whites, resulting in a light and fluffy dessert that is only 160 calories per slice!
Can I use regular cream cheese instead of reduced-fat cream cheese?
While you can use regular cream cheese, opting for reduced-fat will keep the calorie count lower and maintain the light texture that makes this cheesecake special.
How long does the cheesecake need to chill after baking?
It’s best to refrigerate the cheesecake for at least 3 hours, but overnight is even better for achieving the perfect firm texture.
What is a water bath, and why do I need it for this recipe?
A water bath helps to bake the cheesecake evenly and prevents it from cracking. It provides a gentle heat that creates the desired fluffy texture.
Can I add flavors or toppings to this cheesecake?
Absolutely! You can add vanilla extract, lemon zest, or even fruits for flavor. Toppings like whipped cream or fruit coulis also make great additions.
Viral Japanese Cheesecake Hack
Ingredients
Method
- Preheat oven to 320°F (160°C). Line a 7-inch round springform pan with parchment paper on bottom and sides. Prepare a larger roasting pan for water bath.
- In a medium bowl, beat softened cream cheese until smooth and creamy with no lumps, about 2 minutes.
- Add egg yolks, milk, vanilla extract, lemon juice, and cornstarch to cream cheese. Mix on medium speed until fully combined and silky smooth. Set aside.
- In a separate large clean bowl, beat egg whites with cream of tartar and salt using an electric mixer on medium speed until foamy.
- Gradually add monk fruit sweetener (or sugar) while continuing to beat. Increase speed to medium-high and whip until soft to medium peaks form.
- Gently fold one-third of the whipped egg whites into the cream cheese mixture using a spatula, stirring in circular motions.
- Add remaining egg whites in two additions, folding gently from bottom to top until no white streaks remain.
- Pour batter into prepared pan and tap gently on counter. Place pan in a larger roasting pan filled halfway with hot water. Bake for 50-60 minutes.
- Turn off oven, crack door, and let cake cool inside for 30 minutes. Remove cake and cool to room temperature for about 1 hour. Refrigerate for at least 3 hours or overnight.
- Run a thin knife around edges before releasing springform pan. Slice with a clean knife, wiping between cuts.