I made this Buster Bar Ice Cream Cake on a humid Saturday afternoon when the ice cream cravings hit and the idea of turning a Dairy Queen favorite into a tray dessert sounded like a very good life choice. Imagine the snap of a chocolate shell, the creamy give of vanilla ice cream, the salty crunch of red-skinned peanuts, and a thin, fudgy ribbon in between — all in a single, easy-to-slice cake. That combination is what makes this dessert addictive: textural contrast, cold comfort, and a nostalgic flavor that reads like a Buster Bar disguised as a party cake.
I built this in my kitchen with a gallon of vanilla ice cream that had just softened to a scoopable-but-still-firm stage and a jar of hot fudge that almost refused to behave (more on that below). The batter-free, no-bake nature of the cake makes it one of my go-to dessert solutions when I need something impressive fast: it sets in the freezer, slices cleanly when cold, and travels well to potlucks. If you’re serving 24 pieces, expect small, satisfying squares that pack a lot of flavor.
Ingredients Needed for the Recipe
Below are the components you’ll need. I list them conversationally so they’re easy to scan; the exact amounts and timing are included later in the method so you can follow the recipe precisely.
- Chocolate graham crackers – the quick, slightly sweet base that creates a stable bottom layer and soaks up just enough moisture to hold everything together.
- Vanilla ice cream – the creamy canvas; use a good-quality vanilla for the best flavor and smooth texture.
- Hot fudge sauce – provides the rich, gooey ribbon of chocolate; warm it briefly if it’s too thick to pour.
- Red skin peanuts – give the cake that classic Buster Bar crunch and a roasted, nutty pop.
- Magic Shell-style chocolate coating – the final glossy top that hardens into a thin, snappy shell.
Dietary alternatives: swap the ice cream for a dairy-free vanilla, use dairy-free fudge and chocolate coating, and choose gluten-free graham-style crackers to make the cake suitable for dairy-free and gluten-free diets. I’ll note troubleshooting tips for these swaps in the notes below; some dairy-free ice creams freeze harder and may need a longer thaw before you spread them.
Step-by-Step Instructions with Photos
I build this cake in a 9×13-inch baking dish. The steps are straightforward, but the small details — how softened the ice cream is, how thin you spread the fudge, and how evenly you distribute the peanuts — will make a big difference in texture and appearance.
- Soften the ice cream. Remove the gallon of vanilla from the freezer and let it sit at room temperature for 10–15 minutes. You want it scoopable and pliable but not melted. In my kitchen, it’s a sweet spot when the surface gives to the scoop with a little resistance; any colder and it tears the graham crackers, any warmer and it turns soupy.
- Line the pan with graham crackers. Arrange chocolate graham crackers across the bottom of a 9×13-inch pan, breaking a few to fill gaps so you have a complete first layer. The crackers act like a crust — they don’t need to be packed, just laid flat in a single layer. If a few edges poke up, tuck them down so they’re flush with the pan sides.
- Scoop and flatten half the ice cream. Scoop about half the softened ice cream over the graham cracker layer. Use a large ice cream scoop or a stiff spatula to press it down into an even layer. Don’t worry about perfection; small ripples are okay because the fudge layer will smooth things out. Tip from experience: warm your spatula under hot water and dry it before smoothing — it glides over ice cream instead of dragging.
- Warm and pour the hot fudge. Pour a jar of hot fudge sauce in a thin, even layer over the ice cream. If the fudge is too stiff, microwave it in 10–15 second bursts, stirring in between until it’s pourable but still relatively thick. Pouring very hot fudge over cold ice cream will immediately set it into thin ribbons — which is fine — but lukewarm fudge spreads more evenly. Sprinkle half of your red skin peanuts over the fudge so they’re embedded in that chocolate ribbon.
- Top with remaining ice cream. Scoop the remaining ice cream over the fudge and peanuts, pressing gently to seal the layers. The goal is a uniform, level top so the cake slices cleanly later. If you see the fudge pushing up through, press a little more ice cream on the edges to seal it in.
- Finish with peanuts and Magic Shell. Scatter the remaining red skin peanuts evenly across the top. Drizzle the Magic Shell-style chocolate coating over the nuts so it locks them into place and forms that characteristic thin chocolate shell when it sets. When I first drizzled, I had a few dry spots — a quick second pass with the bottle fixed it.
- Freeze the cake. Place the pan in the freezer for at least 3 hours to firm up. For best slicing and travel-readiness, freeze overnight. I usually wrap the whole pan in plastic wrap after 4–6 hours to prevent freezer burn if I’m keeping it longer.
- Slice and serve. Use a sharp knife warmed under hot water and wiped dry between cuts to get the cleanest slices. Cut into 24 small rectangles or into larger squares if you prefer bigger portions. Listen for the small snap of the top shell and enjoy the contrast between the soft ice cream and crunchy peanuts.
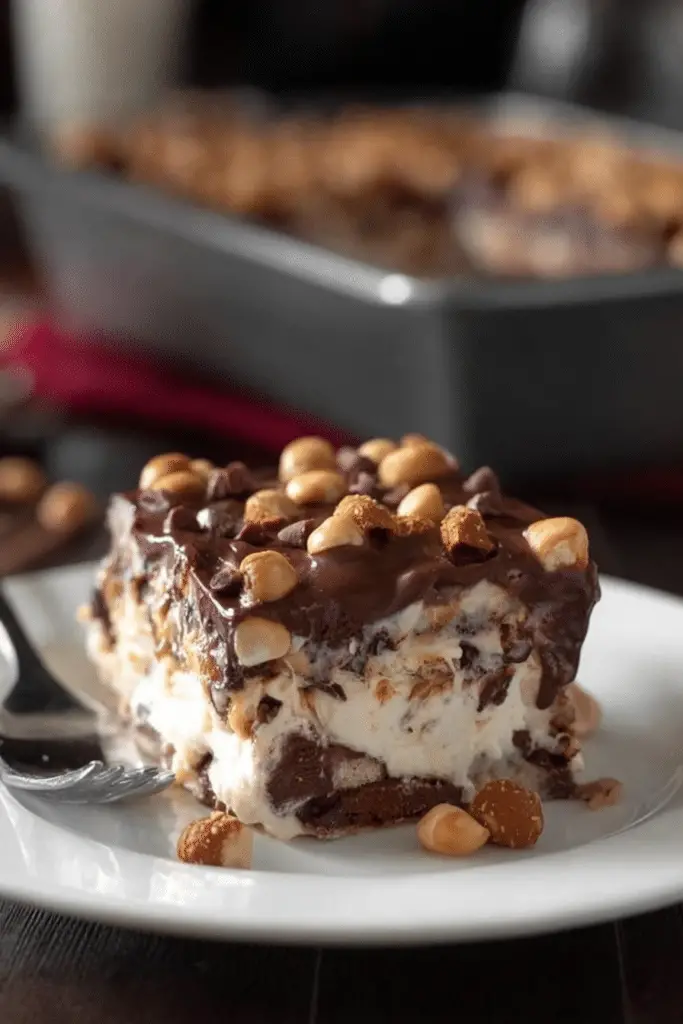
Photo notes: the featured image above shows a close-up cross-section of the cake — you can see the thin fudge ribbon and the peanuts suspended in the top. If you’re photographing the cake yourself, shoot it immediately after you slice one square so you capture the glossy top before it fogs from the freezer.
Nutritional Information and Serving Suggestions
Per the original recipe calculations, each serving (if you cut the cake into 24 pieces) contains roughly:
- Calories: about 488 kcal
- Fat: approximately 25 g
- Carbohydrates: around 55 g
- Protein: roughly 8 g
Serving guidance: small slices pack a lot of indulgence, so I usually serve this alongside fresh fruit to balance the richness — a platter of sliced strawberries or a bowl of mixed berries works beautifully. If you want a plated dessert, add a tiny spoon of warm sauce on the side and a mint leaf for color contrast.
Storage: keep leftovers tightly covered in the freezer; the cake holds up well for up to a week. If you expect to store it longer, press parchment or plastic wrap directly onto the surface before sealing the pan to protect the top shell and prevent ice crystals.
For a fresh twist, learn how to freeze peaches to use as a topping or side for your dessert!
Variations and Customizations
This cake is a blank canvas — switch things up depending on what you have in the pantry or the mood of your crowd. Here are tested swaps that worked in my kitchen:
- Ice cream flavors – try chocolate, coffee, or peanut butter ice cream for a deeper flavor profile; just be mindful that a stronger-flavored ice cream will dominate the peanuts and fudge.
- Crust options – crushed chocolate sandwich cookies pressed into the bottom elevate the chocolate factor and form a slightly firmer base.
- Nuts – if red-skin peanuts aren’t your thing, roasted salted peanuts, chopped almonds, or even toasted hazelnuts work well; adjust the salt level in the nuts to balance sweetness.
- Sauce substitutions – swap the hot fudge for warm caramel or salted dulce de leche for a sweet-and-salty twist; spread thinner for easier slicing.
If you’re looking for a delicious dessert option, try making a vegan chocolate brownie sundae as an alternative to the classic Buster Bar Ice Cream Cake.
History of the Buster Bar Dessert
The Buster Bar is a nostalgic handheld ice cream treat known for its layers: vanilla ice cream, fudge, and a hard chocolate coating with peanuts. The idea of converting these components into a tray cake is a natural evolution — the flavors are already anointed in many memories, and turning them into a cake scales the treat for a party. I’ve served this version at summer barbecues and birthday gatherings where people instantly recognize the flavor combination and comment on how it tastes like a grown-up version of the original frozen bar.
While the handheld Buster Bar has been a fast-food favorite, the cake version leans into convenience: fewer trips to the shop, easier bulk servings, and the joy of slicing through a hardened top to reveal those peanuts and fudge swirled inside.
Tips for Perfecting Your Buster Bar Cake
- Ice cream consistency – too hard and it will tear the crackers; too soft and the fudge will sink through. Aim for scoopable but firm (about 10–15 minutes out of the freezer depending on your room temperature).
- Fudge temperature – warm fudge spreads more smoothly but cools quickly on ice cream; if it’s rock-solid straight from the jar, give it short microwave bursts. Thick fudge creates the best defined ribbons.
- Layer thickness – I find half-and-half layers work best: two roughly equal ice cream layers sandwiching a thin fudge ribbon and nuts. If you make the fudge layer too thick, the cake becomes hard to cut and tends to slide when serving.
- Cutting neat slices – warm your knife under hot water, dry it, and slice in a single long motion where possible. Wipe the blade between cuts for clean edges.
- Troubleshooting – if the top shell doesn’t set fully, it’s usually because the Magic Shell was too warm when applied or the peanuts were wet. Let the pan chill in the coldest part of your freezer for another hour and then recoat small spots if needed.
- Dairy-free notes – many dairy-free ice creams freeze harder. Let them sit out longer to soften and use a flexible silicone spatula to smooth layers without tearing the crackers.
FAQ
Can I make the Buster Bar Ice Cream Cake dairy-free?
Yes! You can use dairy-free ice cream and check for dairy-free chocolate options for the Magic Shell and fudge sauce.
How long does it take to freeze the cake?
The cake should be frozen for at least 3 hours before slicing, but overnight is best for optimal firmness.
What can I substitute for the chocolate graham crackers?
You can use regular graham crackers or gluten-free graham crackers if you’re looking for a gluten-free option.
Can I customize the toppings for this recipe?
Absolutely! You can add different nuts, switch up the fudge with caramel, or even use a different ice cream flavor to make it your own.
How should I store leftover Buster Bar Ice Cream Cake?
Store leftovers in the freezer, tightly covered. It will keep well for up to a week!
Conclusion and Invitation to Share Your Experience
This Buster Bar Ice Cream Cake is one of those recipes I make when friends are coming over and I want something that feels special without a lot of hands-on time. It’s straightforward: a graham-cracker base, two layers of vanilla ice cream, a ribbon of hot fudge, and crunchy peanuts topped with a filmed chocolate shell. Expect a dessert that’s creamy, crunchy, and unmistakably nostalgic.
For another sweet treat, consider making chocolate peanut butter protein balls to share with friends alongside your Buster Bar Ice Cream Cake.
If you love layered desserts, you might also enjoy making a fresh raspberry tiramisu for your next gathering.
Try the recipe, make one swap, and tell me how it went — did you go nuts with nuts, or did you keep it classic? I read every comment and enjoy hearing what readers did differently in their kitchens.

Buster Bar Ice Cream Cake
Ingredients
Method
- Set the ice cream out to soften. Line the bottom of a 9X13 inch baking dish with graham crackers. Break several crackers in half...
- Scoop half the ice cream on top of the graham crackers. Use a scooper or stiff spatula to flatten it out...
- Pour the fudge over the first ice cream layer and sprinkle half the peanuts over...
- Scoop the remaining ice cream over the fudge and peanuts, pressing gently...
- Sprinkle the remaining peanuts over the ice cream and drizzle with Magic Shell...