
I make these cheesy Rotel sausage balls whenever I need something hot, easy, and loved by a crowd. They come together faster than most appetizers, travel well to potlucks, and are forgiving when life gets hectic in my kitchen. I like that you can tweak heat levels or swap a few ingredients and still end up with golden, juicy bites everyone reaches for.
Sometimes I mix the filling a little more than I think I should — and that extra attention pays off. I’ve learned the hard way that a tacky mixture that’s also well-chilled yields tighter, neater balls instead of crumbly lumps. When they come out of the oven, the smell of cooked sausage and melted cheddar fills the house and you can see little flecks of red and green from the diced chilies peeking through the browned crust.
I enjoy making a double batch ahead of time for parties. They freeze beautifully, and a quick reheat in the oven brings back that just-baked crunch while the inside stays soft and cheesy. If you’re hosting, these give you time to focus on guests while a reliable, crowd-pleasing appetizer bakes away.
Why These Cheesy Rotel Sausage Balls Are Ideal for Busy Hosts
These sausage balls are a host’s best bet when the calendar is full: minimal active prep, easy transport, and big payoff at the table. The baking time is short and hands-on time is smaller still, so you can prep while finishing other dishes or getting dressed. The mix of cooked sausage, cream cheese, and shredded cheddar guarantees rich flavor without a fussy setup.
Because they travel well, they’re perfect for potlucks and tailgates — pack them in an insulated carrier or reheat quickly at your destination. You can also tailor them: swap hot sausage for mild if kids are around, or add a pinch of smoked paprika for deeper savory notes.
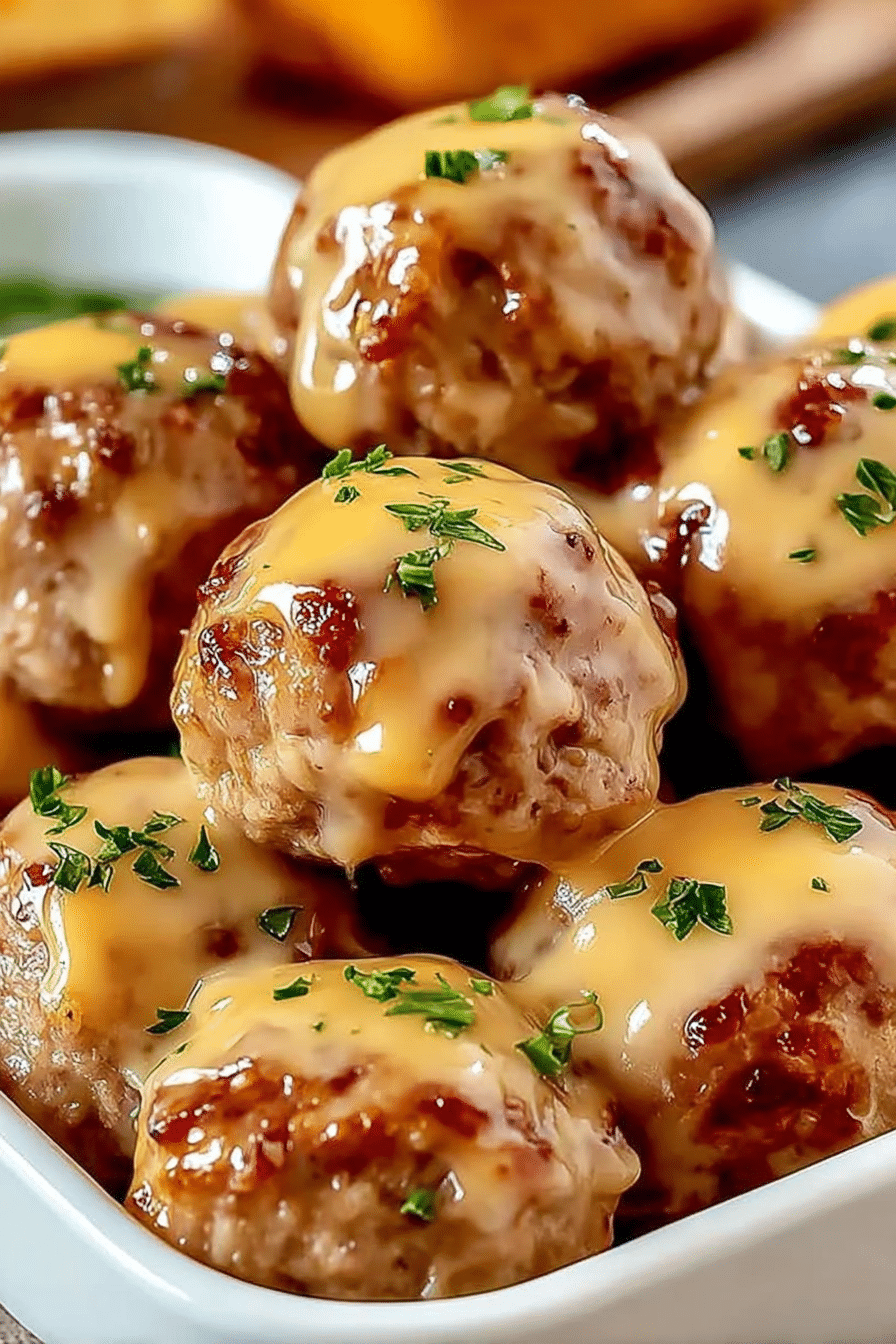
Pairing them with hearty sides makes a fuller spread; for busy hosts, adding our Cheese Enchiladas to your menu will ensure your guests are thrilled. Visually, these sausage balls arrive golden-brown with melted cheese peeking through, and the aroma of browned meat and warm cheese invites people to dig in.
Everything You Need for Cheesy Rotel Sausage Balls
Below I walk through the core ingredients and tools so you know why each item matters and how to substitute if needed.
- Ground sausage – The backbone of flavor and fat that keeps the bites juicy; choose hot or mild based on your crowd or use turkey sausage for a lighter option.
- Cream cheese – Adds creaminess and helps bind the mixture while keeping the interior tender; use plant-based cream cheese for a dairy-free version.
- Rotel diced tomatoes and green chilies – Provides acidity, brightness, and a mild chili kick; drain well to avoid excess moisture.
- Shredded cheddar – Gives savory, melty pockets of cheese; swap for dairy-free cheddar-style shreds if needed.
- Biscuit baking mix (or alternative) – Acts as the binder and gives structure; use a gluten-free baking mix to make the recipe gluten-free, or replace with a homemade mix made from all-purpose flour plus baking powder and salt.
- Seasonings (garlic powder, onion powder, black pepper) – Simple aromatics that round out the meat and cheese; adjust to taste or add smoked paprika for a deeper note.
- Essential tools – A large mixing bowl, a baking sheet lined with parchment, a fine-mesh strainer for draining, and an ice cream scoop or cookie scoop for uniform balls.
The Secret to the Perfect Texture
A perfect sausage ball is tender inside and browned outside without being greasy or dry. That balance comes from mixing, the fat from the sausage, and the right amount of binding mix so the balls hold together without getting dense.
Combine the ingredients thoroughly but don’t overwork them — you want everything evenly distributed so each bite has sausage, cheddar, and a touch of tomato. The cream cheese brings moisture and silkiness; shredded cheddar provides gooey pockets when baked. Letting the mixture rest briefly in the fridge firms it up so you can form compact, even balls.
- Troubleshooting (I use these fixes in my kitchen):
- If the mixture feels too wet, drain the Rotel more thoroughly and chill the mix; excess moisture causes spreading and mushy centers.
- If it’s crumbly, add a little more softened cream cheese or a spoonful of the baking mix until it holds when pressed.
- If the outside browns too quickly while the center is undercooked, lower the oven slightly and extend baking time until cooked through.
Why Drainage and Chill Time Matter
Excess liquid from canned tomatoes is the most common reason sausage balls go soft or fall apart. Draining prevents sogginess and helps the binder do its job. Chilling firms the fat and cream cheese so you get tighter, tidier bites that bake evenly.
- Drain the Rotel in a fine-mesh sieve for a few minutes, pressing gently with the back of a spoon to remove extra liquid.
- After you mix the batter, chill it for at least 20–30 minutes so it firms up; this makes rolling easier and helps each ball keep its shape.
- Cold balls go into a hot oven for better browning and a nice contrast between crisp exterior and tender interior.
How to Make Cheesy Rotel Sausage Balls (Step-by-Step)
- Preheat your oven to the temperature that gives even browning while cooking the centers; line a baking sheet with parchment or grease it well.
- In a large bowl, combine ground sausage, softened cream cheese, well-drained diced tomatoes and chilies, shredded cheddar, the baking mix, and seasonings. Mix until everything is evenly incorporated.
- Chill the mixture briefly if it feels too soft — this helps you form neater balls and prevents spreading during baking.
- Use a small scoop or your hands to form uniform 1-inch-ish balls and place them with space between each on the prepared sheet for even browning.
- Bake until golden brown on the outside and cooked through inside; you should see some melted cheese and a nicely browned surface as visual cues.
- Let the sausage balls rest briefly on the pan after baking so the cheeses set a little before serving.
Pro Tip for cheesy rotel sausage balls: Chill & Drain for Tighter Bites
These Pro-Tips are formatted as a bulleted list for quick scanning.
- I always drain the Rotel well — a few extra presses in a sieve makes a noticeable difference in texture.
- Chill the mixed dough for at least 20–30 minutes; colder fat and cream cheese yield tighter, less crumbly balls.
- Use a small ice cream scoop for uniform sizing so everything finishes at the same time.
- Season to taste — a pinch more garlic powder or a dash of cayenne transforms the flavor without extra work.
Easy Variations — Gluten-Free, Dairy-Free & Air Fryer Options
These variations are presented as easy-to-scan bullets so you can pick one that suits your crowd.
- Gluten-free – Swap the baking mix for a labeled gluten-free baking mix; the method stays the same, and texture will be comparable.
- Dairy-free – Use plant-based cream cheese and dairy-free shredded cheddar-style shreds; choose a higher-fat dairy-free cream cheese for better binding.
- Turkey or chicken sausage – A leaner protein option; expect a slightly different mouthfeel and consider adding a touch more cream cheese to maintain tenderness.
- Air fryer – Cook in a single layer at a moderate temperature, flipping once for even browning; reduce overall time and watch closely to avoid over-browning.
- Spicy twist – Add extra chopped chilies or a pinch of cayenne for heat, or try a recipe riff for more kick:If you’re looking for a twist, try our Spicy Rotel Cheese Sausage Balls for an exciting variation.
How to Store, Reheat, and Make-Ahead Sausage Balls
These sausage balls are fantastic for make-ahead entertaining and freeze-thaw cycles if handled right.
- Fridge: Cool completely, then store in an airtight container for 3–4 days; separate layers with parchment so they don’t stick.
- Freeze: Flash-freeze on a sheet until firm, then transfer to a freezer bag or container. Freeze for up to 3 months. Reheat from frozen or thaw overnight in the fridge before reheating.
- Reheating: For best texture, reheat in a hot oven or air fryer until warmed and the exterior crisps again; the microwave works in a pinch but will soften the crust.
- Make-ahead: You can form raw balls and freeze them on a sheet, then bake straight from frozen with a few extra minutes. For planning other make-ahead dishes, try pairing with items that store well like our Creamy Garlic Shrimp Pasta.
Pairing Suggestions for Dipping Sauces and Sides
A few thoughtful dips and sides make these sausage balls feel like a proper spread. Try a cool ranch or buttermilk-style dip to cut through the richness, a tangy honey mustard for sweet-savory balance, or a smoky barbecue sauce for depth. Simple salsas and pickles also brighten each bite.
For a fuller brunch or buffet setup, serve alongside roasted potatoes, fresh veggie platters, or a warm casserole. Complement your Cheesy Rotel Sausage Balls with our Cheesy Potato and Egg Bake for a hearty combo that keeps guests happy.
Frequently Asked Questions
What kind of sausage is best for Rotel balls?
You can use breakfast sausage, either hot or mild, or even turkey sausage for a lighter option. Choose your favorite for the best flavor!
Can I substitute Bisquick with all-purpose flour?
Yes, you can use all-purpose flour! Just mix in some baking powder and salt to create a similar binding effect.
How should I store leftover sausage balls?
Store them in an airtight container in the fridge for up to 3-4 days. They also freeze well for longer storage!
Can I make these sausage balls gluten-free?
Absolutely! Use a gluten-free baking mix instead of Bisquick to ensure they are gluten-free.
What are some good dipping sauces for sausage balls?
Pair your sausage balls with ranch dressing, barbecue sauce, or a spicy mustard for delicious flavor combinations!
Cheesy Rotel Sausage Balls
Ingredients
Method
- Preheat your oven to 375°F and line a baking sheet with parchment paper or grease it well.
- Combine the sausage, cream cheese, drained Rotel, cheddar, biscuit mix, and seasonings in a large bowl. Mix until well combined.
- Roll the mixture into 1-inch balls and place them on the prepared baking sheet.
- Bake for 20-25 minutes until golden brown and cooked through.
- Optionally, sprinkle with fresh parsley or green onions and serve hot.