I make these salted chocolate peanut butter banana cups when the week gets slammed and everyone still wants a sweet treat. In my kitchen they’re the kind of recipe I reach for after piano practice, when the babysitter shows up late, or on lazy Sunday afternoons when the kids want something a little special without any fuss. They sit in the freezer, ready for random snack emergencies, and they always disappear faster than I expect.
I love that this is a no-bake recipe that still feels indulgent: a crisp snap of chocolate, a creamy peanut butter center, and a sweet banana slice that adds freshness. I’ve tested different chocolates and peanut butters in my kitchen; small swaps change the texture and flavor in obvious ways, so I’ll point out where to be careful. If you want something made ahead for school lunches or a weekend treat, these are ideal — make a few dozen and keep them chilled.
I’m sharing the techniques I use to get that Reese’s-like peanut butter texture without it turning greasy or rock-hard. Read on for straightforward tips, easy swaps for food restrictions, and simple storage tricks so you can pull one from the freezer and serve it like you planned it all along.
Why these chocolate peanut butter banana cups are perfect when you’re short on time
These cups shine on busy days because they demand very little active work and no oven time. I typically have the whole batch ready in under an hour — most of that is passive chilling — which makes them great for situations like:
- After-school snacks when you’re shuttling kids between activities and need something quick but satisfying.
- Weeknight desserts when dinner ran long and you want something homemade without another pot or pan to wash.
- Last-minute guests or playdates — you can make a batch ahead and serve straight from the freezer.
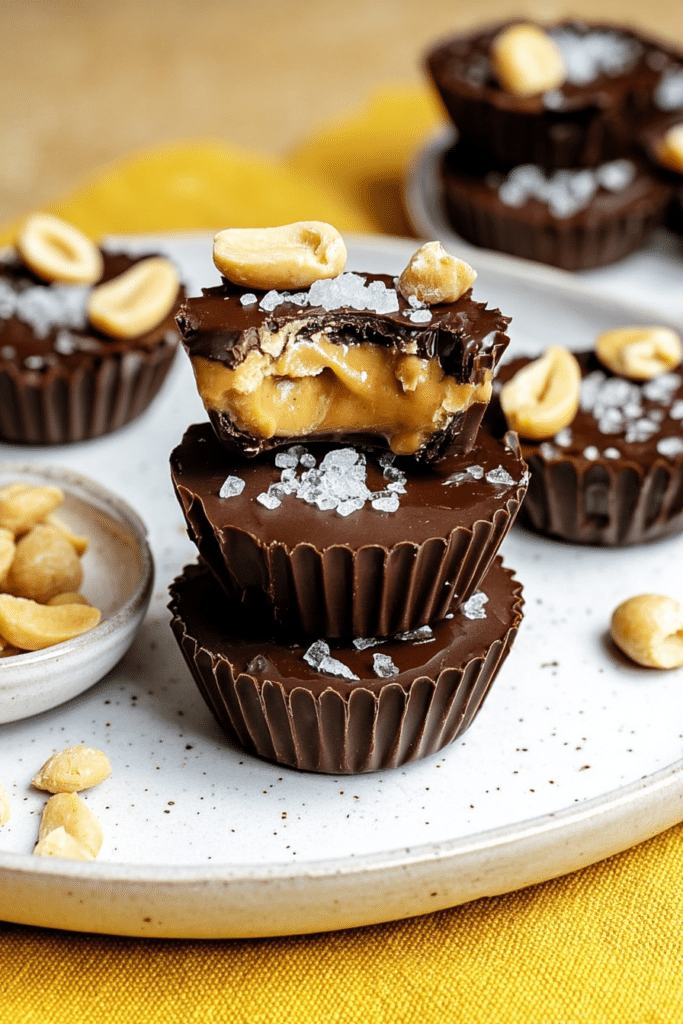
Visually, melting chocolate spreading into liners feels tidy and manageable, and the sliced banana adds a fresh pop of yellow that kids always notice. The scent of warm chocolate and peanut butter coming off the counter is an instant mood lifter — I use that to my advantage on hectic evenings.
Everything You Need for Salted Chocolate Peanut Butter Banana Cups
Gather these ingredient essentials and a couple of simple tools so the assembly flows without pauses. Using good-quality components makes a noticeable difference — especially the chocolate.
- Chocolate bar (70% dark recommended) – Provides structure and a deep chocolate flavor; darker chocolate keeps the sweetness balanced.
- Natural creamy peanut butter – Gives that slightly tangy, nutty center; the natural oils help the filling come together when warmed.
- Pure maple syrup – Acts as a binder and adds a mellow sweetness that plays well with banana.
- Virgin coconut oil – Thins the peanut butter filling slightly so it’s scoopable and helps chocolate set with a glossy finish.
- Banana – Sliced for freshness and a soft, fruity contrast to the chocolate and peanut butter.
- Finely chopped peanuts – Adds crunchy texture and nuttiness; honey-roasted offers extra sweetness and crunch.
- Flaky sea salt – A finishing touch to enhance the sweet notes and highlight the peanut flavor.
- Mini muffin liners and a mini muffin pan – Make release and portioning easy; liners keep things tidy and transportable.
- Microwave-safe bowl or small saucepan and a spoon – For melting chocolate and spreading it into liners without making a mess.
The Secret to That Reese’s-Like Peanut Butter Texture
I’ve found the texture comes down to temperature balance and a small amount of thinning fat. Here’s how I handle it so the filling is creamy but not runny:
- Warm the peanut butter slightly if it’s stiff — a few seconds in the microwave makes it pliable without overheating. This keeps it smooth when mixed with syrup and oil.
- Use a little coconut oil to loosen the peanut butter just enough so it’s scoopable and spreads into the chocolate cup easily; too much oil and the filling will separate when frozen.
- Stir the filling until it’s glossy and uniform — that tiny bit of sheen is your cue that the emulsion is right and the mouthfeel will be creamy, not gritty.
- If you substitute with other nut or seed butters, note that roasted, oilier varieties will behave differently than natural-style butters; you may need to adjust the coconut oil slightly.
When you bite into one, you want a smooth transition from crisp chocolate to creamy peanut butter to tender banana. That comes from mixing at the right temperature and using just enough thinning fat to bind everything without greasiness.
Why Chill Time Matters: Temperature Tips for No-Bake Cups
Chilling is what turns a messy assembly into neat, biteable cups. Temperature changes affect texture dramatically, so here’s how I manage it:
- Freeze the chocolate-lined cups briefly before adding the filling so the first chocolate layer sets hard and won’t blend with the peanut butter.
- Chill the filled cups until fully firm — if you rush this step the top layer of chocolate might crack or set too thinly, and the banana can become soggy.
- Avoid thawing and refreezing: let cups thaw slightly at room temperature for a minute or two before eating if they’re too hard, but keep them mostly frozen for best texture.
- Allow flavors to meld in the freezer for at least 30 minutes; a short rest improves the cohesive bite of chocolate, peanut butter, and banana.
How to Make Chocolate Peanut Butter Banana Cups (Step-by-Step)
- Line a mini muffin pan with liners so you can work quickly; having the pan ready keeps chocolate from cooling too fast while you spread.
- Melt the chocolate gently in short bursts, stirring between each interval so it’s smooth and glossy without burning.
- Spoon a small amount of melted chocolate into each liner and spread it up the sides to form a thin shell; freeze briefly until firm so it holds the filling.
- Mix the peanut butter, maple syrup, and melted coconut oil until smooth and slightly glossy; warm a bit if it’s too stiff to scoop.
- Place about a teaspoon of the peanut butter mixture into each chocolate shell, press in chopped peanuts, and top with a thin banana slice so it sits snugly in the filling.
- Cover each cup with the remaining melted chocolate, smoothing the top and sealing the edges; return to the freezer until solid.
- Sprinkle flaky sea salt on top once fully set and store in the freezer until ready to serve.
Common pitfalls and how I avoid them: don’t overheat chocolate (it will seize), don’t add too much oil to the filling (it’ll become greasy), and place banana slices only when the filling is cool enough that they won’t sink or turn mushy. If you like seasonal spin-offs, try the
For a similar sweet treat, try our chocolate peanut butter valentines heart which is perfect for any occasion.
right after you’ve sealed the tops — it’s a fun variation for themed treats.
Quick Swaps: Nut-Free, Dairy-Free & Lower-Sugar Options
Everyone’s pantry and dietary needs are different — here are practical swaps that keep the spirit of the recipe without sacrificing ease.
- Nut-free: Swap peanut butter for sunflower seed butter; it’s similar in texture and has a slightly savory edge that pairs well with banana.
- Dairy-free: Use dairy-free dark chocolate or a vegan chocolate bar to keep things fully plant-based without altering technique.
- Lower-sugar: Choose a lower-sugar dark chocolate and reduce the maple syrup slightly; you can also try liquid stevia or erythritol-based syrups in small amounts, but adjust to taste.
- Texture swaps: If your nut butter is very oily, chill it briefly before mixing to avoid a runny filling; if it’s very thick, warm gently.
If you’re looking for a healthy breakfast option, check out our peanut butter blueberry overnight oats for a quick and nutritious start to your day.
Pro Tip for chocolate peanut butter banana cups: Prep, Freeze & Serve Like a Pro
I keep these cubes organized so serving feels effortless. Note: the Pro-Tips, Troubleshooting, and Variations sections below are presented as bulleted lists for quick reading and high scannability.
- Make in batches and stack between sheets of parchment in airtight freezer containers to prevent sticking and protect the final finish.
- Label containers with date and brief contents; they stay best for several weeks and still taste great straight from the freezer.
- For parties, set a small tray out with a bowl of flaky sea salt and extra chopped peanuts so guests can customize their cups as they serve themselves.
- When serving, let cups sit at room temperature for 1–2 minutes to soften slightly for easiest bite and best flavor release.
Add-Ins and Topping Ideas to Customize Every Batch
These cups are a great base for experimenting — I like to switch up textures depending on the crowd.
- Sprinkle finely chopped pretzels or crushed graham crackers for extra crunch and a salty contrast.
- Try flavored peanut butters (honey-roasted or cinnamon) for a simple, bold twist.
- Dust a little cinnamon or cocoa powder on the final chocolate layer to add depth.
- Stir in a few mini chocolate chips or chopped dried fruit into the peanut filling for chew and texture variety.
- For a protein boost, consider adding our chocolate peanut butter protein balls as a topping or enjoy them on their own.
How to Store, Freeze, and Make-Ahead Your Banana Cups
These hold up well in the freezer, which makes them perfect for make-ahead planning and quick snacks.
- Store cups in a single layer or separated by parchment in an airtight container to prevent frost and sticking; stacked layers with parchment sheets work best.
- Keep in the freezer for several weeks; they’re ready to eat straight from the freezer or after a minute at room temperature for a softer bite.
- For transport to gatherings, keep them in a cooler with ice packs to maintain firmness until serving time.
- Make ahead idea: assemble cups completely and freeze, then transfer to long-term storage containers — they’re an easy grab-and-go dessert when you need one.
For another make-ahead option, try our banana oatmeal bars, which are perfect for healthy snacking throughout the week.
Nutritional Breakdown and Health Benefits of Ingredients
Per serving, these cups are a small, satisfying treat — roughly 130 kcal with a balance of fat, carbs, and a bit of protein. Typical macronutrient estimates per cup are:
- Calories: ~130 kcal
- Fat: ~9 g — mostly from peanut butter and dark chocolate; mostly unsaturated fats when using natural nut butter.
- Carbohydrates: ~11 g — from banana and chocolate; choose darker chocolate to reduce added sugars.
- Protein: ~3–4 g — from the peanut butter, a helpful little boost in a small snack.
Health highlights: dark chocolate contains antioxidants and can support heart health in moderation; peanut butter is a source of plant protein and healthy fats; bananas provide potassium, vitamin B6, vitamin C, and a bit of fiber — all contributors to a satisfying mini-treat that also offers some nutritional value compared with candy alone.
Frequently Asked Questions
How long do these chocolate peanut butter banana cups take to make?
They take about 45 minutes in total, which includes prep time and chilling time!
Can I make these cups nut-free?
Absolutely! You can substitute the peanut butter with sunflower seed butter or another nut-free alternative.
What’s the best way to store these cups?
Keep them in the freezer for optimal freshness! They’re perfect for snacking straight from the freezer.
Can I use a different type of chocolate for this recipe?
Yes, you can use milk chocolate or dark chocolate as per your preference, just keep in mind that it may change the flavor!
How do I achieve a creamy peanut butter filling?
Make sure to mix the peanut butter, maple syrup, and coconut oil until well combined. If it’s too thick, a quick microwave can help!

Chocolate Peanut Butter Banana Cups
Ingredients
Method
- Line a mini muffin pan with 9 mini liners.
- Melt chocolate in a microwave safe bowl until smooth. Add a heaping teaspoon to the bottom of each cup and spread up the sides with a spoon. Freeze for 5-10 minutes to harden.
- Mix peanut butter, maple syrup, and melted coconut oil in a bowl until well combined. If too thick, microwave for 20-30 seconds.
- Spoon about a teaspoon of peanut butter mixture into each cup. Top with chopped peanuts and sliced banana, then cover with remaining melted chocolate. Freeze for 30 minutes to 1 hour until solid.
- Sprinkle with flaky sea salt and enjoy straight from the freezer.