
I make deviled egg chicks every spring because they bring that silly, hands-on energy kids love. In my kitchen the bright yellow filling and tiny carrot beaks always get a chorus of ‘aww’ before anyone takes a bite. I like that they’re festive on the table but also simple enough for small hands to help decorate.
I’ve learned a few tricks from doing this with kids over the years: a sharp knife for clean cuts, a straw to punch neat olive-eye dots, and a pastry bag (or a zip-top bag with the corner snipped) for piping the filling so it looks tidy. The smell of the creamy yolk mix and the bright orange carrots always signals Easter to my family.
What I enjoy most is turning the assembly into a little station: one kid peels and stabilizes the egg, another pipes the yolk, and a third adds eyes and beaks. It keeps the chaos organized and lets everyone take credit for the final flock of chicks on the platter.
Read on for everything you need, kid-safe tool suggestions, my tips for a silky filling, and easy make-ahead ideas so your holiday stays festive and low-stress.
Make Easter Count: Why Deviled Egg Chicks Are Perfect for Kids
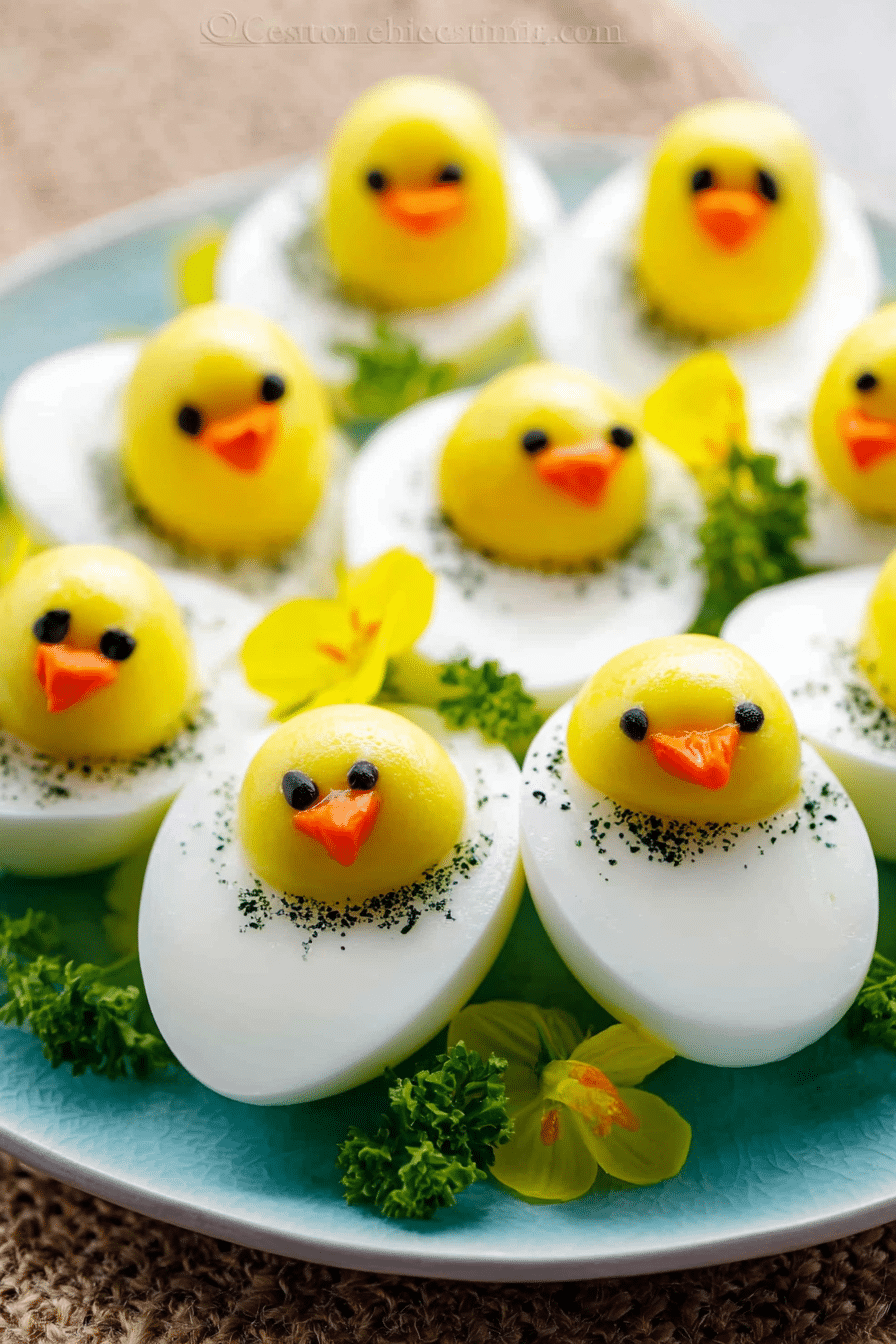
These deviled egg chicks are a visual win — bright yellow centers, round white shells, and tiny carrot beaks make a table feel playful and seasonal. They’re easy to personalize, so children can choose hat ideas (parsley, dill, or edible confetti) and place their own eyes and beaks. The process is hands-on but contained: decorating is the most interactive, low-risk step, so kids feel involved without handling hot pans.
Kids respond to color and texture, so expect excitement when the creamy yolk filling is piped back into the bright white egg cups. The sound of a plastic straw popping olive dots and the crisp snap of a carved carrot are part of the sensory fun — sight, smell, and touch all in one small, bite-sized project.
Everything You Need for Deviled Egg Chicks
Gathering good ingredients makes the assembly easier and the flavors more kid-pleasing. Below I list the essentials and suggest simple swaps so you can adapt for allergies or personal taste.
- Eggs – The star of the show. Fresh eggs that have been hard-boiled and chilled peel more cleanly and give a smooth shell surface to decorate.
- Mayonnaise – Gives the filling a creamy, smooth texture. Use a vegan mayonnaise as a dairy-free substitute.
- Mustard – Adds a gentle tang. If you prefer milder flavor, use yellow mustard or omit it entirely.
- Garlic powder / Salt – Simple seasonings to round out the yolk filling. Adjust to taste for kids who prefer milder flavors.
- Carrots – Orange rings that become beaks when sliced into wedges; crunchy and colorful.
- Black olives – Easy-to-make eyes; a plastic straw helps punch perfect dots.
- Fresh herbs – Parsley or dill for garnish; bright green adds contrast and a spring feel.
Tools That Make This Project Kid-Friendly
Using a few simple tools keeps the activity safe and fun for little helpers and helps younger cooks practice real kitchen skills with low risk.
- Sharp knife (adult use only) – For slicing the egg tops and bottoms cleanly. An adult should handle this step while kids help steady the egg.
- Plastic straw – Punches neat olive-eye dots with minimal fuss; kids can help squeeze out the tiny circles under supervision.
- Pastry bag or zip-top bag – For piping the filling; a small snip in the corner gives kids a controlled way to pipe without a messy scoop.
- Small cookie cutters or melon baller (optional) – Turn decorating into a game by letting kids cut herb shapes or scoop bits of filling.
- Kid-safe kitchen gloves or tongs – Helpful if you want children to handle eggs without direct contact; good for hygiene and confidence.
The Secret to a Smooth, Piped Yolk Filling
I always aim for a silky filling because it looks the cutest when piped back into the eggs. The texture and consistency are what make these chicks look cheerful and well-dressed.
- Start by mashing the yolks completely with a fork until there are no large crumbs — this is the base of a smooth mix.
- Add your creamy binder gradually and mix until the mixture spreads without cracking; you’re aiming for a spreadable, pipeable consistency.
- Use a piping bag fitted with a wide round tip or a zip-top bag with a slightly larger snip for kid-friendly control.
- Troubleshooting piping issues:
- If the filling is too stiff, stir in a little more mayonnaise or a splash of milk to loosen it.
- If it’s too loose and won’t hold shape, add a touch more mashed yolk or chill the mixture briefly to firm up.
- To avoid lumps, press the filling through a fine sieve before piping, or mix vigorously with a fork to break any bits down.
- Smell note: Freshly mixed yolk filling has a warm, creamy aroma that signals it’s ready to pipe — not overpowering, just comforting and familiar.
How to Cut, Assemble, and Keep Shells Intact
Handling the shells carefully is the key to pretty chicks. I handle the slicing myself and let kids decorate after the eggs are prepped.
- Peel the hard-boiled eggs gently; rolling an egg under your palm on the counter first loosens the shell for easier removal.
- Use a sharp knife to slice off a thin layer from the base so the egg stands flat. An adult should do this cut to avoid slips.
- Slice off the top third of the egg with a single, confident cut to create a neat lid; keep lids paired with their bases.
- Gently squeeze around the egg base to loosen the yolk and lift it out in one piece if possible.
- Pipe or spoon the filling into the egg base, then set the top back on at a slight angle so the chick looks like it’s peeking out.
- Assemble close to serving time, or keep the assembled eggs covered and refrigerated so the shells don’t dry or crack.
Step-by-Step: Make Deviled Egg Chicks
Follow this sequence to keep kids involved and the workstation tidy. Assign simple tasks — peeling, piping, and decorating — so everyone can participate.
- Adult: Hard-boil, cool, and peel the eggs ahead of time. Keep a bowl of ice water nearby while cooking to stop the eggs and make peeling easier.
- Adult: Trim a thin slice off each base so eggs stand steady and slice off the top third to create lids. Keep each lid with its matching base.
- Adult: Remove yolks and transfer them to a mixing bowl. Mash until fine and blend with mayonnaise, mustard, garlic powder, and salt until smooth.
- Child-friendly: Spoon or pipe the yolk filling back into the egg bases; let kids practice piping with a zip-top bag if they want.
- Child-friendly: Use a plastic straw to punch tiny olive dots; kids can press out the little circles and place them for eyes.
- Child-friendly: Slice carrot rings into wedges and let kids insert two small wedges for the beak. Garnish with parsley or dill as desired.
- Set the chicks on a platter and refrigerate until ready to serve.
If you love deviled eggs, you should try our classic deviled eggs for a timeless treat.
Pro Tip for easter egg recipe deviled egg chicks: Prep Ahead & Kid-Safe Steps
These are my go-to shortcuts and safety notes to make the activity run smoothly — I use them every year when little hands are involved.
- Boil and peel the eggs the day before; store covered and chilled so assembly is a breeze the next day.
- Mix the yolk filling ahead and keep it refrigerated; transfer to a piping bag just before decorating to reduce mess.
- I supervise all cutting steps — let kids do the fun parts like piping and placing eyes and beaks while adults handle knives.
- Set up an assembly line with bowls and small tools so each child has a station; it keeps the table tidy and gives each kid a job.
- Keep baby wipes or damp cloths handy for quick sticky-finger cleanups.
- If you’re looking for a fun alternative, check out our deviled strawberries for a playful dessert option.
Storing, Make-Ahead, and Variations for Deviled Egg Chicks
Storage and simple swaps let you adapt these deviled egg chicks for different diets and timelines.
- Storage: Store finished eggs in an airtight container in the refrigerator for up to one day. Keep a clean paper towel between layers to prevent sliding.
- Make-ahead: Assemble bases and lids separately and pipe the filling the morning of serving, or fully assemble the day before and keep chilled.
- Variation — Vegan option: Use vegan mayonnaise and swap mashed chickpea yolk seasoning (turmeric for color) to create a plant-based filling.
- Variation — Avocado twist: Fold mashed avocado into the yolk mix for a green, slightly tangy filling (serve immediately to avoid browning).
- Variation — Mild kid-friendly: Omit mustard for a creamier, less tangy filling that picky eaters prefer.
- Serving ideas: Pair these chicks with a simple green salad or potato salad for a fuller spread. For a make-ahead salad option, try our deviled egg potato salad or serve alongside a creamy dill potato salad for a spring buffet.
Frequently Asked Questions
Can I prepare the deviled egg chicks in advance? Yes! You can make the deviled egg chicks a day ahead of time. Just store them in an airtight container in the refrigerator until you’re ready to serve.
What can I use instead of dijon mustard? If you don’t have dijon mustard, you can use regular yellow mustard or leave it out entirely if you prefer a milder flavor.
How do I keep the egg shells intact while preparing the chicks? To keep the shells intact, be gentle when peeling and cutting. Use a sharp knife to slice off the top and base, and make sure to apply minimal pressure.
Are there any variations for dietary restrictions? Absolutely! You can substitute mayonnaise with vegan mayonnaise for a dairy-free option, and use different vegetables for decorations if needed.
How do I achieve a smooth yolk filling? For a smooth filling, make sure to mash the yolks well with a fork and mix thoroughly with the mayonnaise and seasonings until completely combined.
Easter Egg Recipe - Deviled Egg Chicks
Ingredients
Equipment
Method
- Peel 12 hard-boiled eggs. With a sharp knife, slice off a very thin layer from the base of the egg. Cut off a generous top third of the egg and remove the yolk.
- In a medium bowl, mash the yolks with mayonnaise, Dijon mustard, garlic powder, and salt until smooth. Pipe the mixture into the egg bases.
- For eyes, poke through an olive with a straw to make small circles for the eyes. Cut carrot rings into sixths for the beaks.
- Garnish with parsley or dill and serve on a platter.