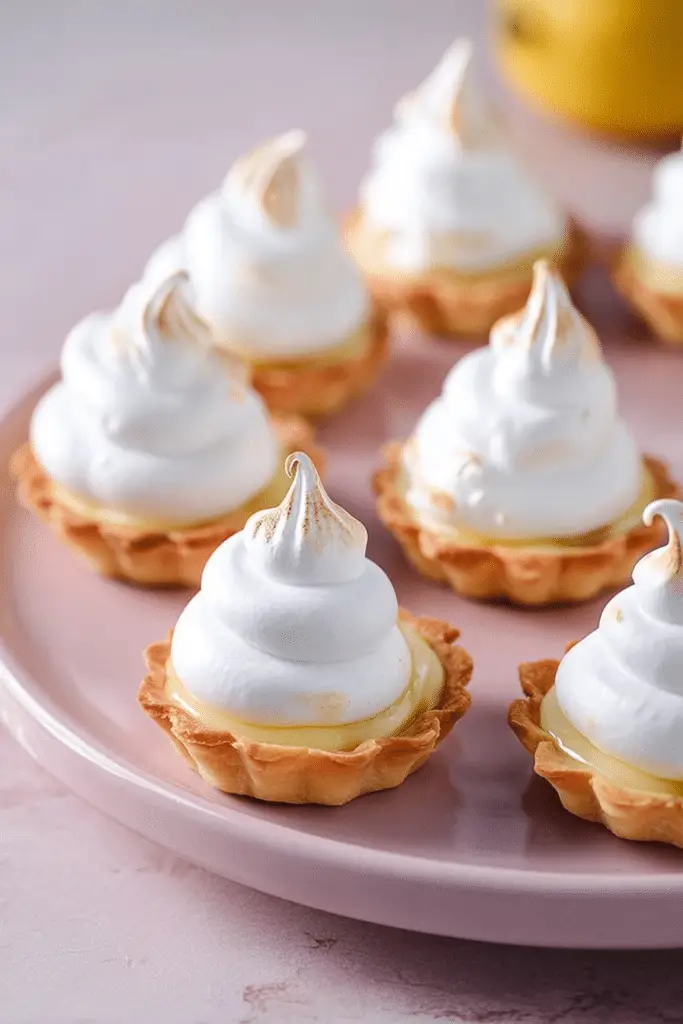
There’s something impossibly satisfying about handing someone a tiny tart that looks like a little sunburst: glossy lemon curd peeking out from a crisp, buttery shell, topped with clouds of toasted meringue. These mini lemon meringue tarts are exactly that — bright, tangy, and utterly charming. I make a batch of 20 whenever friends come by in spring and summer; they’re the kind of dessert you can nibble on between conversations without committing to a full slice. The balance matters: the curd should bite back with lemon tang while the meringue tames it with sweetness and air.
If you love lemon desserts, you’ll also enjoy our lemon meringue cake for a delightful twist on this classic flavor.
Quick note on yield and why I love these: this recipe makes about 20 tarts, which is just the right number for small parties or to keep in the fridge for easy treats. I first started making tiny lemon tarts when I wanted something pretty for a picnic: they travel better than a whole pie, and everyone likes a mini portion. Over the years I tuned the crust to be thinner and sturdier, learned to watch the curd at the right simmer point, and practiced torching the meringue so it gets that caramelized top without collapsing. These are the details I’ll share below so your batch turns out reliably.
Ingredients for Mini Lemon Meringue Tarts
- Unsalted butter – gives the crust that rich, flaky texture; use high-quality butter for the best flavor or a dairy-free block if you need it.
- Superfine sugar – dissolves quickly in the pastry and meringue; you can use caster sugar or process granulated briefly to make it finer.
- Eggs and extra yolks – structure the pastry and set the curd; fresh eggs give the best meringue volume and a brighter color to the curd.
- Vanilla extract – a background warmth in the crust; optional but nice to round out the lemon.
- Salt – essential in the pastry to balance sweetness and enhance flavor.
- Cake flour – keeps the tart shell tender; if you’re gluten-free, substitute a 1:1 gluten-free baking mix and chill the dough a little longer.
- Condensed milk – the base for the lemon curd here; it gives the curd a velvety richness and helps it set without long-cooking.
- Fresh lemon juice and lemon zest – the star of the show; always use fresh lemons for bright acidity and fragrant oils from the zest.
- Egg whites – whipped into the airy meringue; bring them to room temperature first for better volume.
- Kitchen torch (optional) – not an ingredient, but recommended for that toasty finish; you can also brown the meringue under a hot broiler if needed.
Ingredient sourcing note: fresh lemons are worth seeking out — the juice and zest make all the difference. For condensed milk, standard full-fat is best for mouthfeel; light versions thin the curd. If you need non-dairy options, there are coconut condensed milks and dairy-free butters that behave similarly, but expect subtle flavor differences.
Step-by-Step Instructions
Below is the tested method I use every time I make these tarts. I include the original steps and add notes from my kitchen experiments — small changes that saved batches or improved texture.
- Make the pastry: Add the butter and sugar to a food processor and pulse until they’re well combined and smooth. In my kitchen the mixture looks pale and slightly fluffy when it’s ready — don’t overprocess until it’s totally melted; you want a homogeneous mixture but still cold.
- With the processor running, first add the whole egg, pulse to combine, then add the egg yolk and vanilla and pulse again. The dough will come together but remain a touch crumbly — that’s normal. If it seems too wet, add a tablespoon of flour; if too dry, a teaspoon of cold water.
- Sift together the flour and salt and add this to the egg-butter mixture all at once. Pulse until the dough just forms. Don’t overmix; overworked pastry develops gluten and gets tough. The dough should cling together when pinched.
- Remove the dough, wrap it in plastic, and refrigerate for 1 hour. Chilling firms the fat so the shells stay tender and prevents shrinking during blind baking.
- Preheat and prep tins: Preheat the oven to 140°C (290°F). Brush 20 mini tart tins with melted butter — this helps the pastry release cleanly and adds flavor. I use a teaspoon of melted butter per tin; don’t skip this step or the bottoms can stick.
- On a lightly floured surface, roll the chilled dough to about ½ cm (¼ inch) thickness. Cut discs slightly larger than your tart tins and press them gently into the tins with fingertips, pushing to form even sides. If the dough warms and becomes sticky, return it to the fridge for 10 minutes before finishing.
- Line each shell with parchment and fill with uncooked rice or pie weights. Blind bake for 15 minutes at 140°C (290°F) until just lightly golden. This lower temperature helps the crust set without puffing up or getting too dark. Remove weights and let the shells cool slightly in the tins.
- Make the lemon curd: In a large bowl, whisk together 2 tins of condensed milk, 3 egg yolks, about 80 ml fresh lemon juice, and a tablespoon of lemon zest (use more zest if you want more perfume). The original recipe uses condensed milk as the base — it gives a silky texture and shortens cooking time. Whisk until smooth.
- Spoon the lemon mixture into the pre-baked shells, filling almost to the top. A little rim of pastry should be visible for contrast. Bake at 160°C (320°F) for 15 minutes or until the filling is just set — the centers should jiggle slightly but not be liquid. Overcooking makes the curd grainy; undercook and it won’t set.
- Remove the tarts from the oven and let them cool in their tins for 15 minutes before popping them out to cool completely on a wire rack. The lemon curd firms up as it cools; if you cut them too soon they’ll slump.
- Prepare the meringue: Place 4 egg whites and 200 g superfine sugar in a heat-proof bowl set over a saucepan of simmering water (double boiler). Whisk continuously until the sugar has fully dissolved and the mixture is warm to the touch — you should be able to rub a little between your fingers with no grittiness. This heating step (Swiss meringue style) stabilizes the proteins and yields a silky, glossy meringue.
- Transfer the warmed mixture to a stand mixer fitted with a whisk and beat on medium-high for about 10 minutes, until stiff, glossy peaks form and the bowl is cool. The meringue should be thick enough to pipe and hold shape. If it’s sagging, keep whipping.
- Fill a piping bag fitted with a plain round 1 cm (0.4 in) tip and pipe a generous swirl or mound on each tart. Use a kitchen torch to toast the meringue until golden (watch for quick browning — it happens fast). If you don’t have a torch, a few seconds under a hot broiler will do the job, but watch closely to avoid burning.
- Serve immediately or chill briefly. These tarts are best the same day for peak texture: the crust stays crisp and the meringue holds its shape.
Tips for Perfect Meringue
Meringue is equal parts technique and patience. I’ve learned a lot from repeated batches — both the wins and the mistakes — and here are the techniques I rely on.
First, know your meringues. For these tarts I recommend a Swiss meringue: egg whites and sugar heated gently over a bain-marie until the sugar dissolves, then whipped to glossy peaks. It makes a silky, stable meringue that’s perfect for piping and torching. French meringue (dry sugar beaten into whites) is lighter but less stable; Italian meringue (sugar syrup poured into whipped whites) is very stable and glossy but requires a hot syrup. For most home bakers, Swiss is a dependable middle ground.
Here are practical tricks that work every time:
- Room-temperature whites – they whip to more volume than cold whites. Let them sit 20–30 minutes before starting.
- Ensure sugar is dissolved – if you feel grit between your fingers, keep heating and whisking. Undissolved sugar can lead to a grainy meringue and weaken stability.
- Clean equipment – any grease or yolk in the bowl prevents whites from whipping properly. A splash of lemon juice can help stabilize if the whites are borderline.
- Whip to stiff peaks – the meringue must hold a firm peak when you lift the whisk. Under-whipped meringue will weep; over-whipped can break down and become dry.
- Watch the toast – use a small kitchen torch to get an even, golden finish. Keep the torch moving and don’t hover; the tip should sizzle but not catch fire.
Complete your meal with a main dish like baked lemon garlic butter salmon for a balance of flavors.
Nutritional Information
Per mini tart (approximate):
- Calories – ~220 kcal
- Fat – ~10 g
- Carbohydrates – ~28 g
- Protein – ~4 g
These figures come from the finished tart composition: a buttery pastry shell, condensed-milk based lemon curd, and whipped meringue. Lemons bring vitamin C and bright flavor without many calories, and eggs contribute protein and useful nutrients like choline. If you want to make these lighter, try swapping half the butter in the crust with a neutral oil-based spread (results in a slightly different texture) or use a reduced-sugar condensed milk — note that reduced sugar changes both sweetness and setting behavior. Another lighter option is to cut the meringue portion smaller or use a lighter whipped topping for a different mouthfeel, though the classic meringue is part of the charm.
Variations and Serving Suggestions
These tarts are wonderfully adaptable. Here are ideas I’ve tried and served with success.
For a refreshing side, try our lemon dill potato salad, which pairs splendidly with mini lemon meringue tarts.
Explore more citrus delights such as our lemon blueberry tart for another fresh dessert option.
- Different citrus – swap lime or orange for the lemon for a twist. Lime is punchier; orange is gentler and sweeter.
- Fruit toppings – scatter a few fresh raspberries or candied lemon peel on the meringue after torching for color and texture contrast.
- Flavored meringue – fold in a tiny amount of citrus zest or a drop of almond extract for a subtle note. Be cautious: too much liquid or extract can deflate the meringue.
- Mini pavlova style – make larger shells and top with lemon curd and a crown of whipped cream and berries for a party centerpiece.
Serving tips: these are lovely chilled or at cool room temperature. If you’re serving outdoors on a warm day, keep them in the shade — the lemon curd softens if it gets too warm. For gift-giving, pack them in a shallow box with parchment between layers to avoid meringue smudging.
Common Mistakes to Avoid
From years of testing, here are the common missteps and how to fix them.
- Curdling the lemon curd – if the curd looks grainy or separates, it’s usually because the heat was too high or the eggs cooked too quickly. Cook over gentle heat and whisk constantly; if it curdles slightly, strain it through a fine sieve and continue gently cooking to re-emulsify.
- Runny curd – if it’s too loose after baking, it may need more time to set. Return the tarts to a low oven (about 120°C / 250°F) for 5–10 minutes, or chill overnight to firm up, but avoid overbaking.
- Meringue weeping – often due to under-whipping or humidity. Whip to stiff peaks and serve soon after torching. Avoid refrigerating meringue-topped tarts for long periods — condensation causes weeping.
- Soggy bottom crust – blind bake thoroughly and brush the cooled shells with a thin layer of melted chocolate or a light egg wash if you need extra barrier protection before filling.
- Shrinking pastry – chill the dough before baking and avoid stretching it in the tin. Docking (pricking) the base lightly and blind baking with proper weights helps prevent shrinking.
FAQ
- Can I make the tart crust ahead of time?
Absolutely! You can prepare the tart crust in advance and store it in the fridge for up to 2 days. Just make sure to blind bake it when you’re ready to fill it with the lemon curd. - What type of meringue should I use for these tarts?
For mini lemon meringue tarts, a Swiss meringue works best. It gives a silky texture and is more stable than other types of meringue, making it perfect for baking! - Can I use a sugar substitute in the recipe?
Yes! You can use a sugar substitute that measures like granulated sugar, but keep in mind that the texture and flavor may vary slightly. - What if my lemon curd turns out too runny?
If your lemon curd is too runny, it may need more cooking time to set properly. Make sure to let it simmer gently until it thickens, and always whisk continuously for the best results. - How do I prevent the meringue from weeping?
To prevent weeping, make sure your meringue is fully whipped to stiff peaks and that it doesn’t come into contact with moisture. Also, serve the tarts as soon as possible after adding the meringue!
Conclusion and Serving Ideas
Mini lemon meringue tarts are a small project that rewards careful attention: a crisp shell, glossy curd, and toasted meringue make a dessert that looks like you’ve labored for hours while being relatively straightforward. Expect bright lemon flavor with a sweet, cloud-like finish from the meringue. I often make them for weekend brunches, summer barbecues, or as a pretty finish to a dinner party — they’re showy but not fussy.
Personal habit: I usually make the pastry the day before, blind bake the shells the morning of the event, fill and bake the curd midday, and finish with meringue an hour before guests arrive. This staging reduces stress and keeps everything tasting fresh. If you try different citrus or garnish with berries, I’d love to know which version becomes your favorite.
Ready to try them? Make a batch, take a photo, and share how they turned out — I always learn new tips from readers who adapt the recipe.

Mini Lemon Meringue Tarts
Ingredients
Method
- Add the butter and sugar to a food processor. Pulse until the mixture is well combined and homogenous.
- First, add the whole egg to the creamed mixture with the food processor running, and pulse until combined. Then add the egg yolk and vanilla and pulse again.
- Sift together the flour and salt and add this flour mixture to the egg and butter mixture all at once. Pulse until a dough forms, do not overmix.
- Remove the dough from the bowl, cover it in a sheet of plastic wrap, and refrigerate for an hour.
- Preheat the oven to 140°C (290°F) and brush 20 mini tart tins with melted butter.
- Remove the chilled dough from the fridge and roll it out on a lightly floured surface to a thickness of ½ cm (¼ inch) using a rolling pin.
- Cut discs of the rolled pastry slightly larger than the tart tins, place these pastry discs into the buttered tart tins, and use your fingertips to gently press the pastry into the base and sides of the tins.
- Line each pastry tin with parchment paper and fill this with uncooked rice or pie weights. Blind bake the shells in a preheated oven for 15 minutes until a light golden brown. Set aside.
- In a large mixing bowl add the condensed milk, egg yolks, fresh lemon juice, and lemon zest. Whisk to combine.
- Spoon the lemon mixture into the pre-baked pastry shells, be sure to fill them almost to the top.
- Bake the filled tarts in a preheated oven at 160°C (320°F) for 15 minutes or until the lemon filling is just set.
- Remove the tarts from the oven and allow to cool in tins for 15 minutes before removing and cooling completely on a wire rack.
- Add the egg whites and sugar to a heat-proof bowl set over simmering water. Whisk continuously until the sugar has melted.
- Once melted, beat the mixture in a stand mixer until stiff peaks form. Pipe onto each tart and torch until golden.