
I make these Peanut Butter Chocolate Chip Cookie Cups whenever I need an irresistible, delightful little treat that disappears faster than I can top the tray. In my kitchen they’ve become the go-to dessert for casual get-togethers and holiday parties alike — they travel well, look pretty on a platter, and everyone asks for the recipe. I learned a few reliable tricks by testing batches that spread too thin or set too firm; those mistakes taught me how small changes in dough temperature and timing give consistently charming results.
What I love most is how customizable they are. A simple swap — richer chocolate, a sprinkle of coarse salt, or a scatter of chopped peanuts — changes the mood of the whole plate. I’ll share the versions I lean toward for large crowds, how I choose ingredients for the best flavor, and the quick fixes that save a batch when things go sideways.
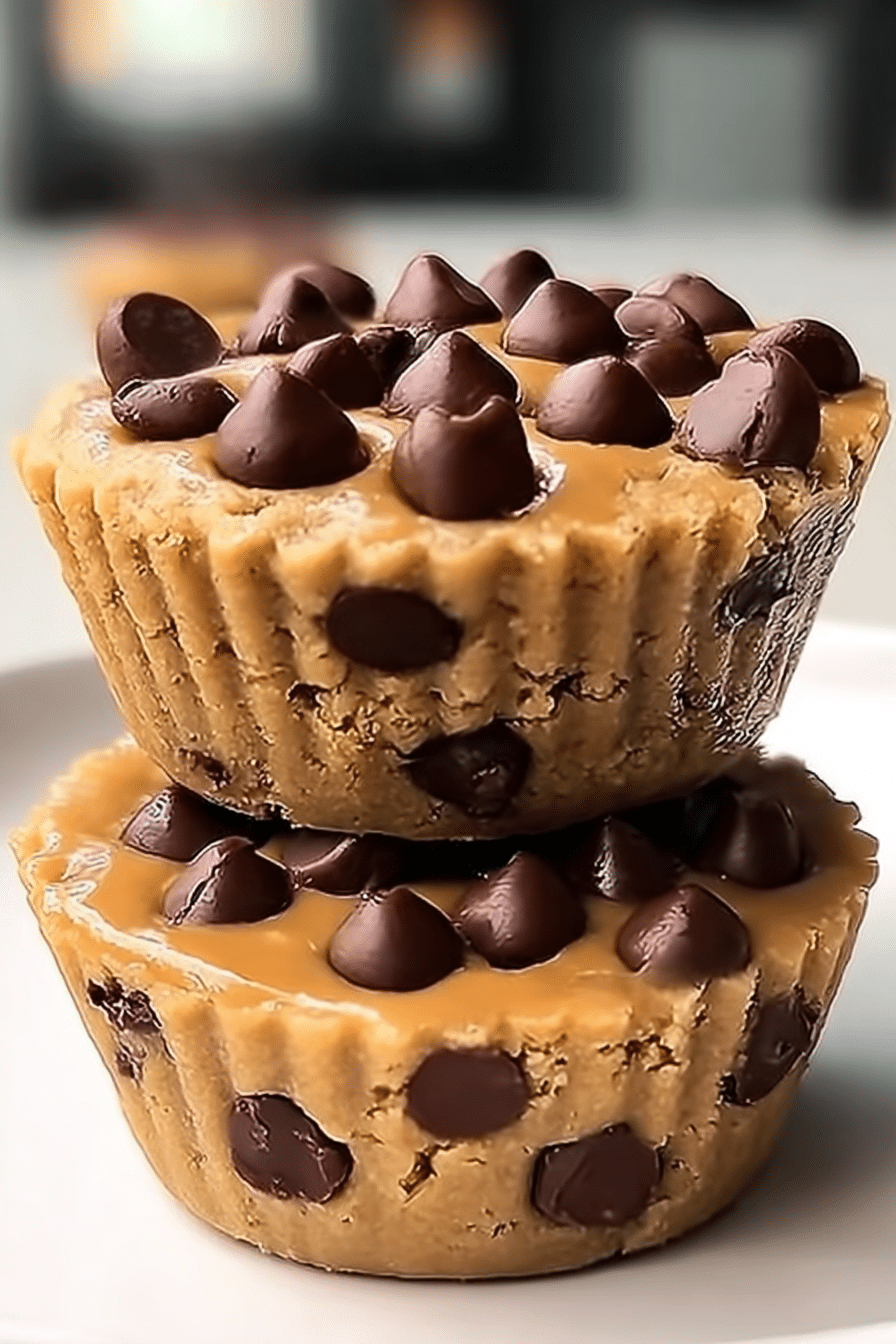
These cookie cups are ideal if you want a dessert that’s both impressive and easy to serve. The combination of a tender cookie shell, smooth peanut butter center, and glossy ganache creates a balance of textures and flavors that’s both familiar and just a little luxurious. Read on for everything you need to get them right, with plenty of practical tips I use in my own kitchen.
Before we dive into the how-to, know that you can scale and tweak them: they’re tailor-made for entertaining because they’re bite-sized, shareable, and welcoming to last-minute variations. Keep a batch of good dark chocolate and a jar of creamy peanut butter on hand and you’ll be ready to make these for guests any time.
Why Peanut Butter Chocolate Chip Cookie Cups Are Party-Perfect
These cups win at parties for a few simple, practical reasons:
- Bite-sized serving: guests can sample one or two without commitment, which keeps the dessert table fresh and flowing.
- Visually inviting: the glossy dark ganache contrasts with the pale peanut butter filling and golden cookie edges — it photographs beautifully and reads as special on a platter.
- Flexible flavors: you can satisfy nut lovers, chocolate fans, and those who prefer a sweeter or less sweet finish by adjusting chocolate percentage and toppings.
Picture handing a guest a small, glossy cup — the ganache catches the light, the peanut butter peeks out when you press with a spoon, and the aroma of warm cookie and roasted peanuts drifts up. That sensory mix makes them irresistible at first sight and delightful to eat.
Everything You Need for Peanut Butter Chocolate Chip Cookie Cups
Gathering the right components makes a big difference. I always recommend using good-quality versions of a few core items so the finished cups taste clean and rich. Keep your ingredients at room temperature where the recipe asks for it — it helps the dough come together and the fillings stay silky.
- Cookie dough – The shell that holds everything; it should be slightly chillable and scoopable so the cups keep their shape. If you want a shortcut, use a high-quality prepared dough that bakes evenly.
- Dark chocolate – For the ganache’s backbone; choose a chocolate with a clear cocoa percentage and clean flavor so the ganache isn’t overly sweet or dull.
- Heavy cream – Adds silk to the ganache and helps it set glossy. If you prefer, use a single-substitution plant-based cream for dietary needs.
- Creamy peanut butter – Provides the smooth filling contrast to the ganache; a natural-style peanut butter with minimal ingredients keeps the flavor bright.
- Powdered sugar – Sweetens and stabilizes the peanut butter filling for a scoopable texture that won’t run.
- Unsalted butter – Rounds out the peanut butter filling and gives a satiny mouthfeel.
- Pinch of salt – Balances sweetness and makes the chocolate and peanut butter pop.
For more peanut butter inspiration, check out our delicious peanut butter cookies. When you choose each component with purpose, the finished cups feel much more refined than their simple list of ingredients suggests.
The Secret to Ideal Cookie Cup Texture
Getting the cookie shell just right is the result of a few specific choices — nothing mystical, just practical technique. Below are the precise steps and troubleshooting tips I use to hit that tender-yet-structured texture every time.
- Chill the dough briefly before scooping: a cooler dough spreads less and yields a thicker wall that holds fillings.
- Fill mini muffin cups only halfway to start so the cookie rises then you press a gentle indentation after baking to form the cup.
- Bake until edges are golden and centers still look slightly soft — residual heat finishes the set without over-baking.
- Press the centers down while the cups are warm but not piping hot; this produces a smooth cup shape without cracking the rim.
Troubleshooting — presented as bulleted list for easy scanning:
- If cups are too flat: dough was too warm or you overfilled the cavities; chill dough longer and reduce scoop size.
- If cups are too stiff or crumbly: you baked too long or the dough lacked enough fat; shorten bake time and make sure your dough is not over-stiffened in mixing.
- If centers collapse after pressing: cups may have been under-baked; return to oven for a minute or two, watching closely.
Choosing Chocolate & Peanut Butter for Maximum Flavor
The chocolate and peanut butter set the tone. I recommend choosing components that complement rather than compete — and being specific helps.
- Chocolate type: opt for a good-quality dark chocolate between about 60–75% cocoa for a rich but not bitter ganache. For a sweeter profile, use semi-sweet or milk chocolate; for candy-like sweetness, white chocolate works but will need a touch less sugar in the filling.
- Chocolate form: use chopped couverture or a bar you’d enjoy eating; chips often contain stabilizers that change melt and shine.
- Peanut butter style: a creamy, natural peanut butter (peanuts and salt only) creates a clean, nut-forward filling. If you prefer sweeter, a commercial creamy peanut butter with added sugar works, but reduce additional sweetening in the filling.
- Flavor combos: add a small pinch of flaky sea salt on top after the ganache sets, or fold in a few mini chocolate chips into the peanut butter for texture contrast.
If you love peanut butter and chocolate together, you might also enjoy our chocolate peanut butter banana cups. Choosing the right pairings lets the aroma of melted chocolate and the warmth of roasted peanuts come forward without anything clashing.
Why Oven Temperature and Cooling Time Matter for Mini Cups
Mini bakes behave differently from full-size cookies — the smaller mass means they heat and cool quickly, so temperature control and timing are everything.
- Bake at a steady moderate temperature so edges set while centers remain tender; higher temps brown too quickly and can toughen the shells.
- Residual heat continues to cook the cup after you remove it from the oven, so allow a short resting period before pressing centers to avoid tearing the rim.
- Check doneness visually: look for set edges with a slightly soft center. Use a toothpick sparingly — probing can deform the cup.
- Cool cups briefly in the tin, then transfer to a rack to finish cooling; this prevents steam from making the bottoms soggy.
Monitor the oven closely; a single extra minute can change the texture from tender to dry. I often rotate the tin once halfway through the bake if my oven has hot spots.
How to Make Peanut Butter Chocolate Chip Cookie Cups (Step-by-Step)
Follow these steps in order so you stay organized — prep the ganache and filling while the cups cool to speed the process. You can make the peanut butter filling ahead if you like and fill just before serving.
- Preheat the oven to moderate temperature and grease a mini muffin tin or line it with nonstick spray.
- Scoop chilled cookie dough into each cavity, filling about halfway. Gently press the dough down so it’s centered and even.
- Bake for roughly ten to twelve minutes until the edges are golden and centers look slightly soft; keep a close eye starting at ten minutes.
- Remove the tin and let cups cool for a few minutes, then press down the centers with the back of a small spoon or a measured tool to form cups while they’re still warm.
- To make the ganache: chop the chocolate and place it in a heatproof bowl. Heat cream until simmering (do not boil), pour over the chopped chocolate, let sit for one minute, then whisk gently until smooth and glossy.
- To make the peanut butter filling: mix creamy peanut butter, sifted powdered sugar, room-temperature butter, and a pinch of salt until smooth and scoopable.
- Once cookie cups are fully cool, fill each with a spoonful of peanut butter mixture, then top with a spoonful of ganache. Finish with a sprinkle of flaky salt, mini chips, or chopped nuts if desired.
- Chill in the refrigerator for at least thirty minutes to set the ganache and stabilize the filling before serving.
Pro-Tips — presented as a bulleted list for easy scanning:
- Make the ganache slightly looser than you want at room temp — chilling firms it up to the perfect shine.
- If you plan to transport, refrigerate until fully set and pack in a single layer with paper liners to prevent sticking.
- To speed cooling, place the tin on a wire rack and gently fan the cups with the oven mitt; avoid the freezer, which can dull chocolate’s shine.
Pro Tip for Peanut Butter Chocolate Chip Cookie Cups: Gluten-Free Swaps that Keep Texture
Gluten-free versions can be just as satisfying with the right flour blends and handling. I keep a few reliable swaps on hand so the texture stays tender and holds fillings.
- Use a well-balanced gluten-free flour blend formulated for cookies (blend that already includes a binder like xanthan gum) to approximate the structure of all-purpose flour.
- Choose a blend that contains rice flour, potato starch, and tapioca starch for a good mix of chew and tenderness; test a small batch and adjust chilling time if the dough feels wetter than usual.
- When using alternative flours, chill the dough a bit longer before scooping to reduce spread and preserve cup walls.
If you’re looking for more peanut butter treats, try our peanut butter banana bars for a delicious option. With these swaps, you can keep the cookie cup experience delightful even for gluten-free guests.
Quick Variations for Parties — Toppings & Add-ins
Make a few small trays with different finishes and your guests will happily sample across styles. These quick ideas keep the presentation bright and customizable.
- Flaky sea salt on top of the ganache for contrast.
- Mini chocolate chips or chopped toffee sprinkled into the peanut butter before topping.
- Chopped roasted peanuts or crushed pretzels for crunch.
- Drizzle of caramel or a dot of fruit jam under the peanut butter for a surprising twist.
- Seasonal sprinkles or colored sugar for holiday-themed trays.
How to Store, Chill, and Serve Peanut Butter Chocolate Chip Cookie Cups
Proper storage keeps them tasting fresh and looking polished on your dessert table. Chill them until the ganache is set, then layer with parchment in an airtight container. If you’ll serve at a party, remove from fridge about ten minutes beforehand so the ganache loses some chill but still holds its shape — that yields the most pleasant mouthfeel.
- Refrigerate in a single layer or with parchment between layers for up to a week; for longer keeping, freeze on a sheet tray until firm then transfer to a freezer-safe container.
- Thaw frozen cups in the refrigerator overnight; bring to cool room temperature before serving for the best texture.
- Serve on a platter with small tongs or cocktail forks so guests can pick them cleanly; they pair nicely with fresh fruit or a lightly dressed salad for a balanced spread.
Your peanut butter chocolate chip cookie cups make a great dessert after a meal; consider serving them with a homemade Caesar salad to balance the richness.
Healthy Alternatives and Dietary Swaps
Want to lighten these up or honor dietary preferences? A few swaps keep the spirit of the recipe while changing the nutrition profile.
- Lower-sugar: use a darker chocolate for ganache and reduce powdered sugar in the peanut butter filling, relying on a touch more salt to keep flavor lively.
- Vegan: use plant-based cream for the ganache and a vegan butter alternative in the peanut butter filling; ensure your cookie dough base is egg-free or use a vegan dough.
- Nut-free option: swap sunflower seed butter for peanut butter and choose a chocolate labeled nut-free; the flavor will be different but equally rich.
- Reduced-fat: opt for lighter spreads and smaller portions, or use a dollop of naturally sweetened yogurt-thinned chocolate instead of ganache for a lighter finish (note: texture will be softer).
Frequently Asked Questions
Can I use a different type of chocolate for the ganache?
Absolutely! While dark chocolate gives a rich flavor, you can use milk chocolate or even white chocolate if you prefer a sweeter taste.
What if I want to make these cookie cups gluten-free?
You can substitute the cookie dough with a gluten-free cookie dough blend to maintain the same delicious texture!
How should I store leftover cookie cups?
Store any leftovers in an airtight container in the refrigerator for up to a week. Just remember to enjoy them chilled for the best taste!
Can I make the peanut butter filling ahead of time?
Yes, you can prepare the peanut butter filling ahead of time. Just store it in the refrigerator and fill the cookie cups right before serving for a fresh taste.
What are some great toppings I can add to the cookie cups?
Get creative! You can top your cookie cups with mini chocolate chips, crushed nuts, or a drizzle of caramel for extra flair.
Peanut Butter Chocolate Chip Cookie Cups
Ingredients
Equipment
Method
- Preheat oven to 350°F (175°C) and grease a mini muffin tin.
- Scoop cookie dough into each cavity, filling halfway, and press down gently.
- Bake for 10-12 minutes until golden on edges; cool slightly before pressing down centers.
- For ganache: Chop chocolate and place in a heatproof bowl. Heat cream until simmering, pour over chocolate, let sit for 1 minute, then whisk until smooth.
- For peanut butter filling: Mix peanut butter, sifted powdered sugar, butter, and salt until smooth.
- Fill cooled cookie cups with peanut butter mixture and top with ganache.
- Chill in refrigerator for at least 30 minutes before serving.