
I still remember the first time I paired cherries with apples in a pie: it was late summer, my kitchen smelled like cinnamon and caramelizing fruit, and the pie bubbled so enthusiastically it escaped onto the baking sheet. The combination surprised me — apples bring structure and gentle sweetness, cherries add a bright, tart snap that cuts through the richness. Cherry apple pie has long been a regional favorite where I live; markets overflow with tart apples and late-summer cherries for just a short window, and families lean on this mash-up when they want something familiar yet a little more festive than plain apple pie.
Over the years I’ve tested a lot of versions — lattice tops, full tops, galettes, single-crust tarts — and this particular approach is the one I come back to when I want a dependable result: a crisp, flaky crust and a juicy filling that sets up nicely without turning into syrup. This post walks you through why each step matters, what to watch for, and how to rescue common problems so your pie comes out confident every time.
Ingredients You’ll Need
Below is the complete ingredient list I used when I made this exact pie in my kitchen. I include precise measurements because baking is a little like chemistry — proportions matter. After the exact list, I’ll explain each ingredient in practical, conversational terms so you know why it’s there and what to swap when needed.
- 340 g all-purpose flour
- 1 teaspoon salt
- 230 g unsalted butter (cold & cubed)
- 140 g ice cold water
- 4 tart apples (about 700 g after peeled, cored, and sliced)
- 300 g red cherries (pitted & halved)
- 50 g brown sugar
- 20 g cornstarch
- 1 tablespoon ground cinnamon
- 2 teaspoons vanilla extract
- 1 egg (beaten)
- 2 tablespoons sugar crystals or coarse sugar
Ingredient discussion — what each one does and mild substitutions if you need them:
- All-purpose flour – the structure for your crust; the balance of protein helps a flaky, tender dough. A pastry blend will make it even softer.
- Salt – heightens the buttery flavor and balances the fruit sweetness; don’t skip it.
- Unsalted butter – creates flakiness and rich flavor; keep it cold so it makes little pockets of steam in the oven.
- Ice cold water – brings the dough together without warming the butter; use chilled water and handle the dough quickly.
- Tart apples – give body and structure; Granny Smith or other baking apples work best for keeping shape.
- Red cherries – add juiciness and bright acidity; pitted and halved cherries distribute flavor throughout the slice.
- Brown sugar – adds caramel depth and pairs beautifully with cooked apples and cherries.
- Cornstarch – thickens the filling without turning cloudy; it helps the juices gel as the pie cools.
- Ground cinnamon – warm spice that ties the fruit together; you can add a pinch of nutmeg if you like.
- Vanilla extract – amplifies the perception of sweetness and roundness in the filling.
- Egg – for an egg wash that gives the crust shine and helps coarse sugar stick.
- Sugar crystals – optional, for a pretty, crackly top and a touch of crunch.
Step-by-Step Instructions
Make the crust, prepare the filling, assemble, and bake. I include the precise baking temperatures and times I used — follow them and look for the same visual cues I describe.
- Cut butter into flour:In a mixing bowl stir together the flour and salt. Toss the cold cubed butter into the flour and use a pastry cutter or your fingers to press the butter into pea-sized pieces. You’re aiming for a coarse mixture with visible bits of butter — these will melt and make pockets of steam during baking, which gives you flakiness. If the butter melts too much, stop and chill the bowl for a few minutes.
- Hydrate the flour:Make a well in the flour and pour in the ice cold water. Gently mix until it forms a shaggy dough. At this stage it should still look rough and slightly dry in places — that’s okay. Over-mixing develops gluten and makes the crust tough.
- Form the dough:Turn the dough onto a sheet of plastic wrap. Press it together and fold it onto itself 2–3 times — just enough so it holds. Divide it into two portions and shape each half into a flattened disc. If the dough feels warm, pop it in the fridge for 15 minutes before shaping to make it easier to roll.
- Chill dough:Wrap both discs tightly and chill in the fridge for at least 2 hours or overnight. I usually make this in the evening and bake the next day; chilling relaxes the gluten and firms the butter, which prevents shrinkage and ensures a flakier crust.
- Prepare the bottom crust:On a floured surface, roll out one disc to about 1/8″ thick. Lift and turn it frequently to prevent sticking. Roll the dough onto the rolling pin and unroll it over a 10″ pie dish (this recipe originally yields one 8″ galette — the dish size you use may vary a little). Press gently into the bottom and edges and trim, leaving roughly a 1″ overhang.
- Make the filling:In a bowl toss peeled, cored, and sliced apples with pitted and halved cherries, brown sugar, cornstarch, cinnamon, and vanilla. The cornstarch is key: it absorbs excess juice and will thicken as the pie cools. At this stage taste a small bit of apple-cherry mix (raw) — if it tastes flat, a pinch more salt will lift the flavors; if it’s too tart, a touch more brown sugar will smooth it out.
- Add filling:Mound the filling in the pie dish — it will look domed, which is fine because the fruit settles and the juices loosen. If the fruit looks excessively wet, add an extra teaspoon of cornstarch. Too dry? A splash of water or a teaspoon of lemon juice will bring out brightness.
- Top crust / lattice:Roll out the second disc to the same thickness. Cut 1″ strips. For a decorative braid, cut two strips and slice each into three strands; braid and slightly stretch to thin the dough. Lay down two strips in a cross first, then weave remaining strips to create a lattice. Trim the excess so the top matches the pie dish size.
- Crimp the crust:Fold the overhang under and crimp with thumb and forefinger to form a wavy border. This helps the crust puff evenly. If your hands warm the dough, chill the pie for 10–15 minutes before the egg wash.
- Preheat:Preheat your oven to 425°F (220°C). Place a rimmed sheet pan on a lower rack to catch drips — pie filling will bubble over a little and that pan makes cleanup easy.
- Egg wash and sugar:Brush the top gently with the beaten egg and sprinkle with coarse sugar for sparkle and crunch. The egg wash gives you a golden sheen and helps the lattice seal together.
- Bake:Place the pie on the preheated oven rack with the sheet pan beneath. Bake at 425°F for 15 minutes to jump-start the rise and set the crust. Then lower the oven to 350°F (175°C) and bake for another 50–55 minutes, until the crust is deep golden brown and the filling is actively bubbling through the lattice. If the edges brown too quickly, tent foil around the crust for the remaining bake time.
- Cool:Let the pie cool for at least 1–2 hours; this is crucial. The filling will thicken as it cools — slice too early and you’ll have runny slices. You want the pie to be warm with a spoonable, not watery, texture when served.
Tips for the Perfect Pie Crust
I make pie crusts a lot, and a few habits have become non-negotiable. They save you time and heartbreak:
- Keep everything cold: flour, butter, and water. If the butter warms and sticks to your hands, it won’t create flaky pockets.
- Don’t overwork the dough. Press just enough to bring it together. Over-kneading develops gluten and makes the crust tough.
- Chill the dough twice: once after forming the discs and again after assembling the pie if your kitchen is warm. Chilled dough handles better and shrinks less.
- Roll evenly: thinner in the center, slightly thicker at the edges, so the edge holds the filling without getting paper-thin and burning.
- To avoid a soggy bottom: If you’re worried, blind bake the bottom crust for 10 minutes at 375°F with pie weights, cool slightly, add the filling, then finish baking as directed. This recipe usually doesn’t require full blind baking because the lattice top lets moisture escape.
- Fixing shrinkage: Chill the crust and try not to stretch it when placing into the pan. If it shrinks while baking, the filling will escape; but a trim and a tight crimp can salvage it.
- Flavor boosts: swap half the butter for browned butter for a nutty depth, or fold a teaspoon of finely grated lemon zest into the dough for brightness.
Health Benefits of Apples and Cherries
Apples and cherries are more than just tasty pie filling — they bring nutrients to the table. Apples are high in dietary fiber, particularly in the skin, which supports digestion and a feeling of fullness. Cherries add antioxidants like anthocyanins, which give them their red color and have been studied for anti-inflammatory effects. Both fruits provide vitamin C and phytochemicals that contribute to overall health.
When you enjoy a slice of pie, you’re also getting a serving of real fruit — and pairing it with whole-food-focused meals helps balance indulgence. Recent nutrition guidance often emphasizes moderation and the value of nutrient-dense foods alongside occasional treats.
Not only does apple play a significant role in this cherry apple pie, but you can also enjoy an Old Fashioned Easy Apple Crisp for another delicious apple dessert.
Serving Suggestions and Pairings
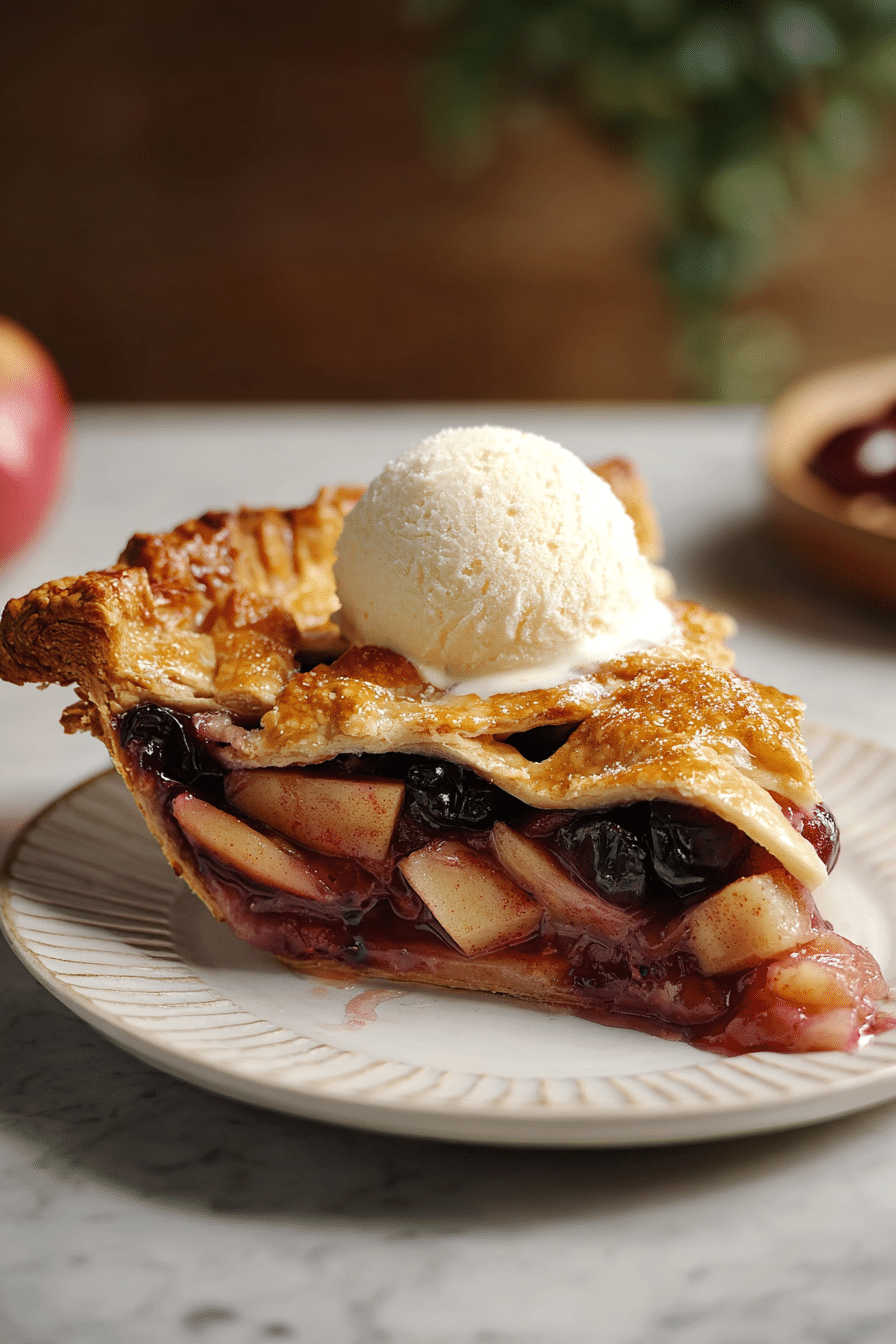
I like to serve this pie warm so the filling is tender and aromatic. A scoop of vanilla ice cream melts into the lattice and cools the first bite; whipped cream keeps things light. Here are a few ideas I use depending on the occasion:
- Classic scoop of vanilla or cinnamon ice cream — the contrast of hot and cold is irresistible.
- A drizzle of salted caramel sauce — for a richer, sticky finish.
- Fresh mint or a sprinkle of toasted chopped nuts like pecans for texture and color.
- For a cozy morning, a warm slice pairs surprisingly well with a strong cup of coffee or a spiced tea.
This delightful pie pairs wonderfully with savory dishes, such as Creamy Garlic Parmesan Chicken for a complete meal experience.
Variations: Vegan and Gluten-Free Options
This recipe adapts well if you need to accommodate dietary preferences. A few adjustments will get you close to the classic mouthfeel and flavor.
- Vegan crust: swap the butter for a chilled solid coconut oil or vegan butter substitute. Keep it cold and treat it like butter, cutting it into the flour. Use a plant-based milk wash (like soy or oat milk) for brushing and a sprinkle of sugar crystals for shine.
- Egg substitution: for an egg wash look, brush with a slurry of plant milk and a touch of maple syrup to brown the crust.
- Gluten-free crust: use a 1:1 gluten-free baking flour blend formulated for pastry, or make a crust partly with almond flour and a gluten-free blend. Note that almond flour alone won’t give the same elasticity, so combine it with a bindable gluten-free mix and chill thoroughly.
- Textural tips: gluten-free doughs often need a bit more bind and moisture. Add a teaspoon of xanthan gum if your blend doesn’t already include it, and handle dough slightly more gently because it can be more fragile.
If you’re looking for a healthy take, try our Apple Pie Baked Oatmeal, which makes for a great gluten-free option!
Storage and Make-Ahead Notes
I usually bake the pie in the morning if I want it for dessert in the evening. You can assemble the pie the day before and keep it covered in the fridge; bake it the next day for the best texture. Leftovers keep well refrigerated in an airtight container for 3–4 days. Reheat gently in a 300°F oven for 10–15 minutes to refresh the crust — avoid microwaving if you want to preserve crispness. For longer storage, wrap cooled slices tightly and freeze up to 2 months; thaw overnight in the fridge and re-crisp in the oven.
Common Problems and How I Fix Them
- Runny filling: This usually means under-thickening. Use cornstarch as directed and give the pie time to cool and set. If it’s still watery after cooling, slice and simmer the leftover filling briefly with an extra teaspoon of cornstarch dissolved in a little water, then pour it back into the crust and chill.
- Burning edges: Tent foil around the edges once they get deeply golden but the center still needs time.
- Crust too tough: Overworking the dough or using warm butter. Chill the dough longer next time and handle minimally.
- Fruit sinks: That often means the slices were too thick or the dough was stretched. Cut apples into uniform slices and don’t stretch the dough when fitting it into the pan.
Conclusion and Final Thoughts
Cherry apple pie is one of those desserts that feels like home: layered flavors, a buttery crust, and the satisfying thump of a warm slice set on a plate. It’s reliably comforting and versatile — dress it up with a lattice, keep it rustic as a galette, or adapt it for diets. I hope these tips and the step-by-step method help you bake a pie that makes your kitchen smell like late summer.
For those who enjoy apple desserts, our Dutch Apple Pie recipe offers a different take on a beloved classic.
FAQ
- Do cherry and apple go together?
Absolutely! Cherries and apples create a delightful combination, balancing sweet and tart flavors perfectly. They make for a refreshing summertime pie! - What is the difference between apple pie and cherry pie?
Apple pie features spiced apple filling baked in a flaky crust, while cherry pie is filled with sweet-tart cherries, creating vibrant and fruity flavors. Both are delicious, but they offer unique tastes! - Can I make the pie ahead of time?
Yes! You can prepare the pie in advance and refrigerate it before baking. Just remember to bake it the day you plan to serve it for the best texture and flavor! - How do I store leftover cherry apple pie?
Store leftover pie in an airtight container in the refrigerator for up to 3-4 days. You can also freeze it for longer storage, just make sure it’s well-wrapped! - What can I serve with cherry apple pie?
Serve cherry apple pie with a scoop of ice cream, a dollop of whipped cream, or a drizzle of caramel sauce for an extra special treat. It pairs wonderfully with coffee or tea too!
Notes: This recipe’s original yield was listed as one 8″ galette; if you use a larger pie plate the baking time may shift slightly. Watch for the filling to actively bubble and for a deep golden crust as your primary cues — those are the signs the pie is done.
Cherry Apple Pie
Ingredients
Equipment
Method
- In a mixing bowl, stir together flour and salt. Toss the cold butter in the flour. Use a dough blender or your fingers to press the butter into pea-sized pieces until you have a coarse flour mixture.
- Make a well in the middle of the flour. Pour ice cold water into the well. Mix until it forms a shaggy dough.
- Turn the dough out onto plastic wrap, press it together, and fold it onto itself until it holds. Don't overwork.
- Cut the dough into two portions, form into discs, wrap in plastic wrap, and chill for at least 2 hours or overnight.
- Roll out the first disc to 1/8" thick, then place it in a 10" pie dish.
- In a bowl, combine apples, cherries, brown sugar, cornstarch, cinnamon, and vanilla extract. Toss to coat.
- Fill the pie with the mixture to form a dome.
- Roll out the second disc, cut into strips, and create a lattice on top of the filling.
- Crimp the edges and preheat the oven to 425°F.
- Brush with egg wash, sprinkle with sugar, then bake for 15 minutes at 425°F followed by 50-55 minutes at 350°F.
- Let cool for 1-2 hours before serving.