There’s something about that first forkful of a coffee ice cream cake that always makes me pause — the cool, creamy coffee flavor hitting the tongue, the fudgy brownie base giving a little resistance, and then the soft vanilla swirl with streaks of chocolate. This is not a cake you rush. It’s an indulgent, make-ahead dessert that rewards patience and tastes like you spent hours fussing over it, even when most of the work is hands-off in the freezer. I make this when I want a crowd-pleasing dessert for a dinner party or when the kids want something special after a long weekend of errands. It’s versatile: bold coffee for morning-coffee lovers, or dialed-back and sweet for those who prefer a gentler touch.
I first developed this version because I wanted a make-able dessert that combined a brownie’s chew with real coffee ice cream. Over several tries I learned how the temperature of the ice cream matters, how long the brownie needs to cool, and which chocolate gives the most satisfying depth. Below I’ll walk you through the recipe exactly as I make it, plus the little kitchen-tested tricks that stop it from turning into a melty mess.
Ingredients You Will Need
- Dark chocolate – builds the fudgy, deep-flavored brownie base; use a quality bar for the best cocoa depth.
- Granulated and brown sugar – sugar balances bitterness and helps develop a glossy brownie crust.
- Unsalted butter – for richness; it also helps the brownie set without being greasy.
- Eggs – provide structure and that slightly custardy bite in the brownie.
- All-purpose flour – a little flour keeps the brownie tender but not cake-like; whole-grain options can work but change the texture.
- Salt – always add a pinch to lift flavors, especially in chocolate-forward desserts.
- Coffee ice cream – the star; homemade is gorgeous when slightly soft, store-bought works if you beat it until spreadable.
- Vanilla ice cream – a cool, mellow layer to balance the coffee; vanilla also takes swirlable fudge beautifully.
- Chocolate fudge – dollops and swirls give visual contrast and little pockets of intense chocolate.
- Optional add-ins – espresso beans, toasted hazelnuts, a drizzle of caramel, or a splash of coffee liqueur for an adult twist.
- Dairy-free or low-sugar alternatives – substitute vegan ice cream or lower-sugar varieties and use coconut oil in place of butter if needed.
Step-by-Step Instructions
- Preheat and prepare: Preheat your oven to 375 °F. Line an 8-inch round cake pan with parchment and lightly grease it. I like the parchment overhang trick — it makes unmolding the brownie so much easier because you can pull it straight out without scraping the edges.
- Melt chocolate, sugars, and butter: Over a double boiler (bain-marie), gently melt together about 8 ounces of chopped dark chocolate with both granulated and dark brown sugar and the sliced butter. Stir constantly so the chocolate doesn’t seize — once it looks smooth and glossy, remove it from the heat and let it cool just until it’s warm, not hot. If it’s too hot when the eggs go in, you’ll scramble them.
- Incorporate eggs and dry ingredients: Add three room-temperature eggs, one at a time, whisking or stirring until each is fully incorporated. In a separate small bowl, whisk together your flour and salt. Fold that mixture into the chocolate with the remaining chopped chocolate so you get little chunks of melted/soft chocolate in the batter. You’re aiming for a thick, glossy batter with no dry streaks.
- Bake the brownie: Pour the batter into the prepared pan and bake for 20–25 minutes. The center should no longer jiggle and a toothpick inserted in the middle should come out clean or with a few moist crumbs. Don’t overbake — the brownie underneath the ice cream should be slightly on the dense, fudgy side rather than cakey. Allow the brownie to cool 5 minutes in the pan, then run a small offset spatula around the edge and unmold onto a rack to cool completely to room temperature. When I tried assembling with a warm brownie, the ice cream started to slip and we had a little melt-drip disaster — so patience here matters.
- Set up your ring mold: Place a cake ring or an adjustable ring on a parchment-lined baking sheet. Line the inside with acetate if you have it — it makes removing the cake cleaner and prevents sticking. Place the cooled brownie on the cake board or parchment inside the ring.
- First ice cream layer — coffee: If you’re using homemade coffee ice cream, work with it when it’s freshly churned and still a little soft — that’s the sweet spot. If you’re using store-bought, scoop the coffee ice cream into the bowl of a stand mixer fitted with the paddle and beat it just until softened and spreadable but still cold. Spread an even layer over the brownie. Cover it with plastic wrap and freeze for 2–3 hours, until the layer is fully solid. I find pressing the ice cream down with an offset spatula helps remove air pockets and yields a smooth top.
- Second ice cream layer — vanilla with fudge swirl: Repeat the softening step with vanilla ice cream. Spread an even layer over the frozen coffee layer. Dollop two tablespoons or so of chocolate fudge over the vanilla in small spoonfuls and use a knife to swirl. Don’t over-swirl — you want streaks for visual contrast. Cover with plastic wrap and return to the freezer for at least 3 hours; overnight is best so the layers are thoroughly set.
- Remove and slice: When the cake is fully set, remove it from the freezer. Gently remove the metal ring and peel the acetate away. If you don’t have acetate, run a warm knife around the ring to loosen slightly, then remove. For clean slices, use a large sharp knife dipped in hot water and wiped dry between cuts — heat the knife, make a cut, wipe, and reheat. The brownie layer will be firm and a bit stiff while cutting; it softens immediately as it comes to room temperature.
- Serve and store: Serve immediately after slicing. Leftovers keep for up to a week when tightly wrapped in plastic and placed in an airtight container to prevent freezer burn. I like to press a sheet of plastic directly onto the cut surface before wrapping to keep ice crystals at bay.
Tips for Perfecting Your Cake
Small details make a big difference with an ice cream cake. Here are the tricks I rely on every time:
- Cool the brownie completely before adding ice cream — heat is the enemy of clean layers.
- Soften but don’t melt store-bought ice cream. It should be spreadable without being soupy; beating in the mixer brings it to the right consistency quickly.
- Use acetate for tidy sides — it makes the slice look professional and peels away cleanly once the cake is set.
- Keep the cake level in the freezer. If one side is slightly higher your layers will tilt. Use a flat baking sheet rather than a slotted rack.
- If you’re worried about ice crystals: press plastic wrap over the ice cream before wrapping the whole cake — this reduces air exposure.
- Warm your knife between cuts for clean slices — yes, it’s worth the extra five seconds per cut.
If you enjoy coffee desserts, consider making our caramel chocolate coffee cheesecake for a luxurious pairing.
Creative Serving Ideas
This cake can be dressed up depending on the occasion.
- Garnish with chocolate shavings, cocoa dust, or a few espresso beans for texture and contrast.
- Serve a small jug of warm salted caramel on the side for guests to drizzle — the contrast of warm caramel over cold ice cream is a delight.
- Top slices with toasted nuts (hazelnuts or almonds) for crunch and nutty depth.
- For a summery vibe, add fresh berries that cut the richness with bright acidity.
For a fun twist, serve slices of the cake with a banana split ice cream sundae on the side!
Healthier Variations to Try
You don’t have to abandon flavor to make smart swaps. Here are ways to lighten this cake without losing identity:
- Use a low-sugar or naturally sweetened coffee ice cream to cut sugar while preserving coffee flavor.
- Swap to dairy-free ice creams made from coconut or almond milk; reduce the fudge dollops to lower added sugar.
- Replace some or all of the all-purpose flour with a whole-grain alternative to add fiber; expect a slightly denser brownie.
- Use semi-sweet chocolate instead of very dark if you find dark chocolate too intense — adjust sugar to taste.
For a delightful treat, try complementing your cake with homemade chocolate turtles for a sweet contrast!
User-Submitted Twists and Variations
I love when readers tinker with the base idea. Here are a few community-tested spins I’ve tried or received notes about:
- Caramel ripple: swirl a thin layer of salted caramel between the coffee and vanilla layers for gooey ribbons.
- Crunch layer: press a thin layer of crushed biscotti or toasted nuts onto the brownie before adding coffee ice cream — adds a welcome crunch.
- Adult iteration: stir a tablespoon or two of coffee liqueur into the coffee ice cream for a boozy note. Reduce added sugar slightly if your liqueur is sweet.
- Nutty twist: fold chopped toasted hazelnuts directly into the fudge swirl. Readers reported the nuts stayed crunchy when toasted well and added a bakery-like depth.
For another delightful dessert, try our Buster Bar Ice Cream Cake that layers sweet flavors with ice cream!
Frequently Asked Questions
- Can I use store-bought ice cream for this recipe?
Absolutely! Store-bought coffee and vanilla ice cream can be used, just make sure to soften them slightly for easier spreading. I find beating store-bought ice cream in a mixer makes it much easier to work with and yields a smoother layer. - How long can I store the coffee ice cream cake?
You can store the cake in the freezer for up to a week. Just keep it well wrapped to prevent freezer burn. If you need to store it longer, wrap tightly and place in an airtight container — but flavors and texture are best within the first week. - What can I substitute for dark chocolate in the brownie layer?
You can use semi-sweet chocolate or even unsweetened cocoa powder, but adjust the sugar levels to taste. If you switch to cocoa powder, add a touch more butter for richness and expect a slightly different texture. - Is there a way to make this recipe healthier?
Yes! You can use low-sugar or dairy-free ice cream options, and consider whole grain flour for the brownie layer. Reducing the amount of fudge and using a dark chocolate with lower sugar can also help. - Can I add other flavors to the cake?
Definitely! Feel free to experiment with flavors like chocolate fudge, caramel, or even liqueurs like Kahlúa for an adult twist.
Conclusion and Serving Suggestions
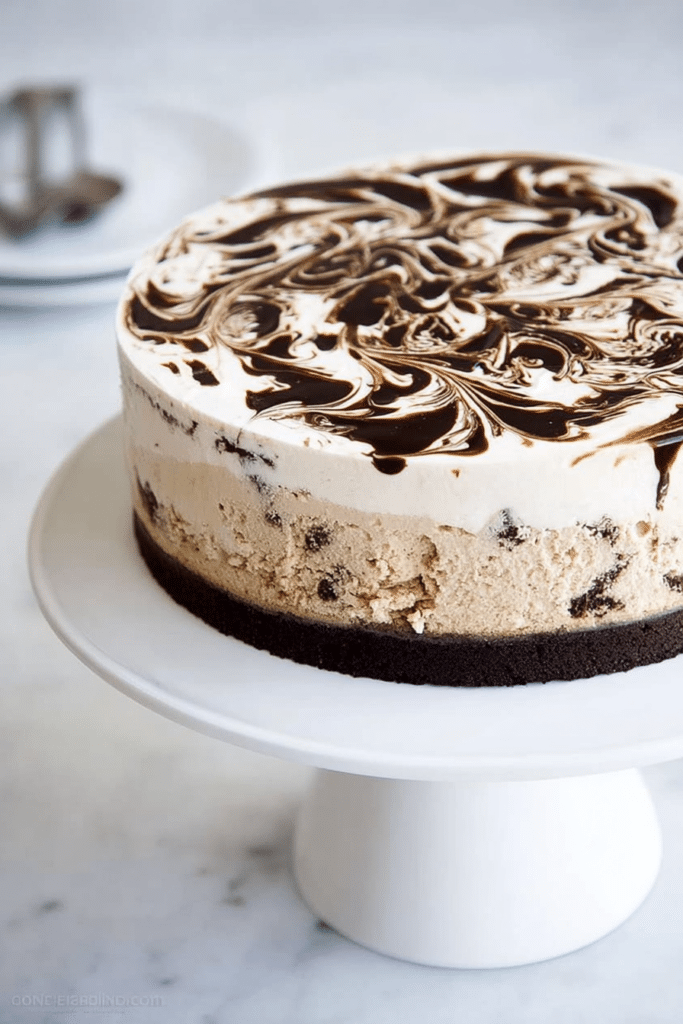
Making this coffee ice cream cake is one of those kitchen projects that looks like effort but mostly needs planning and freezer time. The payoff is a dessert that’s both familiar — brownie, coffee, vanilla — and special enough for celebrations. Expect fudgy chew from the brownie, cool silkiness from the coffee layer, and the simple, comforting sweetness of vanilla threaded with chocolate fudge. If you’re hosting, assemble a day ahead so the layers fully settle; slice with a warmed knife and serve with a drizzle of caramel or a few espresso beans for garnish.
Try the recipe, tweak a bit to match your coffee strength and sweetness preference, and please come back and tell me what you changed. I test variations in my kitchen all the time and love hearing what works for you. If you photograph your slice, tag it — I’ll gladly look for those creative takes. Happy baking and freezing!

Coffee Ice Cream Cake
Ingredients
Method
- Preheat oven to 375 °F. Line 8-inch round cake pan with parchment paper. Lightly grease cake pan and set aside.
- Over a double boiler (bain-marie), gently melt together 8 oz of the chopped chocolate with sugars and butter. Once the mixture is smooth and melted, remove from double boiler and allow to cool slightly.
- Add eggs, one at a time, to cooled chocolate mixture. Whisk until incorporated. In a small bowl, whisk together flour and salt. Add flour mixture and remaining 2 oz of chopped chocolate to batter, folding to combine until there are no dry streaks.
- Pour into prepared cake pan and bake for 20-25 minutes until the center is set. Allow to cool for 5 minutes, unmold, and cool to room temperature.
- Place cake ring on a lined baking sheet, lining with acetate. Place cooled brownie on top and inside the ring.
- For homemade coffee ice cream, spread on brownie layer. For store-bought, beat until spreadable, then spread on brownie. Cover and freeze for 2-3 hours.
- Add the vanilla ice cream using the same method, spreading evenly. Dollop chocolate fudge and swirl. Cover and freeze for at least 3 hours.
- Remove from freezer, gently remove the cake ring and acetate. Cut into slices and serve immediately.