I remember the first time I combined a box of Lucky Charms with classic Rice Krispie Treats — it felt like reaching into a cereal bowl of childhood and pinching all the little marshmallows into a sticky, colorful square. I made these on a rainy Saturday afternoon, the kitchen smelling like warm butter and toasted cereal. When the marshmallow mix hit the pan it hissed softly; as I stirred, the mixture went glossy and almost gluey, studded with the tiny Lucky Charms marshmallows that melted just enough to get gooey but still kept their bright colors. I pressed the mixture into the pan and could already taste that sweet, marshmallow-forward nostalgia before it had even cooled. This version is one I make when I want something playful for a birthday, a school bake sale, or just when I want an excuse to eat cereal with my hands.
If you’re a fan of festive treats, you’ll love our chocolate rice krispie balls that complement this Lucky Charms recipe perfectly.
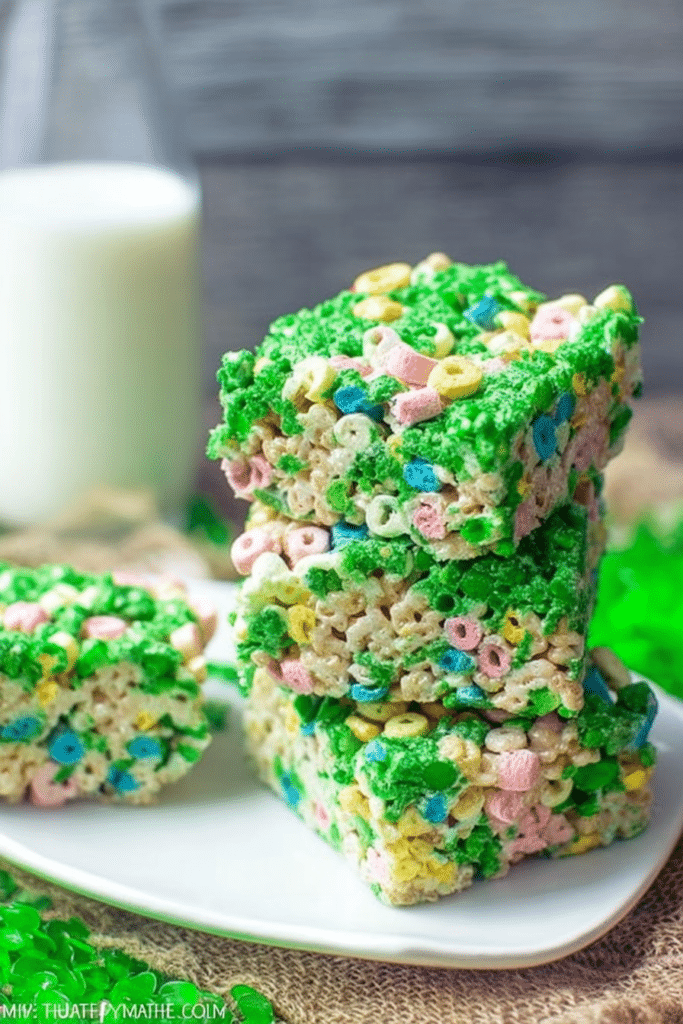
Ingredients You’ll Need
- Lucky Charms – the star for color and those tiny marshmallows that make each bite whimsical; you can also swap for Fruity or Cocoa Pebbles to change flavor.
- Rice Krispies cereal – gives the treats their signature crisp snap and light, airy texture that balances the marshmallow glue.
- Mini marshmallows – the glue of the dish; they melt and bind the cereal together into that chewy, slightly sticky bar.
- Butter – adds richness and helps the marshmallows melt smoothly; use a dairy-free alternative if needed.
- Green gel food coloring – optional, used for theme days like St. Patrick’s Day to tint the marshmallow glue; gel is less watery than liquid color.
- Extra marshmallows – for sprinkling on top so the treats look playful and puffy.
Recipe at a glance (exact amounts used when I tested this): 5 cups Lucky Charms cereal, 4 cups Rice Krispies cereal, one 10.5 oz bag of mini marshmallows, 5 teaspoons salted butter, and a dab of green gel food coloring. Yield: about 12 servings (cut into 12 squares; see notes if you want bigger pieces).
Step-by-Step Instructions
- Butter a 9×13 inch baking dish and set it aside. I rub the butter on with a paper towel so the whole surface gets a sheen — that keeps the bars from sticking and gives a clean edge when you lift them out.
- In a microwave-safe bowl, melt marshmallows in 20-second increments, twice, until slightly melted. Don’t go longer than needed here — you want soft, shaggy marshmallows that will finish melting when combined. If they’re completely liquid they can scorch or become grainy.
- Set aside, then in another microwave-safe bowl, melt butter in 20-second increments until nearly all melted. Small pats of butter melt fast; stop when there are just a couple of unmelted flecks so the heat from the butter finishes the job.
- Combine melted butter with marshmallows and microwave again for about 20 seconds. When you take it out, stir immediately. You’ll see the mix go glossy and smooth — that’s your cue that the marshmallow glue is ready.
- Stir to mix them well. If it looks too stiff, a quick 5–10 second zap will loosen it; if it looks grainy, stir vigorously — the graininess usually disappears as the melted sugar disperses.
- Add food coloring and Rice Krispies, stirring to combine. If you want a subtle color, a tiny smear of gel goes a long way. Work quickly so the marshmallow stays fluid and coats each crisp evenly.
- Mix in Lucky Charms, stirring until fully coated. I usually fold the cereal in with a silicone spatula — it preserves some of the marshmallow pieces from completely dissolving so you get those little muppet-colored blobs of cereal charm in every bite.
- Using a buttered rubber spatula, spread the mixture evenly into the baking dish. Press lightly — not too hard. If you pack it down too firmly the treats get dense and lose their snap. I press with the back of a buttered spoon, patting down just until the top looks even.
- Sprinkle additional marshmallows on top. These toast a little if you pop the pan under a broiler for 10–20 seconds, but I usually leave them as-is for a soft, puffy top.
- Refrigerate for 30 minutes. The bars will firm up but remain chewy. They continue to set as they cool further, so don’t worry if they seem a touch soft right out of the fridge.
- Cut into 12 squares, or 8 squares for larger treats. Use a buttered knife or spray the blade lightly with cooking spray and wipe between cuts for cleaner edges.
Quick technical note: microwave times vary wildly. I tested these in a 1200W microwave, so if yours is weaker add 10–15 seconds total to the marshmallow melting step, and if it’s stronger take off 5–10 seconds. The goal is soft, shiny marshmallow that’s not scorched.
Creative Ways to Customize Your Treats
These treats are a blank canvas. Once you’ve mastered the basic method, I like to riff on textures and flavors depending on the occasion.
For a delightful twist, consider adding some caramel marshmallow rice krispie balls into your mix!
Mix in some edible brownie batter for a rich, fudgy flavor in your rice krispie treats.
- Chocolate chips – fold in a handful of mini chips after removing the cereal mixture from heat. They’ll soften but not fully melt, giving you pockets of chocolatey goodness. If you want melted chocolate ribbons, drizzle melted chocolate over the top after it sets.
- Nut butter swirl – warm a few tablespoons of peanut or almond butter and swirl through the mix before it sets for a nutty counterpoint to the saccharine marshmallows.
- Sprinkles and edible glitter – press bright sprinkles into the top right after you spread the mixture for a party-ready look. Avoid using sprinkles that melt or will bleed color.
- Flavor extracts – add a drop or two of vanilla or almond extract to the melted marshmallow for depth. Be careful: extracts are potent; start small and taste the mix while still warm.
- Swap cereals – replace Lucky Charms or Rice Krispies with Fruity or Cocoa Pebbles for a bold flavor shift. Fruity Pebbles give a tropical, fruity pop while Cocoa Pebbles make the bars chocolatey and rich.
- Color blocking – divide the marshmallow base and tint each batch a different color for striped bars. Work quickly and press layers gently to adhere.
Tips for Making These Treats with Kids
These are a great project to share with children, but there are a few safety notes and ways to make it super fun.
- Kid tasks: measuring and pouring cereal, shaking extra marshmallows on top, and decorating with sprinkles are perfect roles for little hands.
- Supervised tasks: marshmallow melting and stirring should be done by an adult, or with a child standing on a stool while you handle the hot bowl. Teach kids to stir away from their face — the steam can be surprising.
- Portioning: make mini-sized bars by pressing the mixture into a muffin tin or small silicone molds. Kids love having their own individual treats and it’s less cutting for you.
- Cleanup trick: keep a warm, damp towel nearby. Sticky spatulas and bowls wipe clean more easily while still warm.
St. Patrick’s Day Themed Serving Ideas
These treats are naturally festive thanks to the Lucky Charms marshmallows. For St. Patrick’s Day I tint the marshmallow glue a pale green with gel color and press on a few extra green marshmallows for emphasis. Sometimes I wrap individual squares in green tissue and tie with twine for party favors.
- Use shamrock-shaped cookie cutters on slightly cooled bars for a themed shape.
- Place bars on green or gold paper doilies and sprinkle with edible gold dust for a “pot of gold” look.
- Serve with small paper flags or toothpick toppers that say things like “Lucky” or “Magically Delicious.”
- For a classroom party, pre-cut into small bite-sized pieces and pack in little treat bags with a sticker.
Storing and Keeping Your Treats Fresh
Trust me — these are best the first day, but they keep well if stored properly.
- Room temperature – store in an airtight container at room temperature for up to 3 days. I stack parchment between layers to prevent sticking.
- Refrigeration – refrigerating can make them firmer and chewier; bring back to room temperature for the best mouthfeel.
- Freezing – wrap individual squares tightly in plastic wrap and freeze in an airtight container for up to 1 month. Thaw at room temperature for 20–30 minutes before serving to avoid condensation making them soggy.
FAQ
- Can I make these treats vegan?
Yes, you can use dairy-free butter and vegan marshmallows to make Lucky Charms Rice Krispie Treats vegan-friendly! - How should I store the leftovers?
Store your treats in an airtight container at room temperature for up to 3 days. For longer storage, you can freeze them! - What can I add to customize my treats?
Feel free to mix in chocolate chips, sprinkles, or other cereals for a fun twist. You can also add flavored extracts like vanilla or almond! - Can I use a different cereal instead of Lucky Charms?
Absolutely! You can substitute with other cereals like Cocoa Pebbles or Fruity Pebbles to create your own flavor combinations. - What’s the best way to cut the treats once they’re set?
Use a buttered knife for clean cuts, and consider spraying your knife with cooking spray to help prevent sticking.
Conclusion and Call to Action
These Lucky Charms Rice Krispie Treats are exactly the kind of recipe I keep coming back to — quick, forgiving, and endlessly customizable. They capture that childhood cereal joy but packaged into a shareable bar that’s perfect for parties, holidays, or a weekday pick-me-up. When I make a batch, neighbors show up unannounced because that smell travels fast. Try the base once, then start playing with mix-ins; you’ll find little ways to make it your own.
After enjoying your Lucky Charms treats, why not try making our mini chocolate tarts for a sweet dessert experience?
If you make these, I’d love to hear what twist you tried — drop a comment with your favorite add-in or photo of your colorful batch. If you want more playful no-bake ideas, subscribe to the post updates and I’ll share tips and seasonal variations as I test them in my kitchen.

Lucky Charms Rice Krispie Treats
Ingredients
Method
- Butter a 9x13 inch baking dish and set it aside.
- In a microwave-safe bowl, melt marshmallows in 20-second increments, twice, until slightly melted.
- Set aside, then in another microwave-safe bowl, melt butter in 20-second increments until nearly all melted.
- Combine melted butter with marshmallows and microwave again for about 20 seconds.
- Stir to mix them well.
- Add food coloring and Rice Krispies, stirring to combine.
- Mix in Lucky Charms, stirring until fully coated.
- Using a buttered rubber spatula, spread the mixture evenly into the baking dish.
- Sprinkle additional marshmallows on top.
- Refrigerate for 30 minutes.
- Cut into 12 squares, or 8 squares for larger treats.