I’ve made this no bake banana pudding dessert dozens of times — late‑night baking experiments, picnic contributions, and the dessert I turn to when I need something that feels special but doesn’t require the oven. The first spoonful gives you that classic, velvety vanilla pudding with ripe banana sweetness and the faint crunch of wafer cookies that dissolve into soft, melt‑in‑your‑mouth layers. On a humid afternoon this summer I put a bowl on the porch and within an hour my neighbor was asking for the recipe. It’s that kind of dessert: comforting, nostalgic and oddly grown‑up even though it’s basically an assembly job.
Ingredients You’ll Need for No Bake Banana Pudding Dessert
Below are the components I always keep on hand for this recipe. If you like making things from scratch or have dietary needs, there are simple swaps highlighted in the bullets and a link to a homemade option if you want to skip store‑bought cans.
If you prefer to avoid store-bought cans, learn how to make homemade condensed milk to use in your pudding base.
- Instant vanilla pudding mix (5.1 oz) – the backbone of the custard layer; provides a glossy, stable pudding that sets without cooking.
- Milk (3 cups, cold) – hydrates the instant pudding and keeps the texture silkier when cold; whole milk gives the richest mouthfeel, but lower fat milks also work.
- Bananas (4, sliced about 1/2″) – ripe but still firm bananas add sweetness and soft texture; overripe ones turn mushy and brown quickly.
- Whipped topping (8 oz) – folded into the pudding to lighten it and provide a cloudlike texture; you can use stabilized whipped cream instead if you prefer.
- Vanilla wafer cookies (about 15 oz) – the classic layer that softens slightly against the pudding, giving that familiar melt‑in‑the‑mouth contrast.
- Optional garnishes – crushed wafers, extra banana slices, a sprinkle of cinnamon or chocolate shavings to finish the top.
Step-by-Step Instructions
I make this in a 9×13″ baking dish almost every time because it feeds a crowd and stores easily. The whole process takes about 20 minutes of active work, then you chill. Read the steps all the way through once — the order matters, especially with layers and timing.
- Prepare your equipment. Gather a 9×13″ dish, a large mixing bowl, a whisk, and a rubber spatula or the back of a spoon to smooth layers. Make sure your milk is cold—instant pudding sets more reliably when the liquid is cold.
- Make the pudding. Whisk the instant vanilla pudding mix into the cold milk until completely smooth and slightly thickened. It will look glossy and there should be no lumps. If you still see small lumps, whisk vigorously for another 30 seconds — they usually disperse. At first the pudding can look thin; after a minute it will develop more body. Taste it: if it tastes flat, a pinch of salt will amplify the vanilla.
- Lighten the pudding. Fold in about half of the whipped topping (roughly 4 ounces) until homogenous. This keeps the pudding airy and spoonable. If you overmix, the whipped topping will deflate — stop as soon as swirls disappear and the mixture is smooth.
- Make the base layer of wafers. Line the bottom of the dish with vanilla wafer cookies placed side by side. The cookies will soften as they sit under the pudding; if you prefer a slightly firmer bite, place them sparsely rather than edge to edge.
- Layer bananas and pudding. Add a single layer of banana slices over the cookies. Try not to overlap slices too thickly; one layer gives the best distribution of banana flavor. Top bananas with half of the pudding mixture and gently smooth with the back of a spoon. If the pudding seems runny, a quick whisk and an extra minute of chilling will help it set.
- Repeat layers. Repeat the cookie layer, banana layer, and remaining pudding. Spread the rest of the whipped topping over the final pudding layer and smooth to the edges.
- Top and chill. Crush six reserved wafers and sprinkle on top for texture. Chill at least 1 hour so layers set and the wafers soften pleasantly. For softer wafers and an even more melded flavor, 2–4 hours or overnight is ideal.
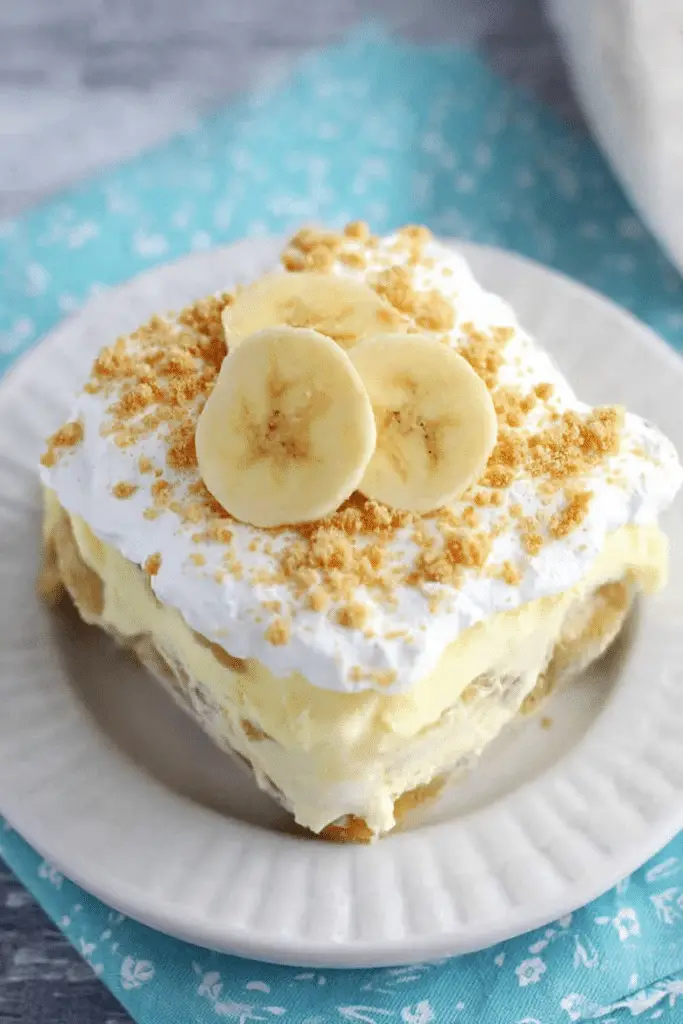
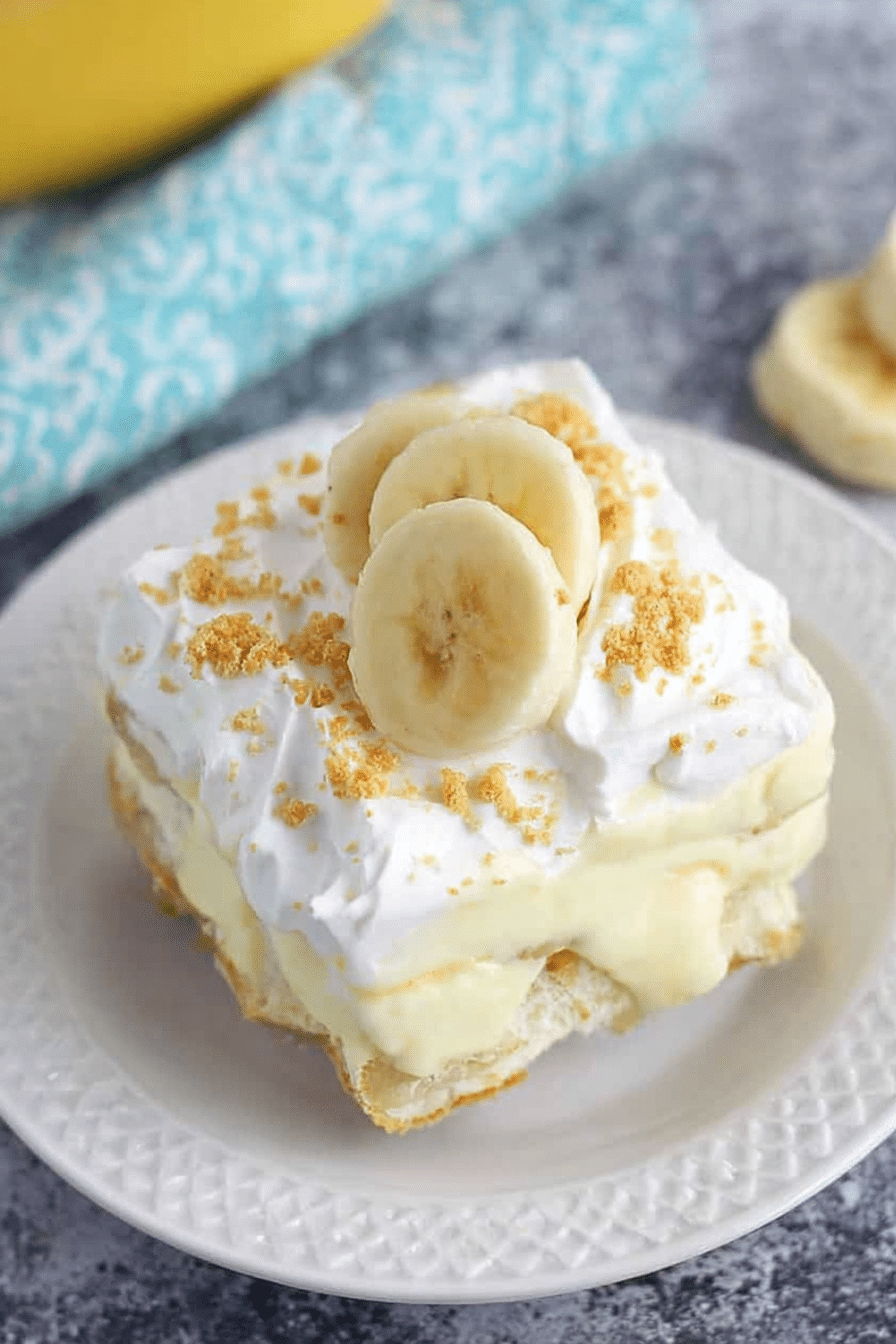
- Serve. When you’re ready, add any fragile garnishes like fresh banana slices or toasted nuts and serve chilled. Leftovers keep well — cover tightly and refrigerate.
Vegan and Gluten-Free Alternatives
If you need to avoid dairy or gluten, this dessert adapts beautifully. I’ve made vegan versions that were just as crowd‑pleasing; the texture is slightly different but still satisfyingly creamy.
- Plant-based milk – use almond, oat or soy milk measured the same way. Choose a higher‑fat option (like full‑fat canned coconut or Oatly Barista) for silkier results.
- Vegan instant pudding or cornstarch thickened custard – some stores sell vegan instant mixes. If you can’t find one, make a quick stovetop custard with plant milk and cornstarch, cool it thoroughly, then fold in coconut whipped cream.
- Coconut whipped cream – chill full‑fat coconut milk, scoop the solid cream and whip it; it keeps the same lightness as dairy whipped topping. You can stabilize it with a little lecithin or a sprinkle of powdered sugar if needed.
- Gluten‑free cookies – use gluten‑free vanilla wafers or crushed gluten‑free cookies for the layers. They’ll soften similarly; the flavor may shift slightly depending on the base flour used.
For a simple vegan-friendly banana treat or make-ahead dessert idea, consider our frozen banana snack bars as an alternative.
Unique Flavor Variations
I’m the kind of cook who treats a reliable recipe like a canvas. Here are tried variations that I’ve tested and recommended to friends — all of them keep the basic assembly method but change one or two components for a new dimension of flavor.
- Chocolate banana pudding – whisk a spoonful of unsweetened cocoa into the instant pudding mix (or use a chocolate instant pudding). For extra depth, fold in a handful of mini chocolate chips that partially melt into the layers.
- Cinnamon‑spiced layers – add a light dusting of ground cinnamon over banana slices; cinnamon pairs beautifully with banana and adds warmth without sweetness.
- Peanut butter swirl – warm a bit of peanut butter until pourable and swirl thin ribbons into the pudding layer for a nutty counterpoint. If you want a cleaner peanut flavor, use peanut butter powder reconstituted with a touch of water.
- Caramel or Biscoff twist – drizzle salted caramel between layers for a sweet, sticky note, or swap crushed Biscoff cookies for wafers for a spiced, caramelized base.
For a caramel-forward twist, get inspired by our Biscoff banana pudding with caramel variation.
Tips for Making Ahead — No Bake Banana Pudding Dessert
This is a dream make‑ahead dessert when you want to minimize day‑of prep. I often build it the night before a gathering and find the flavors actually marry better after some time.
- How far ahead – You can assemble this up to 24–48 hours in advance. After 48 hours the banana slices may brown or become too soft and the final texture changes.
- Prevent banana browning – Toss banana slices lightly with lemon or pineapple juice before layering, or sandwich them between pudding layers so they aren’t exposed to air. Add fresh slices on top right before serving if you want bright, non‑brown garnish.
- Layering strategy – If you plan to make it very far ahead, consider keeping some cookies aside and topping right before serving to preserve a little crunch. Alternatively, use a thicker whipped cream to slow moisture migration.
- Storage – Cover tightly with plastic wrap pressed to the surface to prevent the dessert from picking up fridge odors. Store in the refrigerator; do not freeze — freezing changes the texture of pudding and bananas.
Serving Suggestions
Presentation matters, and this pudding is flexible: family style in a large dish or prettily portioned in jars. I’ve served it both ways and enjoyed the differences — jars are great for picnics and parties, a large dish is warm and communal.
- Individual cups or mason jars – layer smaller amounts in clear jars so guests can see the pretty strata; chill and transport easily for potlucks.
- Large trifle bowl – looks showy and allows big, rustic spoons. Keep a small bowl of extra wafers on the side for guests who want more crunch.
- Garnishes – finish with sliced bananas (added just before serving), a dusting of cinnamon, chopped toasted pecans, or a drizzle of chocolate or caramel sauce for contrast.
- Serving size – this recipe yields about 12 servings in modest portions; give slightly larger portions if it’s the only dessert.
Nutritional Information
Below is the approximate nutrition for a typical serving based on the original recipe. Use this as a guideline — exact values vary with brand and substitutions.
- Calories: ~313 kcal per serving.
- Fat: ~10 g (depends on the whipped topping and milk you use).
- Carbohydrates: ~53 g (mostly from cookies and sugars).
- Protein: ~5 g.
- Allergens: Contains dairy and gluten in the standard version; adjust with plant-based milk/whipped topping and gluten-free cookies if needed.
If you want a lighter version, swap in lower‑fat milk and use less whipped topping or a lighter stabilized whipped cream. To reduce sugar, choose a lower sugar cookie and an instant pudding mix labeled reduced sugar, but remember these changes alter texture and sweetness balance.
FAQ
Is banana pudding no bake?
Yes — this recipe is completely no‑bake. You just assemble the layers (cookies, bananas, pudding, whipped topping) and chill until set.
How long should I chill the pudding before serving?
Chill at least 1 hour so layers set. For best texture and softer wafers, 2–4 hours or overnight is ideal.
Can I make this ahead and how should I store it?
Yes. Make it up to 24–48 hours ahead and keep tightly covered in the refrigerator. Add any fragile toppings or extra banana slices right before serving to keep them fresh.
What are good dairy‑free or gluten‑free substitutes?
Use plant‑based milk (almond, oat, soy) and a vegan instant pudding mix or cornstarch‑thickened custard. Swap whipped topping for coconut whipped cream and use gluten‑free wafer cookies or crushed gf cookies for the layers.
How do I prevent the banana slices from turning brown?
Toss banana slices lightly with a little lemon or pineapple juice before layering, layer them between pudding to limit air exposure, or add fresh slices just before serving.
Conclusion and Final Thoughts
This no bake banana pudding dessert is the kind of recipe I return to when I want something uncomplicated that still looks like effort. It’s forgiving — a little bit of hurried slicing or an imperfect layer won’t ruin it — but it rewards attention to texture: that first creamy, slightly cool spoonful with a kiss of banana is what people remember. Over the years I’ve learned small things that save the dish: keep the milk cold, fold the whipped topping gently, and always save a few cookies to crush for the top. Try it as written the first time, then tweak a variation or two — peanut butter swirl, chocolate, or cinnamon — and you’ll quickly make it your own. If you give it a go, tell me what you changed; sharing those tweaks is my favorite part of testing recipes in a real kitchen.
No Bake Banana Pudding Dessert
Ingredients
Method
- Gather your ingredients including a 9x13" baking dish, a whisk, and a large bowl.
- In a large bowl, whisk to combine the pudding mix and milk until smooth. Then whisk in half of the whipped topping.
- Use the remaining cookies to make the base layer by placing them side by side.
- Add a layer of banana slices, then top with half of the pudding mixture. Smooth out the pudding, and repeat the layers.
- Crush the remaining cookies and sprinkle them on top. Optionally, add leftover banana slices before serving.