
I still remember the first time I made kohakutou with my niece: she gasped when the clear jelly became a sheet of color and later when we tore it into glittering shards. It felt like an art project that smelled faintly of fruit and kept her attention for days as the pieces slowly hardened. I love recipes that turn cooking into a hands-on science lesson — kohakutou does that beautifully without being fussy.
In my kitchen, this is the kind of activity that asks for paint shirts and a snack tray: the steps are simple, the mess is manageable, and the payoff is bright, edible gems that kids can proudly show off. I’ve made this recipe many times, learned how long to let the jelly rest before tearing, and figured out how to keep curious little hands safe around the stove.
What I enjoy most is how creative the process is — color streaks, scented centers, and uneven crystal edges make each piece unique. It’s a great way to teach kids about temperature, how plant-based gelling works, and why patience pays off when candy needs to dry. If you like the idea of pairing a crafty dessert with a cozy drink, try serving your kohakutou alongside warm breakfast treats like cinnamon roll french toast roll-ups after an afternoon of candy-making.
Below I’ll walk you through everything you need, the gentle science behind the texture, step-by-step directions you can do with kids, plus flavor ideas and safe tips for speeding up drying. I’ll also share the little mistakes I made the first few times and how I fixed them — so you can enjoy the process without the guesswork.
Everything You Need for Kohakutou (Japanese Crystal Candy)
Gather these accessible tools and ingredients before you start — nothing exotic required. I like to set everything out first so kids can see what’s coming and help with safe tasks like pouring and stirring.
- Tools – A small saucepan, a flat heatproof container or shallow dish (aim for a depth of about an inch), measuring tools adults use, a spoon for testing thickness, parchment paper for drying, and a safe workspace for kids to tear the candy once set. A shallow tray makes the crystals look like a little gem mine when they’re ready.
- Safety gear – Oven mitts for grown-ups, a clean towel, and a tented sheet of parchment to keep dust off while the candy dries. Make drying a supervised activity so little hands don’t touch sticky jelly too soon.
- Ingredients – Simple pantry items plus a flavoring: water or juice, a plant-based gelling agent, and sugar. I’ll explain each ingredient’s purpose below so you know how to swap things safely.
- Extras for fun – Natural colorings like matcha powder or fruit concentrates, tiny droppers or toothpicks for marbling, and small cookie cutters if kids want geometric shapes. These let children personalize their gems.
A quick cultural note: kohakutou traces its inspiration to traditional Japanese candies that value simple ingredients and beautiful presentation. Making these gems at home is a playful, modern take on that tradition — it’s less about perfection and more about creating small, colorful moments with kids.
Once your batch is finished, these candies are wonderful with morning treats or as a sweet surprise — after making kohakutou, enjoy it as a treat with cinnamon roll french toast roll-ups for a sweet breakfast surprise.
The Secret to That Crunchy Shell and Jelly Center
The magic of kohakutou is texture: a thin crunchy outer shell formed by slow drying, and a soft, jelly-like interior that stays tender. To get that contrast, you need the right gelling agent and gentle drying.
- Gelling agent role – Agar agar creates a firm gel that, when exposed to air, dries on the surface into a brittle crust while keeping the middle chewy. Unlike gelatin, agar sets more firmly at room temperature and tolerates warm conditions better, which helps the center stay jelly-like.
- Temperature & timing – Bring the mixture to a simmer so the agar fully dissolves; undercooked agar can give you gritty bits. After pouring, chilling helps the gel set uniformly. If the jelly is too soft to tear after chilling, it needs a bit more time in the fridge.
- Testing thickness – Use the spoon test: lift a bit of hot mixture on a spoon and let it cool; it should cling and form a ribbon rather than run off quickly. If it’s too thin, let it simmer very gently a bit longer. If it’s too thick and sets immediately, warm it slightly before pouring so it pours evenly.
- Health note – Agar agar is plant-based and mostly fiber, with minimal calories; it’s a vegan alternative to gelatin and can aid digestion as a source of indigestible fiber. That makes kohakutou a friendly option for families avoiding animal products.
Why Agar Agar Matters — Gel Science Made Simple
Agar agar is the backbone of kohakutou. It’s a gelatinous substance derived from red algae (seaweed) used across Asian cuisines for centuries. I like explaining it in plain terms so kids can picture where it comes from and how it behaves.
- What it is – Agar comes from seaweeds and is sold as powder or flakes. Powder dissolves quickly in hot liquid; flakes need more time to hydrate.
- Gelling properties – Agar sets at a higher temperature than gelatin and forms a firmer, more brittle gel. This is why kohakutou gets that crystal-like shell while still keeping a soft center.
- Dietary and environmental benefits – Agar is vegan and plant-based, making it suitable for many diets. It’s low in calories and behaves differently from animal gelatin, which is why pediatricians and parent cooks often prefer it for kid-friendly treats.
- Practical tip – Always dissolve agar fully by bringing the mixture to a simmer; undissolved bits will feel grainy. I learned to stir constantly at the start so I didn’t end up with specks of undissolved powder.
How to Make Kohakutou (Step-by-Step for Beginners and Kids)
These steps are written so you can do them with kids — adults handle the hot parts, and children can help with pouring, coloring, and tearing the set jelly. For a cozy family dessert after your candy session, try serving the pieces with a warm slice of pumpkin pecan cobbler.
- Combine your liquid (water or fruit pulp), agar powder, and sugar in a small saucepan and mix until evenly combined.
- Heat the mixture over medium-low, stirring frequently, and bring to a gentle boil so the agar dissolves completely.
- Reduce heat and simmer for a few minutes until the mixture thickens slightly and coats the back of a spoon.
- Pour the hot mixture into a flat, heatproof container so it’s about an inch deep; if it seems too thin, wait a minute for the agar to thicken before coloring.
- Add color or extracts by using a toothpick or dropper to create streaks and swirls — kids love this part.
- Chill in the fridge until firm (about an hour). Run a knife around the edges and lift the jelly out.
- Tear or cut the jelly into irregular, crystal-like pieces; press small offcuts onto larger pieces so nothing goes to waste.
- Place pieces on parchment and let them dry at room temperature for about a week, covering loosely with tented parchment to keep dust off while allowing air to circulate. The outer shell will harden while the interior remains soft.
Pro-Tips:
- I like to use a shallow, wide dish so pieces form more crystals and dry evenly.
- For vibrant veins of color, use concentrated fruit pulp or gel food coloring applied with a toothpick after pouring.
- If kids want to help, give them the coloring step and the tearing step once the jelly is fully chilled — those are hands-on and safe.
- Keep the cooking heat gentle; a rolling boil can break down delicate flavors and make the mixture too thin.
Troubleshooting (I’ve had to fix these myself):
- If your jelly is grainy, the agar didn’t dissolve; reheat gently and stir until smooth.
- If pieces stay sticky after a week, your room might be too humid — try spacing them out more or using a fan on low (see drying tips below).
- If the center is too firm, you used too much agar — next batch, slightly reduce the agar or increase liquid. I learned to scale down agar a pinch after an overly firm first batch.
- If colors ran together, add coloring after the jelly has slightly cooled but before it fully sets so they hold as streaks rather than blending completely.
Flavoring Tips: Natural Extracts, Fruit Pulp, and Color Tricks
Flavor and color are where kids can get wildly creative. Below are ideas that play well together and practical notes on how different additions affect texture and appearance.
- Fruit pulp – Adds aroma and tiny flecks of color; passion fruit or mango give a bright tropical note but can thin the gel if very watery, so reduce other liquid slightly.
- Powders – Matcha or cocoa powder gives a matte, elegant tint and a mild flavor that kids recognize; they won’t thin the gel.
- Natural extracts – Vanilla, pandan, or citrus extracts are great for subtle flavoring; use sparingly so they don’t overpower the sweetness.
- Color tricks – Use a toothpick to swirl concentrated gels into the set but slightly warm jelly for dramatic veins. Gel or powdered colors hold better than water-based dyes.
- Themes – Make seasonal palettes: pastel berries for spring, citrusy amber for summer, or jewel tones for a birthday craft day. Ask kids to design a color story and photograph their creations.
Pairing idea: For a playful refreshment alongside your candy, try serving kohakutou with a lightly spiced drink like a cinnamon apple cream punch to balance the sweetness.
Pro Tip for kohakutou (japanese crystal candy): Speed Up Drying Safely
Drying is the longest part, but there are safe ways to speed it without sacrificing that crunchy shell. Use these methods carefully when children are around.
- Use a low-temp dehydrator set to under 100°F (or its lowest setting) to keep the inside from melting while firming the outside faster.
- Set a small fan on low to improve air circulation across the pieces; this helps moisture evaporate more evenly in humid rooms.
- Space pieces well on parchment and flip them occasionally so both sides dry uniformly; I learned flipping every other day prevents one-sided brittleness.
- Avoid ovens or direct heat above 120°F — too hot and the interior will collapse or become chewy instead of jelly-like.
- Keep the drying area dust-free and out of direct sunlight so colors don’t fade and children can’t accidentally touch the pieces.
How to Store, Gift, and Make-Ahead Your Kohakutou
Once your kohakutou has dried fully and the shell is crisp, here are easy ways to keep them beautiful and gift-ready.
- Storage – Place cooled pieces in an airtight container at room temperature with parchment layers to prevent sticking; they’ll keep about a month.
- Humidity tip – Add a small silica packet in the container for long-term storage if your climate is humid (keep packets away from kids).
- Gifting – Pack in clear cello bags or small jars with tissue paper and a handwritten label; they make charming little presents. Consider creating a gift basket that includes your kohakutou and some homemade strawberry truffles for a sweet surprise.
- Make-ahead – You can make the jelly and keep it chilled for a day or two before tearing and drying; just be sure to tear it fresh so the edges have texture to form a shell.
Simple Variations: Matcha, Passion Fruit, and Kid-Friendly Flavors
These kid-tested ideas are easy to mix into the basic method. I always let children choose one flavor and one color to keep decisions simple and fun.
- Matcha gems – Stir matcha powder into the hot mixture for a soft green, slightly bitter edge that pairs well with white chocolate truffles on the side.
- Passion fruit burst – Add passion fruit pulp for a tropical tang and flecks of seed that look magical inside amber shards; reduce extra liquid slightly if the pulp is very juicy.
- Strawberry lemonade – Use a concentrated strawberry puree with a touch of lemon extract for a sweet-tart combo kids love.
- Berry swirl – Layer different berry concentrates and use a toothpick to marble colors right before chilling.
- Kid-friendly mixes – Let children mix two favorites (e.g., grape + vanilla or orange + coconut) so they feel ownership of the final treat.
Tip on substitutions: If you need to swap ingredients for dietary reasons, keep the balance of liquid to agar in mind — stronger flavors in concentrated form are better than watery juices that can weaken the gel.
Making kohakutou is one of those projects I return to when I want a quiet, creative afternoon with kids. The steps are forgiving, the results are beautiful, and the slow drying builds anticipation — which, in my house, is half the fun.
Frequently Asked Questions
What is kohakutou?
Kohakutou is a traditional Japanese crystal candy that’s visually stunning, featuring a crunchy shell and a jelly-like center. It’s fun to make and perfect for kids.
How long do kohakutou candies last?
Once dried, kohakutou candies can be stored in an airtight container at room temperature for about one month.
Can I use different flavors for kohakutou?
Absolutely! You can experiment with various natural extracts, fruit pulps, or even food coloring to create unique flavors and colors.
Is kohakutou suitable for vegans?
Yes! Kohakutou is made with agar agar, a plant-based gelatin alternative, making it a great option for vegan candy lovers.
How do I make the shell crunchy?
To achieve a crunchy shell, allow the formed jelly pieces to dry completely at room temperature for about one week before storing them.
Kohakutou (Japanese Crystal Candy)
Ingredients
Method
- In a small saucepan, combine water and passion fruit pulp (or your preferred liquid), agar agar powder, and granulated sugar. Mix well. Heat over medium-low until the mixture comes to a boil, about 6 minutes. Reduce the heat and let it simmer for about 4 more minutes, or until the liquid clings to the spoon when lifted.
- Pour the mixture into a flat, heatproof container. Aim for a depth of at least 1 inch. The liquid should be thick enough that any food coloring, gel, or extract you add will hold rather than spreading out. If the mixture is too watery let it sit for a minute for the agar agar to thicken it before adding color. Use a toothpick to dip into the food coloring and swirl it into the jelly to create streaks and swirls.
- Transfer the mold to the fridge and let the jelly set (about one hour).
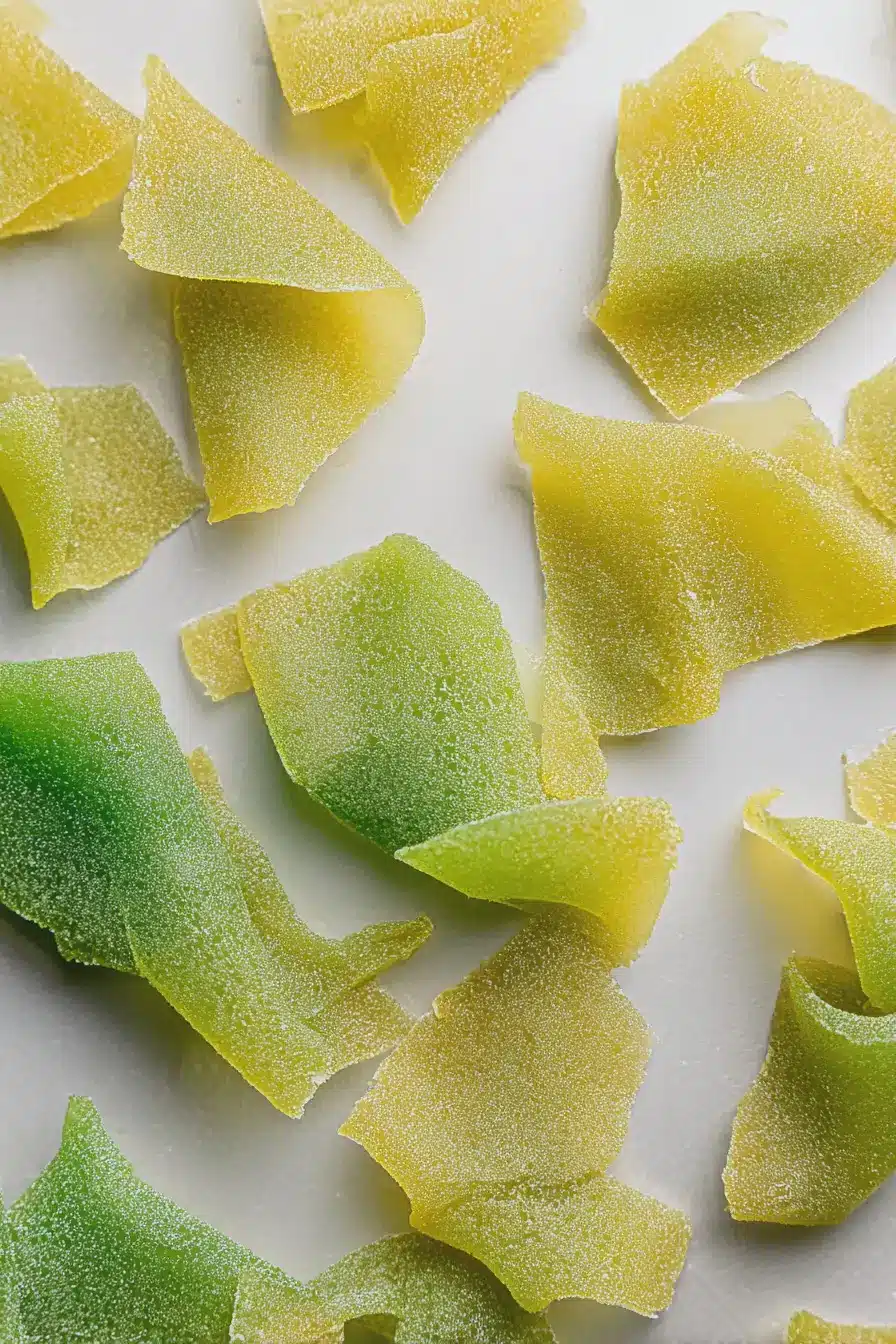
- Once the jelly is firm, run a knife along the edges to loosen then lift the jelly out. Tear the jelly into pieces by hand to create natural, jagged edges that resemble shards of glass. You can also use a knife to cut irregular, crystal-like shapes. Take any leftover small pieces and press them onto the larger pieces.
- Place the shaped pieces on parchment paper and leave them to dry at room temperature for about one week. Cover loosely with tented parchment paper to keep dust off. The outer shell will harden, creating the signature crunchy shell and the interior will remain soft. Once fully dried, store the candy in an airtight container at room temperature for up to one month.