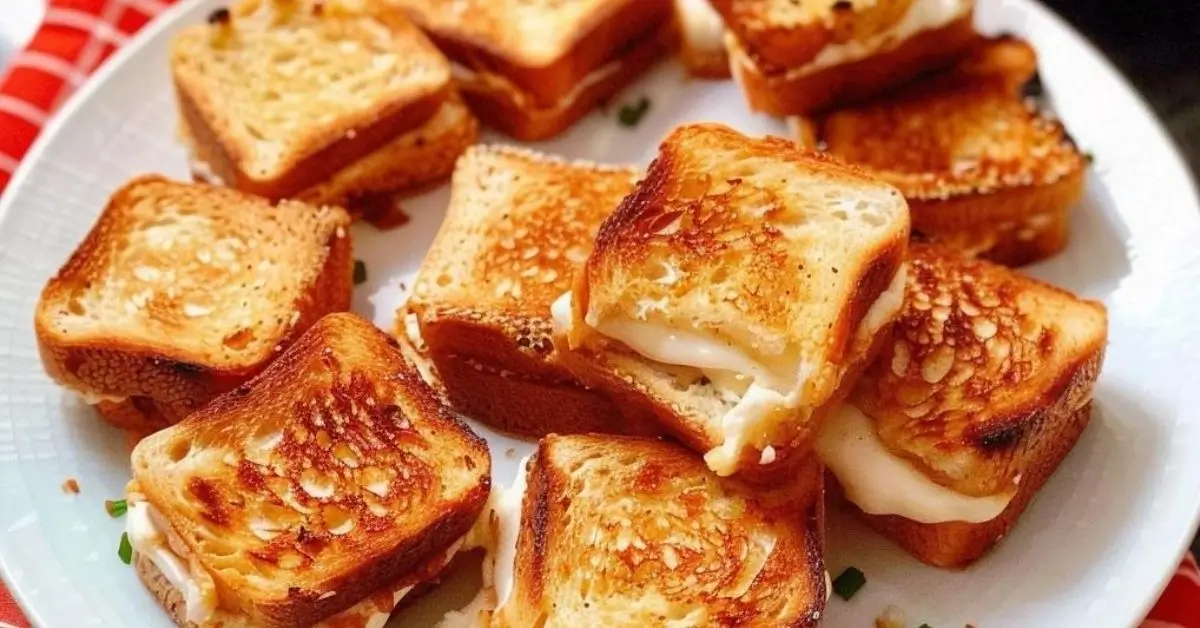
Delight your taste buds and impress your guests with these irresistible Mini Grilled Cheese Sandwiches! Perfect for any gathering, these bite-sized treats are not just adorable but packed with flavors that will leave everyone craving more. Whether it’s a cozy family dinner, a vibrant party, or a casual get-together, these mini sandwiches serve as the ultimate comfort food, transforming a classic favorite into a gourmet experience. With a luscious filling of cream cheese, sun-dried tomatoes, and a hint of spice, each sandwich is a melody of textures and tastes, beautifully crowned with a golden, crispy parmesan topping. Dive into this culinary adventure and discover how these mini delights can become the highlight of your next event.
Preparation Phase & Tools to Use
Embarking on the journey of creating Mini Grilled Cheese Sandwiches is an exciting culinary endeavor that combines simplicity with gourmet flair. To begin, ensure you have the following tools at hand: a sharp knife for precise bread trimming, a toaster to pre-toast the bread slices, a bowl for mixing the filling, and a baking sheet for oven-toasting the sandwiches to perfection.
The preparation process is straightforward yet rewarding. Start by carefully trimming the crusts off the bread to achieve a neat, uniform appearance for each mini sandwich. Pre-toasting the bread slices is a crucial step, as it prevents them from becoming soggy when you add the creamy filling. Next, blend the cream cheese with sun-dried tomatoes and a dash of black pepper, creating a rich and flavorful mixture that will serve as the heart of your sandwiches.
Assembling the sandwiches is a breeze: spread the filling on half of the bread slices, top with another slice, and transfer them to a baking sheet. The final touch, a sprinkle of grated parmesan, adds a delightful crunch and a boost of flavor. Oven-toasting the sandwiches not only melts the cheese but also enhances their color and texture, making them irresistible.
Ingredients List
- Cream Cheese: Acts as a creamy, tangy base for the filling.
- Sun-dried Tomatoes: Provide a chewy texture and a burst of tangy sweetness.
- Black Pepper: Adds a subtle heat and depth of flavor.
- Bread Slices: The foundation of the sandwiches, offering a crisp exterior.
- Parmesan: Offers a savory, nutty topping that crisps beautifully.
Step-by-Step Instructions
- Preheat and Prepare: Begin by preheating your oven to 400ºF (200ºC). Trim the crusts from the bread slices for uniformity and lightly toast them to enhance their texture and prevent sogginess.
- Mix the Filling: In a mixing bowl, blend the cream cheese, finely chopped sun-dried tomatoes, and a pinch of black pepper until the mixture is smooth and evenly combined.
- Assemble: Spread the cream cheese mixture generously on half of the toasted bread slices. Cover each with another slice to form sandwiches and place them on a baking sheet.
- Top and Toast: Sprinkle grated parmesan over the sandwiches for a crispy finish. Bake in the oven for 2-3 minutes until the parmesan is melted and golden.
- Serve and Enjoy: Once golden and crispy, remove the sandwiches from the oven. Allow them to cool slightly before serving to let the flavors meld together beautifully.
Side Dish Recommendations
When serving Mini Grilled Cheese Sandwiches, pairing them with the right side dishes can elevate your meal from delightful to extraordinary. The key is to choose accompaniments that complement the rich, cheesy flavor of the sandwiches while introducing a variety of textures and tastes to the palate. Here are some side dish recommendations that promise to enhance your mini grilled cheese experience, making it a well-rounded and satisfying meal.
1. Tomato Basil Soup:
A classic pairing, tomato basil soup offers a tangy contrast to the creamy richness of the grilled cheese sandwiches. The soup’s acidity and herbal notes cut through the cheese’s decadence, creating a harmonious balance. Plus, dipping your mini sandwiches into the soup adds an extra layer of enjoyment.
2. Garden Salad:
A fresh garden salad with a variety of colorful vegetables provides a crisp and refreshing counterpoint to the warm, toasted sandwiches. Opt for a light vinaigrette to dress the salad, adding a zesty note that complements the cheese without overpowering it.
3. Sweet Potato Fries:
For a sweet and savory twist, serve your mini grilled cheese sandwiches with a side of baked sweet potato fries. Their natural sweetness and crispy texture make them an irresistible companion to the gooey, melted cheese.
4. Pickled Vegetables:
Offering a side of pickled vegetables introduces a tangy element that can cut through the richness of the cheese. From classic cucumbers to more adventurous options like pickled beets or carrots, these zesty bites add a flavorful crunch.
5. Roasted Brussels Sprouts:
Roasted until golden and crispy, Brussels sprouts bring a nutty depth and a hint of bitterness that pairs wonderfully with the savory sandwiches. Toss them with a bit of olive oil, salt, and pepper for a simple yet delicious side.
6. Fruit Salad:
For a lighter, sweeter side, consider a vibrant fruit salad. The natural sugars and acidity of the fruit offer a refreshing contrast, cleansing the palate between bites of grilled cheese.
7. Creamy Coleslaw:
A side of creamy coleslaw adds a crunchy and tangy dimension to your meal. The creaminess of the dressing mirrors the meltiness of the cheese, while the cabbage provides a contrasting crunch.
By thoughtfully selecting side dishes that complement and contrast with Mini Grilled Cheese Sandwiches, you can create a meal that’s diverse in flavors and textures. Whether you prefer the comforting warmth of soup, the crisp freshness of a salad, or the sweet touch of fruit, the right sides can turn your grilled cheese experience into a memorable feast.
Lunchbox Ideas
Packing a lunchbox can be a delightful adventure, especially when it includes Mini Grilled Cheese Sandwiches, a versatile and beloved favorite that can brighten up any midday meal. These tiny treats are not only delicious but also incredibly adaptable, allowing for a variety of flavors and ingredients to suit any palate. Here’s how you can transform these mini sandwiches into a lunchbox sensation, ensuring a meal that is both nutritious and enjoyable.
Variety is the Spice of Life:
One of the joys of Mini Grilled Cheese Sandwiches is their ability to be customized. Consider creating a selection of sandwiches using different cheeses like mozzarella, cheddar, or gouda, and adding inclusions like avocado slices, tomato, or even a thin layer of pesto. This variety ensures that lunchtime is never dull and caters to different tastes and preferences.
Pair with Healthy Sides:
Balance the richness of the sandwiches with a side of fresh fruits or vegetables. Baby carrots, cucumber slices, or cherry tomatoes add a refreshing crunch and nutritional value. For a sweet touch, include seasonal fruits like berries or apple slices, which also provide essential vitamins and fiber.
Make It Interactive:
Kids love interactive meals. Pack the ingredients separately, allowing them to assemble the sandwiches themselves. Include small containers of spreads or additional fillings to encourage creativity and a sense of culinary exploration.
Mindful of Allergies and Dietary Restrictions:
When preparing lunchboxes for school or work, be mindful of potential allergies. Opt for gluten-free bread for those with gluten sensitivities and consider dairy-free cheese alternatives if necessary. Always check labels for potential allergens to ensure a safe and inclusive meal.
Keep It Fresh:
To maintain the freshness of the sandwiches, pack them in an insulated lunchbox with a cool pack. Wrap the sandwiches in parchment paper or place them in airtight containers to prevent them from getting soggy.
Sweet Ending:
End the meal on a sweet note with a small treat. A homemade oatmeal cookie or a piece of dark chocolate can provide a satisfying conclusion to the lunch, offering a little indulgence to look forward to.
By incorporating Mini Grilled Cheese Sandwiches into your lunchbox ideas, you create meals that are not only nourishing and balanced but also fun and exciting. These sandwiches offer a canvas for culinary creativity, allowing you to tailor flavors and ingredients to personal tastes, making every lunchtime a delicious adventure.
Nutritional Information & Health Benefits
These Mini Grilled Cheese Sandwiches not only tantalize your taste buds but also offer some nutritional benefits. Cream cheese, the main ingredient, provides a good source of vitamin A and contributes to your daily calcium intake. Sun-dried tomatoes are rich in antioxidants, particularly lycopene, which supports heart health and skin vitality. The whole grain bread option can add fiber to your diet, promoting digestive health.
While these sandwiches are a treat, they can be part of a balanced diet when consumed in moderation. The key is to use high-quality, nutrient-rich ingredients. Opting for whole-grain bread enhances fiber content, while a sprinkle of parmesan adds calcium without overwhelming the sandwiches with fat.
In terms of health benefits, these mini sandwiches offer a comforting meal that can be enjoyed as part of a balanced diet. They provide a satisfying combination of carbohydrates, protein, and fat, along with essential vitamins and minerals. Enjoying them in moderation can add joy and nutrition to your meals, especially when paired with a side of fresh vegetables or a healthy salad.
Common Mistakes To Avoid & How to Perfect the Recipe
Creating the perfect Mini Grilled Cheese Sandwiches is an art that requires attention to detail. Here are some common pitfalls to avoid and tips to elevate your culinary creation:
- Overloading the Filling: While it’s tempting to add a generous amount of cream cheese mixture, overstuffing can cause the filling to ooze out during baking. Aim for a balanced spread that complements the bread without overwhelming it.
- Skipping the Pre-toast: Toasting the bread slices lightly before assembling the sandwiches is crucial. It prevents the bread from becoming soggy and ensures a crisp, satisfying texture in the final product.
- Uneven Bread Slices: Consistency is key for both aesthetics and cooking. Ensure your bread slices are uniformly trimmed and of the same thickness to promote even toasting and a cohesive presentation.
- Ignoring the Oven Watch: Keep a close eye on the sandwiches while they’re in the oven. The transition from perfectly golden to overdone can happen quickly, so vigilance is essential to achieve that ideal melt and color.
- Neglecting the Cooling Time: Allowing the sandwiches to cool slightly before serving is vital. It not only makes them easier to handle but also lets the flavors meld together, enhancing the overall taste experience.
To perfect your Mini Grilled Cheese Sandwiches, consider these additional tips:
- Experiment with Cheeses: While the recipe suggests parmesan, feel free to explore other cheese varieties like cheddar or mozzarella for different flavor profiles.
- Add Fresh Herbs: Incorporating finely chopped herbs like basil or oregano into the cream cheese mixture can introduce a fresh, aromatic dimension to the sandwiches.
- Serve with Dips: Elevate the serving presentation by pairing the sandwiches with a selection of dips, such as marinara sauce or a basil pesto, for added flavor and variety.
Tips, Notes, Storing, and Reheating
Tips:
- Bread Choice: Experiment with different types of bread, such as sourdough or rye, to find your preferred texture and taste.
- Serving Size: Consider the occasion and audience when deciding on the number of sandwiches. They make excellent appetizers or a fun addition to a brunch spread.
Notes:
- Ingredient Variations: Feel free to modify the filling based on dietary preferences or to introduce new flavors.
- Seasoning Adjustments: Tailor the seasoning in the cream cheese mixture to suit your taste, adding more spices or herbs as desired.
Storing:
- Store any leftover sandwiches in an airtight container in the refrigerator. They can be kept for up to two days, ensuring they remain fresh and delicious.
Reheating:
- To reheat, place the sandwiches on a baking sheet and warm them in a preheated oven at 350ºF (175ºC) for a few minutes until heated through and crispy.
FAQs
Q: Can I make these sandwiches ahead of time? A: Yes, you can assemble the sandwiches and store them in the refrigerator a few hours before baking. Just add the parmesan topping right before they go into the oven.
Q: Are there any gluten-free options? A: Absolutely! Use gluten-free bread to make these sandwiches suitable for those with gluten sensitivities.
Q: Can I add meat to the sandwiches? A: While this recipe focuses on a vegetarian version, you can add cooked bacon or ham for extra flavor. Just ensure the meat is thinly sliced or chopped to maintain the mini sandwich’s integrity.
Q: How can I make these sandwiches spicier? A: Incorporate a pinch of red pepper flakes or a dash of hot sauce into the cream cheese mixture for a spicy kick.
Q: What’s the best way to serve these at a party? A: Arrange the sandwiches on a platter with garnishes like fresh herbs or cherry tomatoes. Providing a variety of dips can also enhance the guest experience.
Conclusion
Mini Grilled Cheese Sandwiches are a delightful treat that combines classic comfort with a touch of gourmet elegance. Whether you’re hosting a party, looking for a fun family meal, or simply indulging in a cheesy delight, these sandwiches are sure to impress. By following the tips and avoiding common mistakes, you can create a memorable dish that’s as enjoyable to make as it is to eat. Embrace the versatility of this recipe and make it your own, ensuring each bite is a testament to your culinary creativity and passion.
Mini Grilled Cheese Sandwiches
Ingredients
Method
- Preheat and Prepare: Begin by preheating your oven to 400ºF (200ºC). Trim the crusts from the bread slices for uniformity and lightly toast them to enhance their texture and prevent sogginess.
- Mix the Filling: In a mixing bowl, blend the cream cheese, finely chopped sun-dried tomatoes, and a pinch of black pepper until the mixture is smooth and evenly combined.
- Assemble: Spread the cream cheese mixture generously on half of the toasted bread slices. Cover each with another slice to form sandwiches and place them on a baking sheet.
- Top and Toast: Sprinkle grated parmesan over the sandwiches for a crispy finish. Bake in the oven for 2-3 minutes until the parmesan is melted and golden.
- Serve and Enjoy: Once golden and crispy, remove the sandwiches from the oven. Allow them to cool slightly before serving to let the flavors meld together beautifully.
Notes
- Bread Choice: Experiment with different types of bread, such as sourdough or rye, to find your preferred texture and taste.
- Serving Size: Consider the occasion and audience when deciding on the number of sandwiches. They make excellent appetizers or a fun addition to a brunch spread.
- Ingredient Variations: Feel free to modify the filling based on dietary preferences or to introduce new flavors.
- Seasoning Adjustments: Tailor the seasoning in the cream cheese mixture to suit your taste, adding more spices or herbs as desired.