I’ve been making stuffed shells for as long as I can remember — the recipe changed hands at family gatherings and each version left a fingerprint on my memory. In my kitchen this dish is the smell of simmering tomato sauce and the sound of foil being pulled off a pan while everyone gathers at the table. It’s the kind of meal that feeds a crowd without fuss, the sort of comfort food that comes with stories and seconds.
Over the years I learned the little things that separate a good tray of shells from a great one: the right ricotta texture, not overcooking the pasta, and a generous layer of sauce so each bite is saucy without being soggy. I lean on simple, quality ingredients — good cheese makes the dish sing — and on straightforward prep that lets you talk to guests while the oven does the finishing work.
These shells are practical, too. You can assemble them ahead, freeze them for a rushed weeknight, or hand them off to someone else to bake. They’re comforting and homey, yet efficient: a few hands-on minutes, then a warm, golden pan that brings everyone to the table.
Why These Classic Stuffed Shells Are Perfect for Family Dinners
Stuffed shells grew from a desire to stretch simple ingredients into a communal meal — a very Italian-American way of turning modest elements into celebration food. They serve a crowd easily because each shell is an individual portion that reheats well and sits nicely on a buffet-style table.
These are reliable, forgiving recipes: if you’re short on time you can use a store-bought marinara and still get a home-cooked result, and if you’re feeding picky eaters you can customize a few shells with plain cheese or hidden vegetables. Picture the final pan: glossy red sauce, bubbling mozzarella, and browned edges that smell like Sunday afternoons.
Everything You Need for Classic Stuffed Shells
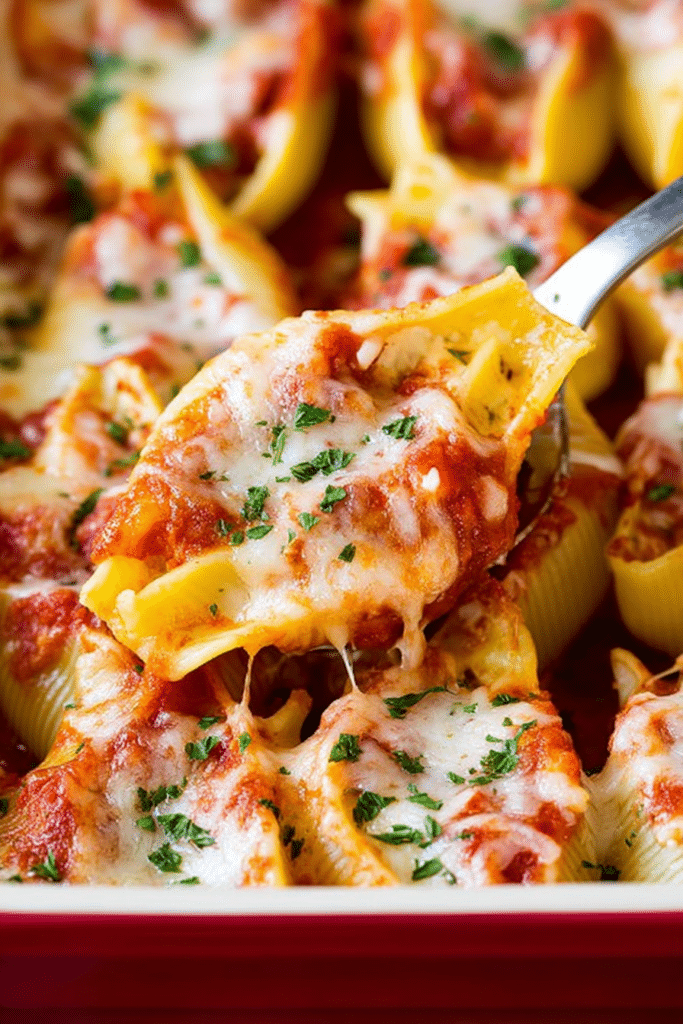
- Jumbo pasta shells – The vehicle for the filling; pre-cooked shells make assembly quick and easy. Substitute with manicotti tubes if you can’t find shells.
- Ricotta cheese – The creamy base of the filling; choose a fresh ricotta for the silkiness. For a lower-fat option, use a part-skim ricotta or a blended cottage-cheese ricotta substitute.
- Mozzarella – Adds melt and stretch on and inside the shells; use a good shredding mozzarella or fresh mozzarella for a richer bite.
- Parmesan – Gives a salty, nutty finish to the filling; substitute Pecorino for a sharper note.
- Egg – Binds the filling so it holds together after baking; omit for a no-egg vegetarian version and add a bit more cheese or a touch of cornstarch for structure.
- Marinara sauce – The saucy cradle for the shells; choose a simple, herb-forward sauce or make your own if you have a few extra minutes. Premade sauces are a legitimate shortcut.
- Italian seasoning and fresh parsley – Herbs lift the filling and finish the dish; fresh is best for garnish, while dried herbs are fine in the filling.
- Cooking spray or olive oil – Prevents sticking and helps the cheese brown evenly; replace spray with brushing a thin film of olive oil if you prefer.
The Secret to Silky Ricotta Filling
- Start with room-temperature ricotta and any other dairy; cold cheese can make the mixture lumpy. I let mine sit on the counter for 20–30 minutes before mixing.
- Beat the ricotta with the egg and a small portion of shredded mozzarella until smooth. A gentle folding motion keeps the texture silky—overworking can become too dense.
- Add grated hard cheese last to season and tighten the mixture slightly. The ratio of ricotta to shredded cheeses controls creaminess versus chew: more ricotta for silk, more shredded cheese for structure and melt.
- For dairy-free or vegan fillings, try a blended tofu ricotta with nutritional yeast and a splash of lemon for brightness. For added creaminess without eggs, a spoonful of vegan cream cheese works well.
Why Salt and Temperature Matter for Pasta Texture
Salt and heat are the small chemistry lessons that change pasta from bland to flavorful and from floppy to pleasantly toothsome.
- Salt the pasta water generously so the shells themselves have seasoning; pasta cooked in lightly salted water tastes flat even with a rich filling.
- Cook shells just until al dente. They should still have a tiny bite because they’ll finish cooking in the oven and you want them to hold their shape when you fill them. Overcooked shells become soft and slippery — difficult to stuff and prone to falling apart.
- Rinse or cool the shells slightly after cooking to stop the cooking process and make them easier to handle. A brief rinse under cold water prevents them from sticking together while you prepare the filling.
Simple Ways to Sneak Veggies into the Filling
- Spinach (finely chopped and sautéed)—fold into the ricotta so it blends without adding watery texture.
- Zucchini (grated and lightly squeezed to remove moisture)—adds body and a mild flavor that doesn’t compete with cheese.
- Bell peppers or mushrooms (finely diced and sautéed until soft)—use to add color and savory depth.
- Roasted butternut or sweet potato (mashed)—for a subtly sweet, creamy variation that pairs beautifully with sage.
- For vegan options, sautéed lentils or finely chopped tempeh mixed with vegan ricotta-style bases create a satisfying, protein-forward filling.
How to Make Classic Stuffed Shells (Step-by-Step)
- Preheat your oven and prepare a baking dish with a thin, even layer of marinara so shells sit in sauce rather than on a dry pan.
- Cook the jumbo shells until just al dente, drain, and cool briefly so they’re easy to handle.
- Combine room-temperature ricotta with part of the shredded mozzarella, grated hard cheese, Italian seasoning, egg, and seasoning; mix until smooth.
- Fill each shell with the ricotta mixture and line them snugly in the sauce-lined dish so they support one another during baking.
- Spoon more marinara over the shells and scatter remaining shredded mozzarella on top to encourage even browning.
- Cover with foil for the first part of baking to melt the filling and heat through, then uncover to brown the cheese and crisp the edges.
- Let the pan rest a few minutes after baking so the filling sets slightly before serving; garnish with chopped parsley for freshness.
For a delightful twist on the classic, try making Creamy Cajun Chicken Stuffed Shells instead.
Pro Tip for Stuffed Shells: Make-Ahead and Freeze Without Sogginess
- Assemble but do not bake — I often prepare the shells through assembly, cover tightly, and refrigerate for up to 48 hours. This keeps the pasta from over-softening and allows flavors to marry.
- Freeze before baking — Arrange assembled shells on a tray and flash-freeze until firm, then transfer to a freezer-safe container. This prevents shells from sticking together and helps avoid a watery bake later.
- Protect from freezer burn — Wrap the baking dish with an extra layer of foil or plastic wrap and seal in a freezer bag for best results.
- Thawing and baking — Thaw overnight in the fridge before baking, or bake from frozen but add extra time and keep the dish covered longer to prevent the top from overbrowning while the center heats through.
- Troubleshooting — If the filling seems runny after thawing, drain excess liquid and blot the shells before topping with fresh cheese; a brief extra bake uncovered helps tighten the texture.
- Variations — Make batches with different fillings (plain cheese, spinach, meat) so guests can choose; these can all be frozen and baked as needed.
How to Store, Reheat, and Freeze Leftovers
- Fridge storage — Store leftovers in an airtight container for up to three days. Keep sauce and shells together so they don’t dry out.
- Freezer storage — For longer storage, freeze leftovers in a shallow, freezer-safe container. Label with the date and consume within 2–3 months for best quality.
- Reheating — Reheat individual portions in the oven at a moderate temperature, covered with foil, until warmed through. For faster reheating, use the microwave but add a splash of water or extra sauce to prevent drying.
- Creative reuse — Turn your leftovers into a delicious meal by making a Leftover Pasta Frittata for breakfast or lunch!
Vegan and Vegetarian Adaptations of Stuffed Shells
- Replace ricotta with blended silken tofu or a store-bought vegan ricotta; add nutritional yeast, lemon juice, and a pinch of salt to mimic the tang of dairy.
- Use vegan shredded cheeses that melt well, or combine a small amount of vegan cream cheese with shredded-style vegan cheeses for a creamier mouthfeel.
- For vegetarian but not vegan versions, swap egg for a flax ‘egg’ if you want to avoid animal products but keep a binder; alternatively, increase the grated hard cheese fraction for structure.
- For a bright, vegetable-forward version, check out our Vegan Pasta Primavera for ideas to make the filling colorful and fresh.
Healthy or Low-Calorie Variations
- Use part-skim ricotta or a blended cottage cheese to reduce fat while preserving creaminess.
- Substitute whole-grain or legume-based jumbo shells to add fiber and protein.
- Bulk up the filling with pureed roasted vegetables so you use less cheese but keep the texture satisfying.
- Replace a portion of the cheese topping with a breadcrumb-herb mix lightly toasted in olive oil for a crunchy, lower-calorie finish.
Quick or One-Pot Versions for Time-Crunched Individuals
- Use pre-cooked frozen shells and thaw quickly to shave off prep time; assemble and bake as usual.
- Prepare sauce while the shells cook: a skillet sauce made from canned tomatoes, garlic, and herbs simmers quickly and keeps flavor bright.
- Batch-cook the filling and freeze in portions so you can pull together a tray in minutes.
- If you’re short on time, try our Garlic Butter Shrimp Pasta for a true one-pan, fast meal.
Serving these shells is simple: a green salad, some crusty bread, and a pitcher of something cold and fizzy will balance the richness. Let the pan sit for a few minutes before you serve so each portion holds its shape — that little pause makes the difference between a messy scoop and a composed plate.
Frequently Asked Questions
Can I make stuffed shells in advance?
Absolutely! You can prepare the stuffed shells up to the baking point, cover them, and refrigerate for a day or two. Just bake when you’re ready!
What kind of pasta should I use for stuffed shells?
You should use jumbo pasta shells, which are designed specifically for stuffing. They hold plenty of filling and sauce!
How do I ensure the ricotta filling is creamy?
Mix the ricotta with the egg, mozzarella, and seasonings until smooth. Make sure to use fresh ricotta for the best texture!
Can I add vegetables to the filling?
Yes! You can sneak in finely chopped spinach, zucchini, or bell peppers for added nutrition without compromising flavor.
How do I store leftovers?
Store any leftovers in an airtight container in the fridge for up to 3 days. You can also freeze them for longer storage, but use a freezer-safe container.

Classic Stuffed Shells
Ingredients
Method
- Preheat the oven to 375 degrees F. Coat a 9"x13" baking pan with cooking spray.
- Spread 1 1/2 cups of the marinara sauce in an even layer in the bottom of the pan.
- Place the ricotta cheese, 1 1/2 cups of mozzarella cheese, Italian seasoning, egg, salt, pepper, and parmesan cheese in a bowl. Stir to combine.
- Fill each shell with the ricotta mixture and place in the baking dish.
- Spoon the remaining marinara sauce over the shells, then sprinkle the other 1 1/2 cups of cheese over the top.
- Cover the dish with foil. Bake for 20 minutes. Uncover the pan, then bake for an additional 10 minutes or until cheese is melted and starting to brown.
- Sprinkle with parsley, then serve.