
I fell in love with Japanese kohakutou in my kitchen one gray afternoon when my kids asked for a craft and a snack all at once. We wanted something bright, hands-on, and safe for little helpers — and these crystal gummies ticked every box. I like that they use plant-based agar agar, so my vegetarian friends and my kids with food sensitivities can join the fun without worry.
Making these with kids is part science experiment, part art project. We play with colors and shapes while the sugary jelly simmers, and the whole kitchen smells faintly fruity and sweet — something about pandan or a berry purée warms the room and gets tiny noses sniffing. The best part: they’re mostly pantry-friendly, and you can often find everything at a regular supermarket or a health-food store if you want organic options.
Over the years I learned a few things the hard way: don’t rush dissolving the agar, keep the drying area dry and airy, and let kids do the fun bits like pouring into silicone molds or pressing cookie cutters into set sheets. I’ll walk you through how to get that glossy, jewel-like interior and the crunchy crystal shell kids love, plus simple swaps for allergies and ways to speed drying without losing texture.
These treats are quieter on additives than many commercial candies, so if you care about cleaner ingredients or sourcing organic produce, you’ll feel good making them at home. Now let’s get into everything you need and how to make them so the whole family has a tasty, colorful afternoon project.
Everything You Need for Crystal Gummies
- Agar agar – The plant-based gelling agent that gives a firm set and creates the glassy interior; use agar powder for consistent results. If you need gelatin alternatives for dietary reasons, agar is the friendly vegan option.
- Sugar – Sweetness and that crystallized shell come from using regular granulated sugar; you can experiment with milder sweeteners but they can change texture and drying time, so test small batches.
- Flavorings – Fresh fruit purées, pandan juice, brewed tea, or extracts add character; choose concentrated flavors so color and aroma stay bright after drying.
- Natural coloring – Beet juice, spirulina, butterfly pea tea, or berry reductions make vivid, food-friendly hues if you want to avoid artificial dyes.
- Neutral oil or nonstick spray – Lightly greases molds or pans so gummies release cleanly and kids can unmold safely.
- Equipment – A saucepan with a good seal, silicone molds or a shallow baking pan, and a sharp knife or cookie cutters for shaping. Silicone molds make the process tidier and more fun for kids.
- Optional: dehydrator or fan – Handy if you want to speed up drying with control; otherwise a dry, well-ventilated countertop works fine.
Tip: when you shop, try to choose organic fruit purées and organic sugar if possible — the flavors are cleaner and you avoid extra preservatives. You don’t need fancy gear; the FAQ below even answers whether special equipment is necessary.
The Secret to That Crunchy Crystal Shell
The crunchy shell is a simple moisture trick: after the jelly sets solid, the surface slowly loses water to the air and the sugar on the exterior crystallizes into a thin, glassy crust. Agar agar gives you a firm, jewel-like interior because it gels more rigidly than gelatin, so the contrast between the crunchy outside and the slightly softer inside is striking.
Two technical bits to keep in mind: agar must be fully dissolved during cooking to avoid a grainy texture, and the drying environment matters — low humidity and good air circulation produce the best crystals. If you flavor with water-heavy purees, they can slow drying, so I recommend balancing moisture by reducing extra liquid or allowing a longer dry time.
Listen for the satisfying snap when you cut through a well-dried candy, and look for a glossy shine on the interior when you break one open. Those sensory cues mean you’ve hit the right balance between set and dry.
How Temperature and Timing Change the Texture
- Simmering time matters: keep the mixture at a gentle boil long enough for agar to dissolve completely; undercooked agar will make candies that won’t set properly.
- Heat intensity affects clarity and mouthfeel: a rolling boil can introduce bubbles; a steady simmer gives a clearer, smoother set.
- Mold size changes drying times: small molds or thin sheets will dry to a crunchy shell faster than a deep mold, so adjust expectations — thin candies finish in a few days, thicker pieces can take longer.
- Flavor infusion timing: add delicate extracts off the heat so volatile aromatics don’t evaporate; for whole-tea or spiced infusions, steep before mixing so you control both flavor intensity and extra liquid.
How to Make Crystal Gummies (Step-by-Step)
- Bloom the agar: pour cool liquid into your saucepan, sprinkle the agar powder over the surface and let it sit briefly so the strands hydrate before heating. This helps prevent clumps.
- Heat gently: bring the mixture to a boil over medium heat, stirring frequently. Once it boils, lower to a simmer and cook for a couple of minutes until the agar dissolves fully and the liquid looks clear.
- Add sugar and dissolve: stir in sugar and continue stirring until fully dissolved and smooth. Taste carefully—this is when you can adjust sweetness.
- Fold in flavor and color: remove from heat for delicate extracts, or stir in concentrated purées or brewed tea so the flavor is evenly distributed.
- Pour and set: lightly oil a pan or fill silicone molds, then pour the hot mixture. Let it cool to room temperature and set until firm — this usually takes a couple of hours.
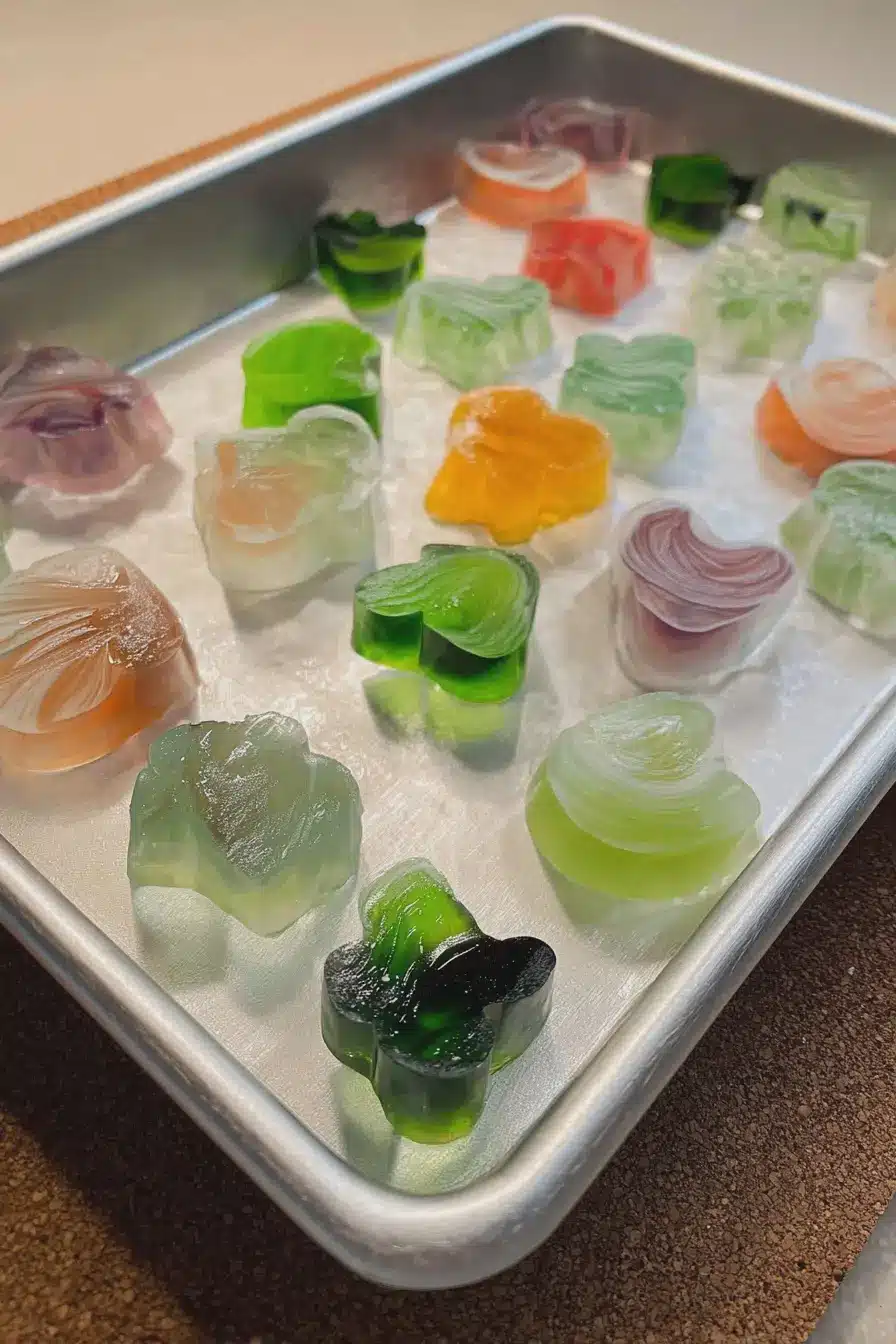
- Cut shapes: unmold or lift the set sheet, then cut into crystals, diamonds, or cubes using sharp cookie cutters or a knife. Kids love choosing shapes and colors here.
- Air-dry to form the shell: place the pieces on a rack or a tray, uncovered, in a cool, dry spot. Expect several days of drying; the surface will crystallize while the interior stays slightly tender.
Troubleshooting tips are below if something goes wrong during any step, and remember patience is the secret ingredient for that crunchy shell.
Flavor Swaps & Dietary-Friendly Variations
- Fruit-forward: use strained berry, mango, or kiwi purée for natural color and flavor; reduce added water to keep drying time reasonable.
- Tea and floral: steep strong green tea, chamomile, or hibiscus and use the strained brew as your liquid base for delicate flavors and lovely hues.
- Extracts and oils: add vanilla, citrus, or pandan extract off the heat to preserve aroma; these work well with neutral-colored candies.
- Lower-sugar options: try a blend of sugar and natural syrups like honey or agave, but test small batches because syrupy sweeteners change drying and crystallization.
- Vegan and allergen swaps: agar agar is already vegan; if avoiding cane sugar, look for organic beet sugar or other non-refined options and check labels carefully for cross-contamination.
- Color naturally: beet juice for pinks, turmeric for golds (use sparingly), butterfly pea for blue that shifts with acidity.
Pro Tip for crystal gummies: Speed Up Air-Drying Without Losing Crunch
- I use a dehydrator on a low setting to accelerate surface drying while preventing sticky bottoms — it gives control over airflow and humidity.
- I place gummies on a single layer with space between pieces so air circulates all around; crowding slows and unevenly dries them.
- I position a small fan nearby (not blowing directly) to increase gentle air movement in humid kitchens; it helps without creating dust on the candy.
- I rotate trays every day so all pieces dry evenly and you avoid over-drying one side.
Troubleshooting
- If the set is too soft: I check whether the agar fully dissolved — if not, reheat gently, stir until clear, and pour again. Under-dissolved agar is the usual culprit.
- If the surface stays sticky: I move the tray to a drier spot or use a dehydrator briefly; humidity is the enemy of crisp shells.
- If candies taste grainy: I make sure sugar fully dissolved while still hot next time — stirring until smooth fixes this in future batches.
- If flavors are weak: I concentrate the flavor (less water, more purée or a stronger tea) and add delicate extracts after removing from heat to preserve aroma.
- If you get bubbles or cloudiness: I skim foam while cooking and pour slowly; gentle stirring and a brief rest before pouring helps the liquid settle.
How to Store, Gift, and Serve Your Crystal Gummies
Store gummies in an airtight container in a cool, dry place to keep that crisp shell. If your kitchen is humid, refrigerate them briefly to extend freshness, but note refrigeration can soften the exterior over time — always bring to room temp before serving for the best crunch.
For gifting, tuck the candies in parchment-lined boxes or clear jars layered with tissue so colors show through. Small treat bags with a handwritten note make lovely party favors. When serving, arrange various colors and shapes on a platter so kids can pick their favorites — these candies are great for themed parties or as a simple afterschool reward.
Expect them to keep well for several weeks when stored correctly; if the surface begins to soften noticeably, enjoy the rest sooner rather than later.
Frequently Asked Questions
Can I use other types of sweeteners instead of granulated sugar? Yes, you can experiment with other sweeteners like honey, agave syrup, or even sugar substitutes, but note that it may affect the texture and flavor.
What is the best way to store my crystal gummies? Store them in an airtight container in a cool, dry place to keep them fresh and crunchy. You can also refrigerate them for longer shelf life.
How long do crystal gummies last? When stored properly, crystal gummies can last for several weeks. Just keep an eye on their texture; if they start to feel too soft, it’s time to enjoy them!
What flavorings work best for crystal gummies? You can use pandan juice, fruit purées, tea, or extracts. Try different combinations to find your favorite flavor!
Do I need special equipment to make crystal gummies? No special equipment is necessary! Just a saucepan, a baking pan or silicone molds, and a sharp knife or cookie cutters for shaping.
Crystal Gummies
Ingredients
Method
- Bloom the Agar: Start by pouring 2 cups of water into a saucepan and sprinkle in 2 tbsp agar agar powder. Give it a quick stir and let it sit untouched for about 5 minutes.
- Boil and Simmer: Place your saucepan on medium heat and bring the agar mixture to a boil. Stir frequently to keep it smooth. Once boiling, lower the heat to simmer and cook for another 2-3 minutes until the agar completely dissolves.
- Add the Sweetness and Flavor: Add 2.5 cups granulated sugar to your simmering agar and stir well until completely dissolved, about 1-2 minutes. Remove from heat, then add your chosen flavorings.
- Pour and Set: Lightly grease a baking pan or silicone molds with neutral oil, or line a pan with parchment paper. Pour your agar-sugar mixture into the pan or molds and let it cool at room temperature for at least 2 hours.
- Cut into Crystal Shapes: Once your jelly mixture is fully set, carefully remove it from the pan. Grab a sharp knife/cookie cutters and cut the jelly into cute crystals, diamonds, cubes—whatever shapes you like!
- Air-Dry for the Crunchy Shell: Let your candies air-dry uncovered at room temp for 3-7 days.