I make these gummies in my kitchen on slow afternoons when the kids beg for something sweet but I don’t want the artificial junk. Using real fruit — not juice — gives each gummy a bright color and that immediate fresh-fruit scent as soon as you open the container. I like that the texture is tender and springy rather than waxy like many store-bought options.
Over the years I’ve tested different gelatins, temperatures, and straining methods to squeeze every last bit of flavor from fruit without adding a ton of sweetener. What I landed on keeps the recipe simple: whole fruit, a touch of honey, and high-quality beef gelatin for protein and great set. The result is a snack that feels like a treat but plays nicely with a paleo, gluten-free, and dairy-free lifestyle.
These are especially great for kids because they look fun and colorful, but parents can actually feel good about handing them over. If you want something playful for a party, you can pair them with other kid treats — for a playful dessert idea try this Kids’ Dirt Dessert with Gummy Worms for a themed platter.
Below I walk through everything you need and the small technique details that make the texture just right, plus storage, swaps, and troubleshooting so your batch comes out perfect.
Why These Paleo Homemade Gummies with Real Fruit are the Smart, Kid-Friendly Snack
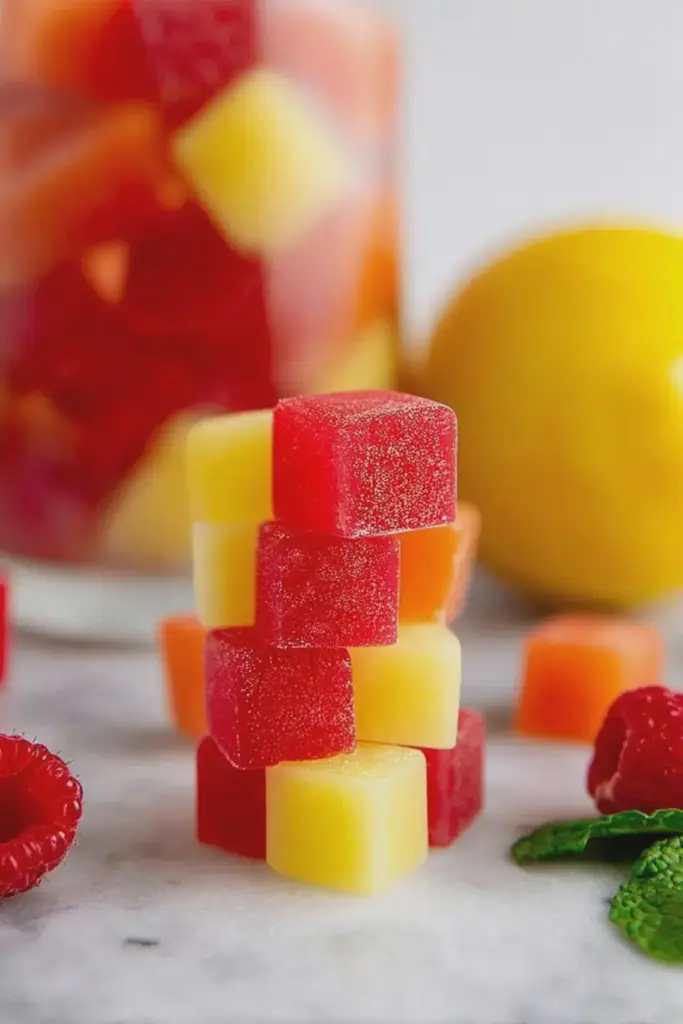
Real fruit gives these paleo homemade gummies with real fruit a punch of authentic flavor and natural color that store-bought gummies can’t match. Because you start with whole fruit, the aroma while you’re blending is bright and fresh and the colors are vibrant — think sunny orange and deep strawberry pink. Using grass-fed beef gelatin brings protein to each bite and creates a pleasant chew that kids love.
Beyond flavor, this recipe avoids artificial colors, corn syrup, and refined sugars. A light touch of honey balances tart fruit without making the gummies overly sweet, and a little acidity from lemon or orange brightens the final taste. Parents get a snack that’s portable, fridge-stable, and genuinely made from simple ingredients you can recognize.
Everything You Need for Paleo Homemade Gummies with Real Fruit
- Whole Fruit (or seasonal fruit) – The primary flavor source; choose ripe, fragrant fruit for the best results. Swap in seasonal produce for varied colors and nutrition.
- Vital Proteins Beef Gelatin – A reliable, high-quality grass-fed gelatin that provides protein and a clean set; it’s my go-to for consistent texture.
- Light Coconut Milk (or thin dairy-free milk) – Adds a touch of creaminess and mouthfeel for citrus-based batches; can be skipped or substituted with more fruit juice for a lighter bite.
- Honey – A paleo-friendly sweetener; use sparingly and adjust to the sweetness of your fruit.
- Lemon or Orange Juice – Provides acidity to lift flavors and preserve brightness.
- Water – For thinning thick purees or helping gelatin bloom.
- Nut Milk Bag or Fine Mesh Strainer – Essential for removing pulp and seeds so the texture stays smooth.
- Silicone Molds or a Greased Glass Dish – Molds give neat shapes but a glass dish works fine if you plan to cut into pieces.
- Small Saucepan and Whisk – For gently warming the liquid and fully dissolving gelatin.
If you need ingredient substitutions, you can use other high-quality gelatins from grass-fed sources or, for a vegan option, agar-agar (note: agar sets differently and requires adjusted ratios). When fruit is out of season, frozen ripe fruit thaws and concentrates flavor well — just strain more carefully to remove extra pulp. Sourcing local, in-season fruit will reward you with the most vibrant color and aroma.
The Nutrition Breakdown: What You’re Getting in Each Gummy
Each gummy is a small, protein-forward snack because of the gelatin. Gelatin supplies amino acids like glycine and proline that support connective tissue and digestion — a real plus for a snack that also tastes indulgent. The light fat from coconut milk adds some satiety and a silky mouthfeel without dairy.
Natural fruit sugars provide quick energy, while the whole fruit brings vitamins, antioxidants, and a bit of fiber if you leave some pulp. Different fruits change the nutrition profile: berries boost vitamin C and antioxidants, citrus adds vitamin C and bright aromatics, and stone fruits bring beta-carotene. For more ideas on nutrient-dense add-ins you can pair with gummies, consider nut-forward snacks like these pecan bites for balance and extra healthy fats: Pecans: Helpful for Nutrition.
Because these gummies are lightly sweetened, they’re a lower-sugar alternative to candy. They make a good bridge snack for kids between meals — a sweet note that still contributes protein.
The Secret to the Perfect Gummy Texture (Gelatin Tips & Temperature)
Texture comes down to two things: the quality and amount of gelatin, and the temperature at which you combine the gelatin with the liquid. Gelatin must bloom (hydrate) then dissolve gently; overheating destroys its setting power, while not dissolving it fully leaves grainy pockets.
- Bloom gelatin in cool liquid first so the granules absorb water and swell; this ensures even gelation.
- Warm the bloomed gelatin gently — just until dissolved. Keep the mixture below a simmer; you want it warm, not hot.
- Cool slightly before pouring into molds so you avoid trapped steam or excessive foam, which can reduce clarity.
- If your fruit puree is very acidic (berries, citrus), slightly increase the gelatin to counteract weaker setting, because acid can lessen gelatin’s strength.
- Different gelatins have different bloom strengths. If you switch brands, test a small batch first and expect to tweak the quantity for a firmer or softer chew.
How to Make Paleo Homemade Gummies with Real Fruit (Step-by-Step)
- Prepare fruit by washing, peeling if needed, and roughly chopping so it blends smoothly.
- Blend the fruit until completely smooth; you should see bright, uniform color and smell the fresh fruit aroma.
- Strain the puree through a nut milk bag or fine strainer, squeezing well to extract clear juice and leave pulp and seeds behind for a clean texture.
- Bloom your gelatin in a small amount of cool water or a portion of the liquid you’re using until it swells.
- Warm the strained juice with any added coconut milk, honey, and a pinch of salt over low heat — warm just until the mixture is comfortable to the touch and the honey dissolves.
- Whisk in the bloomed gelatin a little at a time until fully dissolved and the liquid is smooth and glossy; avoid boiling.
- Let the mixture rest briefly to release surface foam, then carefully pour into silicone molds or a greased dish.
- Chill in the fridge until fully set; when firm, pop the gummies from the molds or cut the slab into bite-size pieces.
- Store in an airtight container in the fridge and let them come slightly toward room temperature before serving if you prefer a softer chew.
For easy reference: Pro-Tips, Troubleshooting, and Variations are presented below as bulleted lists for scannability.
- Troubleshooting (I tested these fixes in my kitchen):
- If gummies are too soft, I add a little more gelatin to the next batch or chill longer.
- If they’re grainy, it usually means the gelatin didn’t dissolve fully — warm more gently and whisk until smooth.
- If flavors are weak, I concentrate the puree by reducing it slightly over low heat before adding gelatin or use riper fruit next time.
- If molds release poorly, I lightly grease them or dust finished gummies with a tiny amount of arrowroot to prevent sticking.
Flavor Swaps & Sweetener Alternatives for Common Dietary Needs
You can tailor these gummies to whatever fruit is abundant in your market — each swap changes the color, aroma, and nutrition. Try stone fruits, mango, blueberry, or mixed-berry blends. When using seed-heavy fruits like raspberries, take extra care straining to remove seeds for a smooth chewing experience.
- Seasonal Fruit Ideas – Spring berries for pinks and purples; summer stone fruits for amber hues; winter citrus for bright, sunny gummies.
- Sweetener Alternatives – Use maple syrup for a different flavor profile, or a monk-fruit/erythritol blend if you need lower sugar; adjust to taste since sweetness varies.
- Vegan Option – Agar-agar can replace gelatin, but it sets firmer and a bit more brittle; start with less and test a small batch.
- Allergy Considerations – These are naturally dairy- and gluten-free; to keep them nut-free, avoid nut milks and use coconut or water instead.
For inspiration on fruity treats that pair well with these gummies, you might also enjoy this playful fruity dessert idea: Homemade Strawberry Truffles.
Pro Tip for Paleo Homemade Gummies with Real Fruit: Extract Maximum Fruit Flavor without Added Sugar
- I always start with ripe fruit — it makes the biggest difference in flavor intensity.
- Blend and then strain through a nut milk bag, squeezing until barely any pulp remains; the clearer the juice, the brighter the flavor.
- For concentrated flavor, gently reduce the strained puree over low heat to intensify sweetness and aroma before adding gelatin.
- Layer flavors by adding a tiny amount of compatible zest or a splash of another fruit’s juice to create depth without extra sweetener.
- Use a touch of acid (lemon or orange) to brighten and balance sweetness — it makes colors pop and aromatics sing.
For more fruit-forward snack ideas that fit a health-conscious routine, try pairing these gummies with other portable snacks like these pumpkin energy bites: Pumpkin Protein Balls.
How to Store, Make-Ahead, and Serve Paleo Homemade Gummies
These gummies keep well in the fridge for up to two weeks in an airtight container. If you need to make them ahead for a party, prepare them up to a week in advance and store layered between parchment to prevent sticking. For longer storage, freezing works — freeze in a single layer on a tray, then transfer to a sealed bag and thaw briefly before serving.
Serve them chilled or slightly warmed to soften the chew. They work beautifully in a colorful snack spread for kids’ parties or packed into bento boxes alongside fresh fruit and nut bars. Small silicone molds make them extra-fun for themed gatherings.
Pro-Tips, Troubleshooting, and Variations are formatted as bulleted lists above for quick scanning while you work through the recipe.
Frequently Asked Questions
Can I use other fruits besides oranges and strawberries for the gummies? Absolutely! You can experiment with any fruit you like. Just remember to adjust the amount of sweetener based on the sweetness of the fruit you choose.
How long do these paleo homemade gummies last? These gummies can be stored in the fridge for up to 2 weeks. Just keep them in an airtight container.
What if I don’t have gelatin, can I use something else? If you don’t have gelatin, you can try using agar-agar as a plant-based alternative, but you’ll need to adjust the proportions because it’s a bit different in how it sets.
Are these gummies suitable for kids? Yes! These gummies are a great kid-friendly snack option since they’re made with real fruit and contain no artificial ingredients.
Can I make these gummies vegan? To make them vegan, use agar-agar instead of gelatin and adjust the recipe accordingly for the right texture. Keep in mind that the outcome may differ slightly in texture.

Paleo Homemade Gummies with Real Fruit
Ingredients
Method
- Blend oranges until smooth. Strain the puree to extract juice.
- Combine coconut milk, honey, and sea salt; warm and whisk in gelatin.
- Pour into molds and refrigerate for 2 hours until firm.
- Blend strawberries, water, and lemon juice; strain the puree.
- Combine with honey and sea salt; warm and whisk in gelatin.
- Pour into molds, refrigerate for 2 hours.