Teriyaki sauce is one of those pantry staples I reach for when I want something comforting, glossy, and full of umami without a lot of fuss. It comes from Japanese cooking—”teri” meaning glaze or shine and “yaki” meaning to grill or broil—so think of it as a sweet-savory glazing sauce that leaves food lacquered and fragrant. I’ve made this simple teriyaki sauce dozens of times: sometimes as a quick dinner shortcut on weeknights, sometimes in batch jars to have on hand for weekend grilling. The smell of it warming in the pan—sweet caramel notes, the faintly alcoholic lift from mirin-style sake or mirin, and a warm ginger whisper—always tells me dinner’s going to be good.
I’ll be honest: my first attempts were too thin, and another batch was too sweet. Over time I learned the small techniques that make a reliable, glossy sauce every time—how to bloom cornstarch so it doesn’t clump, when to add honey for depth versus extra brown sugar for caramel, and how low-and-slow gentle simmering turns a thin mix into a clingy glaze. This is a straightforward version that yields about two cups—enough for a family meal, or to use as glaze across a couple of dinners.
Ingredients You’ll Need
- Soy sauce – the salty, savory backbone of the sauce; swap for gluten-free soy sauce or coconut aminos if needed.
- Brown sugar – adds molasses notes and helps the sauce caramelize when you glaze meats; light or dark both work.
- Honey – gives a smooth sweetness and sheen; use maple or agave for a vegan version.
- Water – thins the sauce to the right consistency before thickening; start with a cup and adjust.
- Ground ginger – gives warm spice and brightness; fresh grated ginger is a great upgrade if you have it.
- Garlic powder – offers a mellow garlic presence without the risk of burning; fresh minced garlic works too if added briefly at the end.
- Cornstarch – the thickening agent that gives the sauce a glossy, clingy finish; mix with cold water first to avoid lumps.
- Cold water (for slurry) – used to dissolve the cornstarch so it blends smoothly into the hot liquid.
Tip on sourcing: a decent soy sauce and good-quality brown sugar make a noticeable difference. I usually keep a small bottle of dark soy for deeper color and a lighter one for everyday use; both will work here. If you’re buying mirin or sake just for this sauce, a splash is nice but not required—this recipe uses a mirin-style touch, so regular pantry staples are sufficient.
Step-by-Step Preparation Guide
Prep time: about 5 minutes. Cook time: about 10 minutes. Total time: ~15 minutes. Yield: roughly 2 cups.
- Gather your ingredients and equipment. I like to have everything measured out: 1 cup water, 1/4 cup soy sauce, 5 teaspoons packed brown sugar, 1 tablespoon honey, 1/2 teaspoon ground ginger, 1/4 teaspoon garlic powder, 2 tablespoons cornstarch, and 1/4 cup cold water for the slurry. Use a small whisk, a heatproof saucepan, and a bowl for the cornstarch slurry. Having the slurry ready prevents scrambling when the sauce hits heat.
- Combine the base in a saucepan over medium heat. Add the cup of water, soy sauce, brown sugar, honey, ground ginger, and garlic powder. Stir once or twice to bring everything together. You’ll notice the sugar slowly dissolving and the mixture taking on a thin, glossy look. Heat until the liquid is just warm—about a minute. You don’t want a rolling boil at this stage; keep it gentle so the flavors marry without boiling off the aromatic lift from the honey.
- Make the cornstarch slurry. In a separate small cup, stir 2 tablespoons cornstarch into 1/4 cup cold water until completely dissolved. This is important: cornstarch lumps if added dry to hot liquid. Cold water ensures the starch granules separate and then swell uniformly when heated.
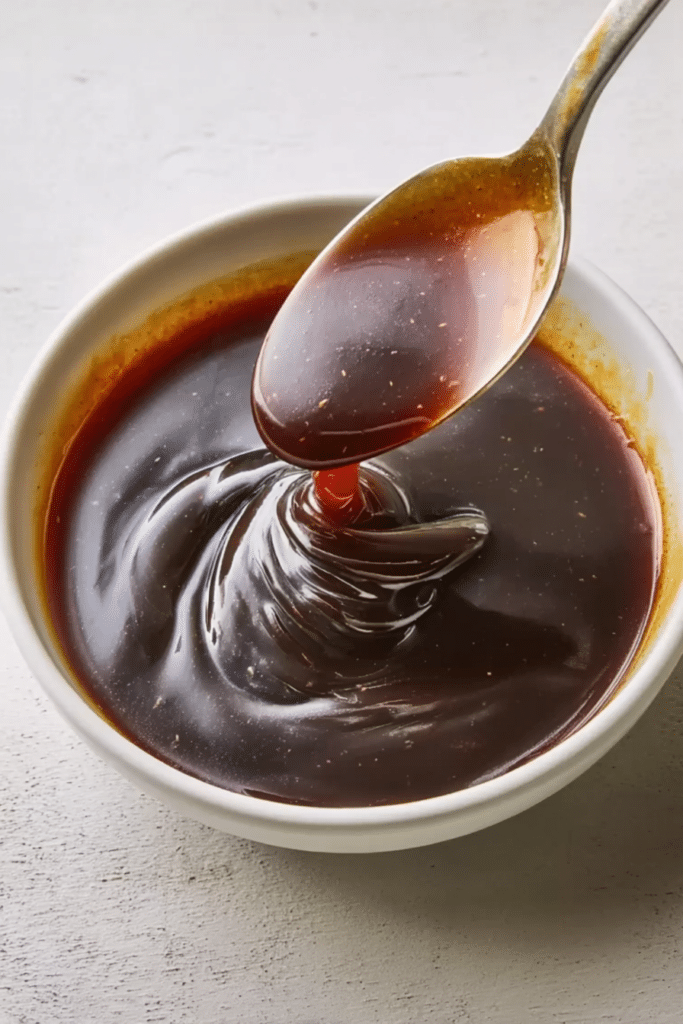
- Whisk the slurry into the warm sauce. Slowly pour the dissolved cornstarch into the saucepan while stirring. Increase heat to medium-low and stir continually. Within a minute or two the sauce will begin to thicken. You’ll see it go from watery to a slow-moving, glossy ribbon that coats the back of a spoon. That visual cue—when it clings and coats—is how I determine doneness more than a strict time limit.
- Cook and adjust. Simmer gently for about 5 to 7 minutes, stirring so the bottom doesn’t stick. If you overcook on high heat, the sugars can scorch and taste bitter; if it’s undercooked, it will be runny and won’t cling. If the sauce tastes flat, add a pinch more salt or a splash of soy; if it’s too sharp, a touch more honey or brown sugar smooths it out. If it’s too thick, whisk in a tablespoon or two of warm water until you reach the desired consistency.
- Finish and cool slightly. Once glossy and thickened, remove from the heat. It will thicken a touch more as it cools—so don’t over-thicken on the stove. Taste and adjust seasonings. If you used garlic powder and want a fresher hit, stir in a teaspoon of minced fresh ginger or a little garlic right at the end for brightness.
- Use or store. Use immediately as a glaze, dip, or stir-fry sauce. If you’re storing, transfer to a clean jar and let it come to room temperature before sealing and refrigerating.
Common pitfalls and fixes
- Clumpy sauce – usually from adding cornstarch dry; always dissolve cornstarch in cold water first.
- Bitter or burnt notes – high heat will burn the sugar; cook gently and stir.
- Too thin – simmer longer or whisk in a tiny extra cornstarch slurry (start with half a teaspoon cornstarch dissolved in a tablespoon water).
- Too sweet – a splash more soy sauce or a squeeze of citrus can balance it.
Using Your Teriyaki Sauce
I use this sauce three ways most often: as a quick stir-fry sauce, as a marinade for proteins before grilling, and as a glaze brushed on midway through broiling or grilling for that lacquered finish. It clings beautifully to chicken thighs and salmon, gives a shiny coat to stir-fried vegetables, and doubles as a dip for dumplings or wings.
Try using your teriyaki sauce in our delicious teriyaki salmon bowls for a quick and flavorful meal.
For stir-fries, add the sauce in the last minute of cooking so vegetables keep a little bite and the sauce coats everything evenly. For marinades, let protein sit for 15 minutes to an hour—longer for tougher cuts—then shake off excess before grilling to avoid flare-ups from the sugars. When glazing meat for a bake or broil, brush on during the last 5–8 minutes so the sugar caramelizes without burning.
Your teriyaki sauce can enhance a comforting bowl of chicken noodle soup by adding a sweet and savory twist.
Protein and vegetable pairings I rely on:
- Chicken thighs or drumsticks – the fat helps the sauce cling and caramelize.
- Salmon or tuna steaks – brush the sauce in the final minutes on a hot grill or under the broiler.
- Tofu – press well, sear until golden, then toss in the sauce to coat.
- Broccoli, snap peas, bell peppers – quick stir-fry then finish with the sauce for glossy veggies.
Variations for Dietary Restrictions
If you have dietary needs, this sauce is forgiving and easy to adapt without losing its character.
For a delightful vegetarian option, try pairing teriyaki sauce with vegetarian stuffed peppers.
- Gluten-free – swap regular soy sauce for tamari or a labeled gluten-free soy sauce. Coconut aminos also work and add a slightly milder, less salty profile.
- Vegan – replace honey with maple syrup or agave nectar; keep brown sugar if refined sugar is acceptable, or use coconut sugar for a less refined option.
- Soy-free – coconut aminos are the best direct substitute and keep much of the umami while reducing sodium.
- Lower sugar – reduce brown sugar and increase a little mirin or add a splash of rice vinegar for balance; note that the glaze effect will be less glossy and more liquid without the sugar content.
Storage Tips and Shelf-Life
I batch-make this sauce and keep it in the fridge in a sealed jar. Proper storage keeps it usable for weeks and gives you a fast dinner shortcut.
- Refrigerator – keep in a clean, airtight container. Properly stored, homemade teriyaki sauce will keep up to two weeks in the fridge. The sugar preserves it, but since it’s homemade, it lacks commercial preservatives.
- Freezer – freeze in ice cube trays for single-use portions, then transfer to a freezer bag. This is perfect if you want to defrost just a tablespoon or two for a glaze. Frozen cubes are best used within 2–3 months.
- Signs it has gone bad – sour smell, visible mold, or unexpected fizzing are clear signs to discard. A small amount of separation is normal; just whisk to recombine.
- Batch cooking – I often double the recipe and jar it. It saves time, but remember to cool completely before sealing jars so condensation doesn’t invite spoilage.
Flavor Enhancements and Substitutions
There are a lot of ways to riff on this base to make it your own.
If you’re looking to spice things up, consider adding some homemade hot sauce to your teriyaki recipe.
- Fresh ginger – swapping ground ginger for freshly grated ginger brightens the sauce and gives a little zip.
- Garlic – a clove of minced garlic added at the end keeps it fresh and aromatic; add raw at the end instead of powder if you want a sharper bite.
- Sesame oil – a teaspoon stirred in at the end lends a toasty aroma. Use sparingly; sesame oil is strong.
- Citrus – a squeeze of orange or lime brightens and cuts sweetness, which is nice with rich fish or fatty meats.
- Chili – red pepper flakes, gochujang, or a dash of sriracha add heat and complexity.
Substitutions and how they change the sauce:
- Coconut aminos – lower sodium, slightly sweeter, less of the deep soy flavor.
- Maple syrup for honey – adds a woodsy, rounded sweetness and is vegan friendly.
- Arrowroot – can replace cornstarch in a 1:1 swap; it makes a clearer glaze but should be added off-heat to avoid thinning.
FAQ
How long can I store homemade teriyaki sauce?
You can store homemade teriyaki sauce in the fridge for up to two weeks. For longer storage, consider freezing it in an airtight container.
Can I make this teriyaki sauce gluten-free?
Absolutely! Just use gluten-free soy sauce or coconut aminos as a substitute for regular soy sauce.
What dishes can I use teriyaki sauce with?
Teriyaki sauce is versatile! You can use it in stir-fries, as a marinade for meat or fish, a glaze for vegetables, or even as a dipping sauce.
How can I make teriyaki sauce thicker?
You can make the sauce thicker by cooking it for a longer time or adding a bit more cornstarch mixed with water. Stir well until you achieve your desired consistency.
What can I use instead of honey for a vegan version?
For a vegan version, you can substitute honey with maple syrup or agave nectar, which will maintain the sweetness and consistency.
If you try this recipe, I’d love to hear how you used it—marinated, glazed, or tossed into a noodle bowl. Small adjustments are normal and expected; tell me what you changed and why. That’s how recipes evolve into your go-to weeknight solution.
Conclusion and Serving Suggestions
This simple teriyaki sauce is the kind of recipe that becomes part of your regular rotation. It’s quick to make, forgiving to tweak, and works across proteins and veg. Expect a glossy, slightly thick sauce that’s sweet with salty umami and a warm ginger note. It thickens as it cools, so stop cooking when it just coats a spoon.
Serving ideas:
- Brush on grilled chicken thighs during the last 5 minutes of cooking and finish with sesame seeds and sliced green onions.
- Toss with hot noodles and roasted vegetables for an instant yakisoba-inspired bowl.
- Glaze salmon and broil for a minute to caramelize the top—serve with steamed rice and pickled cucumbers.
- Keep a jar on hand as a dip for dumplings, spring rolls, or crispy tofu bites.
Try making a small batch first to tune the sweetness and salt to your palate. Over the years, those tiny adjustments—less sugar in summer when fruit is sweeter, a touch more soy when using low-sodium protein—are what make this recipe one I come back to repeatedly.

Simple Teriyaki Sauce
Ingredients
Method
- Gather all ingredients.
- In a saucepan over medium heat, combine water, soy sauce, brown sugar, honey, ginger, and garlic powder. Heat until nearly warm, about 1 minute.
- In a cup, mix cornstarch with cold water until dissolved, then add to the saucepan.
- Cook and stir the sauce until it thickens, about 5 to 7 minutes.
- Serve and enjoy!