I make these coconut-and-lime jelly bowls whenever I want something that feels special without taking over my afternoon. In my kitchen they’ve become the go-to for hot-weather get-togethers: they need only a handful of hands-on minutes, then time in the fridge to set. I like that the preparation is quick, but the final plates look deliberately pretty—soft white jelly gleaming with lime zest and a dusting of fresh coconut.
I’ll be honest: the trickiest part when I first made this was getting the texture right. After a few tries I learned how temperature and timing change the mouthfeel, and now I can consistently get a silky, glossy set that still jiggles. I also learned that keeping the lime until the end preserves its bright, fresh character—add it too early and the citrus dulls.
This recipe is forgiving, which is why I reach for it when I’m short on time but want to impress. It’s naturally gluten-free and can be made vegan with the right substitute. The aroma of coconut as it warms, punctuated by the lime zest at the end, is the kind of smell that instantly says summer.
Note to other writers and content creators: present the Pro-Tips, Troubleshooting, and Variations as bulleted lists for quick scanning.
The No-Fuss Summer Dessert: Coconut-and-Lime Jelly Bowls for Busy Hosts
This dessert is built for hosts who want something that looks thoughtful but doesn’t swallow the prep time. You spend a short time warming and dissolving, then the fridge does the rest. It’s versatile — creamy and tropical for anyone who likes coconut, but bright and refreshing thanks to lime, so it appeals to people who prefer a tart finish.
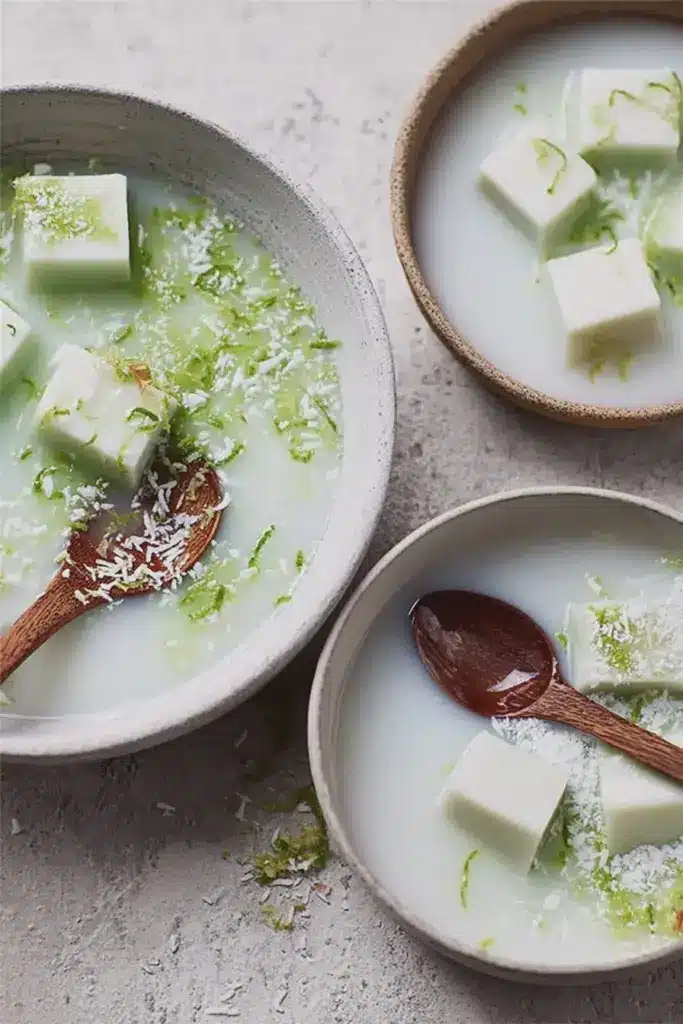
Sensory note: the bowls look elegant in simple glassware — creamy white with neon specks of lime zest and a snowy coconut garnish. The aroma of coconut while mixing, followed by a burst of lime when you grate the zest, is what makes guests smile before the first spoonful.
Everything You Need for Coconut-and-Lime Jelly Bowls
Below I explain the purpose of each ingredient and offer swaps so you can adapt to what you have or dietary needs. For a tropical pairing, you might also enjoy serving a different coconut dessert alongside these—try our Hawaiian Pineapple Coconut Fluff for a contrasting texture and flavor.
- Coconut milk – Provides a light, silky coconut base and a subtle aroma. Use full-fat for creamier mouthfeel or a lighter version if you prefer less richness.
- Coconut cream – Adds depth and a velvety finish; it’s the reason the jelly feels luxurious rather than thin. If you want a lighter set, reduce the amount and balance with more coconut milk.
- Sugar – Balances the coconut and lime. You can swap for coconut sugar, honey, or a sugar substitute—adjust to taste and remember some substitutes affect set and color.
- Gelatine (or gelatine sheets) – The traditional setting agent that gives a smooth, tender gel. Use powdered or sheet form as you prefer; both work when handled correctly.
- Lime (zest and juice) – Zest adds bright aroma and visual pop; juice adds tang. Always finish with the juice off the heat to keep the flavor fresh.
- Fresh coconut – For garnish; it adds texture and a snowy finish that pairs beautifully with the lime’s color.
Nutritional snapshot: this dessert is naturally gluten-free and can be dairy-free when made with coconut-only ingredients. It’s relatively high in saturated fat because of the coconut cream, and contains added sugar unless you reduce or swap sweeteners. For guests watching macros, portion size and sweetener choice matter most.
The Secret to a Silky Coconut Jelly Texture
- Gelatine chemistry: warm liquid fully dissolves gelatine, then cooling lets the protein network form a smooth gel. Avoid boiling after adding gelatine; that can weaken the set.
- Powder vs sheets: sheet gelatine tends to give a cleaner, clearer set; powdered is more convenient. Both yield a glossy finish when dissolved in warm (not boiling) liquid and allowed to bloom properly.
- Temperature control: dissolve gelatine in warm coconut mix off the boil. If the mixture simmers gently you’ll dissolve the gelatine quickly; high boil can create air bubbles and change texture.
- Sensory focus: a properly set jelly looks glassy and gives a gentle, even wobble when you shake the bowl. The surface should be smooth, without granules or limp areas.
Vegan Gelatine Substitutes That Actually Set
- Agar-agar — a reliable seaweed-based alternative that sets firmer and a little quicker than gelatine. It needs to be dissolved at a higher temperature, so bring the mixture to a gentle boil and simmer briefly to activate it.
- Other plant options — carrageenan and pectin can work in specific recipes but behave differently; carrageenan gives a softer set for dairy-free creams, while pectin is most effective with higher sugar and acid.
- Adjustments — vegan agents often require different quantities and a slightly different technique (heat to activate, then cool rapidly). Read package instructions and test a small batch if you’re unsure.
- Avoid these pitfalls — under-heating agar prevents it from setting; over-boiling gelatine breaks down its structure. When using vegan substitutes, keep a close eye on temperature and stirring.
- Pro tip: if you learn better visually, search short demonstration videos on using agar-agar—they show boiling points and texture changes clearly, which helps when you try it for the first time.
Why Lime Timing Makes the Flavor Bright
- Adding lime juice at the end preserves the fresh acidity and prevents bitterness that can develop when citrus is cooked for too long.
- Fresh lime juice gives a cleaner, livelier flavor than bottled juice; the scent from zest added at the end elevates the aroma when you plate.
- Texture note: very acidic mixtures can interfere with gelatine setting if introduced too early or in large quantities—add the juice after the gelatine is fully dissolved and slightly cooled to keep both flavor and structure intact.
- Sensory focus: the bright green of lime zest against the creamy jelly and the sharp citrus scent when you grate the zest right before serving make the dish feel summery and vibrant.
How to Make Coconut-and-Lime Jelly Bowls (Step-by-Step)
- Warm the coconut milk, coconut cream, and sugar together over medium heat until the mixture is steaming and just at a simmer; don’t let it reach a hard boil.
- While it warms, bloom your gelatine in cold water (if using sheets or powdered form); squeeze out excess water from sheets before adding.
- Remove the coconut mixture from heat, stir in the dissolved gelatine until completely melted, then let the mixture cool for a few minutes off the heat.
- Stir in fresh lime juice off the heat to preserve brightness, then pour the mixture into serving bowls or glasses and refrigerate until set (typically several hours).
- Before serving, grate fresh lime zest over the set jelly and sprinkle with shredded fresh coconut for texture and contrast.
Troubleshooting (I speak from experience):
- If the jelly is too soft: it likely needs more setting agent or less liquid—next time increase your gelatine proportion or shorten the liquid volume slightly.
- If it’s grainy or has lumps: the gelatine wasn’t fully dissolved. Warm gently and stir until smooth; avoid boiling.
- If the jelly separates or weeps watery liquid: it may have been stored too long or exposed to temperature swings. Serve within a few days for best texture.
Variations I use when I want to switch things up:
- Add a layer of puree (mango or passion fruit) between sets for color and a tropical contrast.
- Top with macerated berries and a sprig of mint for a fresher finish that complements the coconut and lime.
- For a show-stopping platter, layer coconut jelly with whipped coconut cream and toasted desiccated coconut.
If you’re looking to impress, try making a Luscious Lemon Lime Cherry Pistachio Cheesecake as a companion dish to your jelly bowls.
Pro Tip for coconut-and-lime jelly bowls: Add the lime juice after the gelatine
- Add the lime juice after the gelatine has dissolved and the mix has cooled slightly — this keeps the citrus bright and prevents it from weakening the set.
- I always reserve the zest until plating; the oil in the zest is highly aromatic and loses power if added too early.
- Experiment with other citrus (like yuzu or Meyer lemon) sparingly — they change acidity and aroma, so adjust taste at the end.
- When using vegan gelling agents, follow the timing for activation—some require boiling, so add delicate flavors after the mixture has cooled to preserve aroma.
How to Store, Make-Ahead, and Serve Coconut-and-Lime Jelly Bowls
- Make-ahead: you can prepare these up to a couple of days in advance; keep them covered in the fridge to prevent them from absorbing other flavors.
- Storage: refrigerate in an airtight container or cover each bowl tightly; properly stored, they retain texture for a few days but are best eaten within 48–72 hours.
- Serving: grate lime zest and add fresh coconut just before serving to keep those elements lively and textured.
- Transporting for a party: keep chilled in an insulated box with ice packs and add garnishes on arrival to keep them fresh.
For an easy dessert option to serve alongside your jelly bowls, consider making No-Bake Turtle Mini Cheesecakes to complement the light, tangy jelly.
Creative Alternatives for Coconut and Lime Jelly Beyond a Dessert
This jelly isn’t just for spoons — you can use it in a variety of creative ways that bring the coconut-and-lime flavor into other parts of a menu.
- Cocktails: cut the set jelly into cubes and add to tropical cocktails or mocktails for a chewy, cooling textural note.
- Parfaits and trifle layers: alternate jelly with chopped fruit, yogurt or whipped coconut cream and granola for a layered presentation.
- Sauce or glaze: warm a little of the set jelly gently to create a glossy sauce for a simple coconut cake or a fruity tart.
- Savory ideas: use small cuts of coconut-lime jelly as a playful garnish in light seafood dishes where a touch of sweet-acid balance is welcome — for inspiration on coconut-savory pairings see ideas like Coconut Lime Fish Soup.
Frequently Asked Questions
Can I use a different type of gelatine?
Absolutely! If you prefer, you can use agar-agar as a vegan substitute. Just follow the package instructions for the best results.
How long do the jelly bowls need to chill?
They need to chill for about 4–6 hours or until they are completely set. It’s best to prepare them in advance!
Can I make this recipe ahead of time?
Yes, you can! These jelly bowls store well in the fridge for a few days, making them a perfect make-ahead dessert.
What other fruits can I add to the jelly?
You can experiment with fruits like mango, pineapple, or even berries for added flavor and color!
Is this dessert suitable for gluten-free diets?
Yes! Coconut-and-lime jelly bowls are naturally gluten-free, so they are perfect for gluten-sensitive guests.

Coconut-and-lime jelly bowls
Ingredients
Method
- Heat all the ingredients except the gelatine and lime zest and juice in a saucepan over a medium heat until simmering. Remove from the heat.
- Meanwhile, soak the gelatine in cold water for 5 minutes, or until soft. Squeeze out any excess water and add to the pan. Stir until the gelatine has dissolved. Remove from the heat and stir in the lime juice.
- Chill for 4–6 hours, or until set. Grate over coconut and lime zest to serve.