I fell into pickle-brining by accident: one weekend I had more pickle juice than pickles and a fridge full of chicken. I tossed the breasts into the jar juice, intended to forget them for a day, but after a few hours I pulled them out and found the meat so much more tender than usual. From then on I treat leftover pickle brine like a tiny miracle for busy dinners.
I make this recipe when I want something quick that still looks and tastes like I spent time on it. The whole process is forgiving — pounding the breasts to an even thickness, a short soak in brine, and a quick skillet finish — but it rewards a couple of small habits: don’t over-brine, get the pan hot, and let the chicken rest. I learned those the hard way when one batch came out too salty and another had a pale crust.
In my kitchen this chicken is a weeknight workhorse. It pairs with roasted vegetables, mashed potatoes, or a quick green salad, and it reheats well for lunches. If you want to stretch flavors further, try pairing it with Parmesan zucchini fries for a crowd-pleasing plate that comes together fast.
My goal here is to give you the no-fuss version: clear reasons this works, simple swaps if you have dietary needs, and practical tips I actually use so your chicken comes out tender on the inside with a golden crust on the outside.
Why Pickle-Brined Chicken Is Perfect for Busy Weeknights
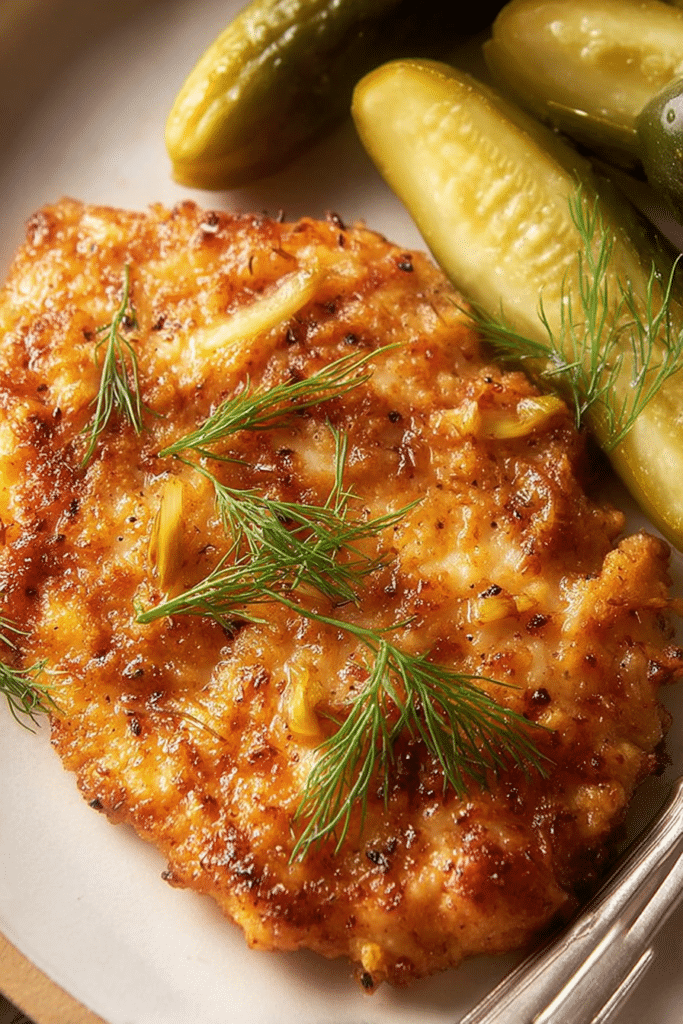
Pickle-brined chicken is the kind of recipe that feels elevated but is truly low-effort. The brine needs only a few hours to work—much less time than many traditional marinades—so you can marinate in the morning and cook in the evening. The tangy aroma of the brine is subtle while cooking, and the skillet browns the exterior into a satisfying golden crust that signals dinner is ready.
This method boosts tenderness and adds an undercurrent of sweet-salty-sour that plays nicely with simple sides. It’s versatile enough to serve with steamed greens, oven-roasted potatoes, or quick fries like Parmesan zucchini fries.
Everything You Need for Pickle-Brined Chicken
Everything here is basic pantry stuff and a jar of pickles. Use a pickle juice you actually enjoy drinking—if the jar tastes bright and balanced, the brine will translate that flavor to the chicken. If you need a gluten-free version, swap a gluten-free all-purpose flour or almond flour for dredging; for Whole30, replace the flour dredge with crushed nuts or compliant cassava flour.
- Chicken breasts – Look for even-shaped breasts; they’re easier to pound to uniform thickness for even cooking or slice them in half for speed.
- Pickle juice – The star ingredient; use the juice from dill, bread-and-butter, or any pickles you like. A brighter, tangy brine yields livelier flavor.
- All-purpose flour – Creates the crust; replace with a gluten-free blend or almond/cassava flours for special diets.
- Seasonings – Simple dried aromatics (garlic, onion, paprika) and salt/pepper give the crust depth. Adjust to taste.
- Fat for cooking – A mix of oil and butter gives a nice brown in the pan; use a high-smoke-point oil if you’ll crank the heat.
- Tools – A meat mallet or rolling pin, a shallow dish for brining, and a heavy skillet are the essentials for speed and consistency.
Pair your pickle-brined chicken with some delicious Parmesan zucchini fries for a complete meal.
The Science: Why Pickle Juice Tenderizes Chicken
Pickle juice contains acid (vinegar) and salt; together they change meat proteins and water retention in ways that make chicken more tender and flavorful. The acid gently denatures surface proteins, which helps the muscle fibers relax and shortens the cooking time needed for a juicy interior. Meanwhile, salt helps proteins reorganize so they hold onto moisture rather than losing it while cooking—this is why brined chicken often reads as juicier even after searing.
There’s also a small nutritional upside: fermented pickle brines can contain probiotics, and while most are reduced by cooking, the brine itself can be a tangy, slightly probiotic-rich ingredient if you sip a bit before heating. Keep in mind that acid is progressive; long contact turns the texture mealy, so timing matters.
In practice, the result is a tactile difference: properly brined chicken feels springy and tender when you slice it, versus the slightly stringy bite of unbrined meat. You’ll notice a brighter, well-rounded mouthfeel rather than a one-note seasoning.
Flavor Balance: Sweet, Salty and Sour—What to Expect
Pickle-brined chicken sings on three fronts: the salty backbone from the brine, the sour snap of vinegar, and often a hint of sweetness depending on the pickle variety. That balance keeps the chicken interesting without overpowering sides. If you choose a sweeter pickle, expect a milder tang and a touch of sweetness; a dill brine will highlight herbs and fresh, grassy notes.
Good pairings play off those elements: creamy mashed potatoes or a tangy slaw amplify the sour notes, while roasted root vegetables bring out the sweet side. If you like balancing sweet and savory, try our honey garlic chicken for another delicious flavor experience.
How to Make Pickle-Brined Chicken (Step-by-Step)
- Place the chicken on a cutting board and cover it with plastic wrap; pound the breasts to an even thickness so they cook uniformly.
- Put the chicken in a shallow dish and pour enough pickle juice to cover; refrigerate and brine for 4–6 hours—do not brine overnight.
- In a separate shallow bowl, whisk together flour and your seasonings. Drain the chicken and discard the brine; pat the chicken lightly if it’s dripping, then dredge each piece in the seasoned flour, shaking off excess.
- Heat oil and butter in a heavy skillet over medium heat until the fat shimmers. Add the chicken and cook until the crust is golden brown—about 5–7 minutes per side—and the interior reaches 165°F.
- Remove the chicken to a cutting board and let it rest for 5–10 minutes before slicing; resting lets the juices redistribute so the meat stays moist.
If you prefer a visual, look for a short video on how to pound chicken and one-pan skillet searing; seeing the pan shimmer and how the crust looks at the right stage makes the technique easier to trust.
The Secret to a Crispy, Golden Crust
The crust comes down to three technical points: dry surface, hot fat, and even contact with the pan. Excess brine on the surface steams the flour and prevents browning, so shake off or pat the chicken dry before dredging. The pan should be hot enough that the fat shimmers but not smoking; medium to medium-high heat gives a steady sear without burning the seasoning.
If you’re precise, a shallow-fry surface temperature between about 325–350°F promotes even browning without an oily finish. Work in batches if your pan is crowded—overcrowding drops the pan temperature and results in pale crusts. Listen for the sizzle and look for a deep golden color before flipping; that’s your cue the crust has formed and sealed the juices inside.
Pro Tip for Pickle-Brined Chicken: Brine 4–6 Hours, Not Overnight
- Short brine window: 4–6 hours gives tenderness and a bright flavor without turning the meat mealy or overly salty.
- If you’re short on time: butterfly or slice chicken thinly and brine for 1–2 hours—thinner pieces absorb flavor quickly.
- Adjust by thickness: thicker breast halves need the full 4–6 hours; thin cutlets need less.
How to Store, Reheat and Use Leftover Pickle-Brined Chicken
Cool any leftovers to room temperature briefly, then store in an airtight container in the fridge for up to 3–4 days. Reheat gently—slices warmed in a skillet over low heat with a splash of oil or wrapped in foil and heated in a moderate oven help preserve texture better than microwaving alone.
Leftover pickle-brined chicken is terrific in sandwiches, salads, or tossed into pasta. Try transforming leftovers into a creamy skillet dinner to refresh the flavor and texture.
Use your leftover pickle-brined chicken to make a delicious creamy garlic chicken dish, adding a new twist to your meals.
Dietary Swaps and Variations
- Gluten-free: swap the all-purpose flour for a gluten-free blend or almond/cassava flour for dredging; expect a slightly different crust texture but great flavor retention.
- Whole30-friendly: skip the flour crust and use crushed nuts or cassava flour; cook in plenty of oil to get a golden exterior.
- Vegetarian/plant-based option: brine thick slices of firm tempeh or pressed extra-firm tofu in pickle juice and pan-sear until browned for a tangy protein swap.
- Flavor swap: use bread-and-butter pickle juice for a sweeter profile or dill for classic tang; each brine changes the balance of sweet, salty, and sour.
For a fun variation, consider crafting crispy fried chicken tacos using your pickle-brined chicken.
Pro Tips (Quick Bulleted List)
- I always taste the pickle juice before using it—if it’s overly vinegary, dilute with a little water to avoid over-acidifying the chicken.
- Pound to an even thickness so you don’t end up with dry edges and an undercooked center.
- Use a mix of oil and butter for flavor and browning; pure butter can burn at higher heat.
- Work in batches to keep the pan hot and the crust even.
Troubleshooting (Quick Bulleted List)
- If the crust is soggy: you likely didn’t shake off excess brine or the pan was too cool—dry the chicken and raise the heat slightly.
- If the chicken tastes too salty: brine duration was probably too long or the pickles were very salty—shorten brine time or rinse briefly and pat dry before dredging next time.
- If the interior is dry: check your cooking time and resting step—use a thermometer and remove at 165°F, then rest to retain juices.
- If the exterior burns before the inside is done: lower the heat and finish the chicken in a covered pan or finish in a moderate oven.
Variations (Quick Bulleted List)
- Spicy crust: add cayenne or chili powder to the flour mix for a kick.
- Herbed crust: fold in dried dill or thyme to echo the pickle flavors.
- Breadcrumb topping: after dredging, press panko onto the surface for extra crunch (use gluten-free panko if needed).
Frequently Asked Questions
How long should I brine the chicken in pickle juice?
For best results, brine the chicken for 4 to 6 hours. Avoid brining it overnight to prevent altering the texture.
What does pickle-brined chicken taste like?
Pickle-brined chicken is tender, juicy, and features a unique flavor balance of sweet, salty, and sour notes from the pickles.
Can I use pickle juice from any type of pickles?
Yes! You can use juice from dill pickles, bread and butter pickles, or any pickled variety you enjoy.
How should I store leftover pickle-brined chicken?
Store leftover chicken in an airtight container in the refrigerator for up to 3-4 days. Reheat gently to maintain its moistness.
What is the best way to achieve a crispy crust on the chicken?
Make sure to dredge the chicken thoroughly in the flour mixture and cook it in a hot skillet with oil and butter for a golden-brown crust.

Pickle-Brined Chicken
Ingredients
Method
- Set the chicken breasts on a cutting board and cover them with plastic wrap. Pound the chicken with a meat mallet or rolling pin to 1/2-inch thickness. Editor's Tip: Flattening the chicken breasts to the same thickness helps the chicken cook evenly.
- Place the chicken into a shallow dish and cover them with the pickle brine. Cover and marinate them in the refrigerator for four to six hours.
- In another shallow bowl, whisk together the flour, garlic powder, onion powder, paprika, salt, pepper and cayenne pepper (if using). Drain the chicken and discard the brine. Dredge the chicken in the flour mixture, evenly coating all sides. Shake off any excess.
- Heat the olive oil and butter in a large skillet over medium heat. Add the chicken and cook for five to seven minutes per side, or until the crust is golden brown and the internal temperature reaches 165°F. Let the chicken rest for 5 to 10 minutes before serving it.